Frequently Asked Questions
| Site: | TEAMCARE Integrated Platform |
| Course: | TEAMCARE Integrated Platform User Guide |
| Book: | Frequently Asked Questions |
| Printed by: | Guest user |
| Date: | Monday, 22 June 2026, 7:02 AM |
1. Index
• Introduction
• Login and Logout
• Login to the platform
• Logout
• Profile
• Modules
• Main Section
• Thematic Modules
• Forum
• Start a new discussion in the forum
• View and respond to discussions
• Webinar
• Access a webinar
• Webinar interface
• Participating in a BBB session
• Breakout rooms
• Quiz
• Assignment
• Submit an assignment
• Database
• Completion
• Badge
• Quick Reference
• How do I change my time zone?
• How do I change the interface language?
2. Introduction
Dear participant,
This book will provide you with some tips for using the course platform. The learning platform will be used throughout the course, and it is important that you learn how to access its many features.
This book is intended to serve as a detailed technical guide, and we will refer you to its sections throughout the course. If you have difficulty understanding the guide or have questions not addressed in this document, you can post a question in the helpdesk forum available within the course.
Please note that you can change the language of the book by selecting your preferred language (English, Greek, Polish, or Italian).
3. Login and Logout

3.1. Login to the platform
It is necessary to authenticate before accessing the platform.
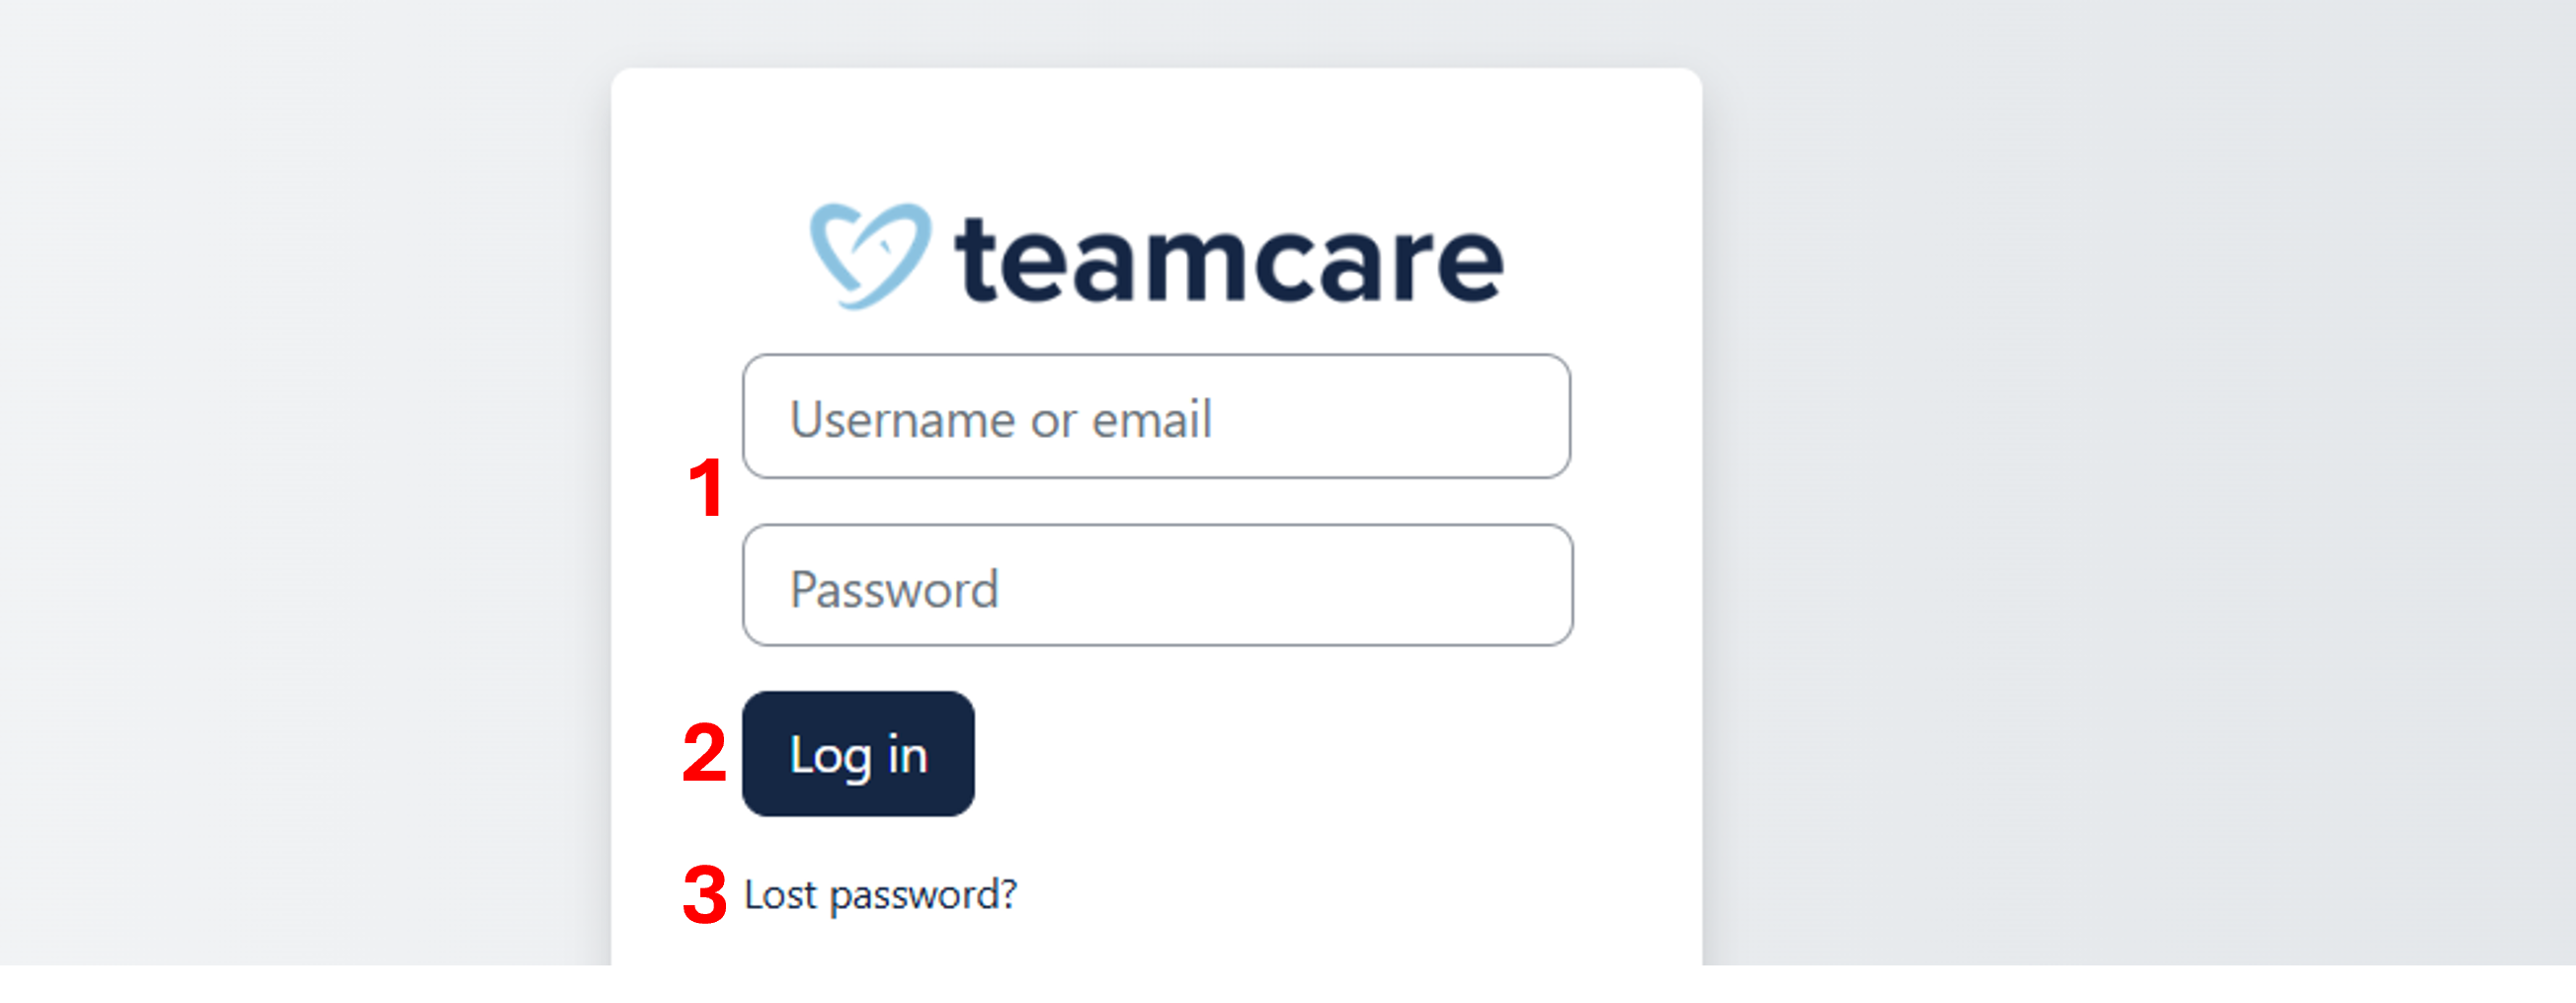
Click on the "Log in" link in the upper-right corner of any page to load the TEAMCARE login form (below).
To access the platform:
- Enter username (or email address) and password in the login fields (1).
- Click on the "Log in" button (2).
If successful, the login action automatically brings the user to their personal Dashboard.
If you have forgotten your username or password, click on "Lost password" (3).
Enter your username or email and click on "Search".

You will receive an email with instructions on how to recover your username and/or password.
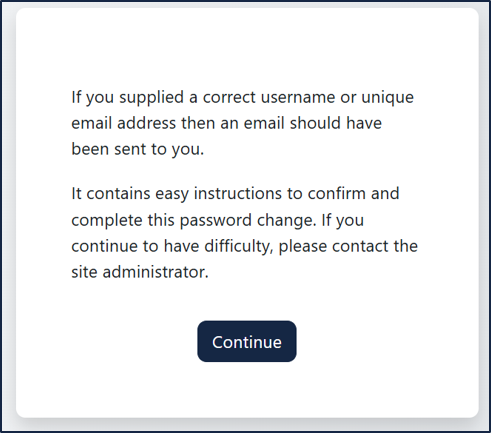
If the problem persists, contact the site administrator.
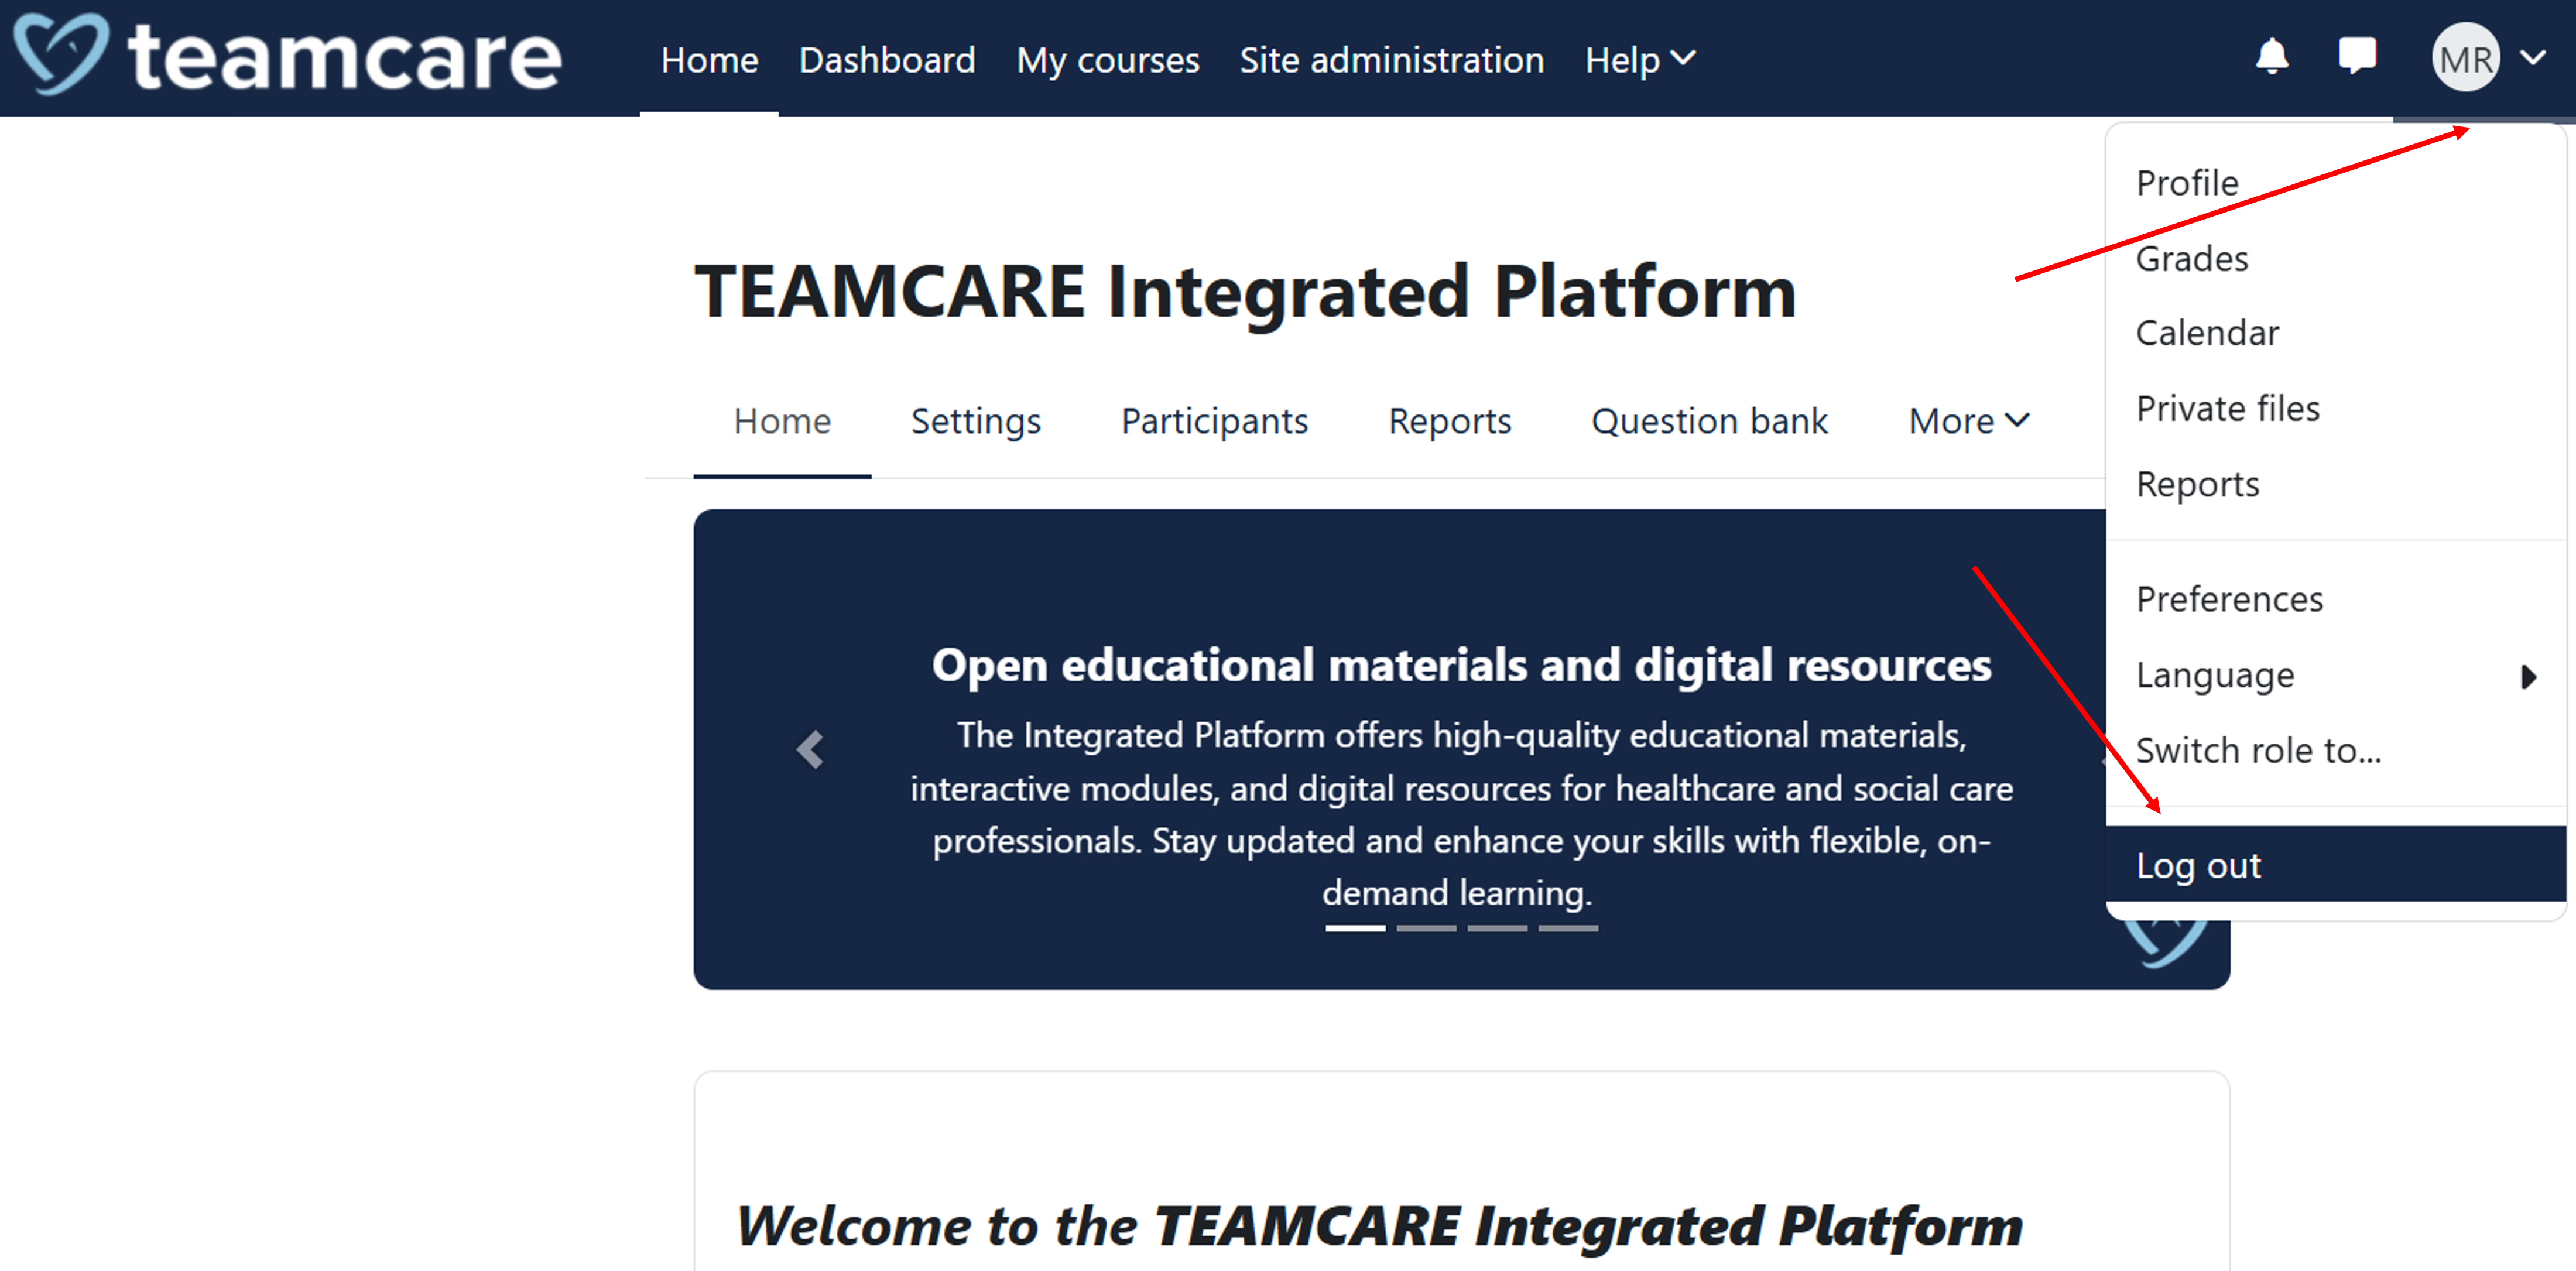
3.2. Logout
To sign off the platform:
- Click on the user menu in the upper-right corner of any page.
- Click on the "Log out" link in the dropdown menu.
4. Profile
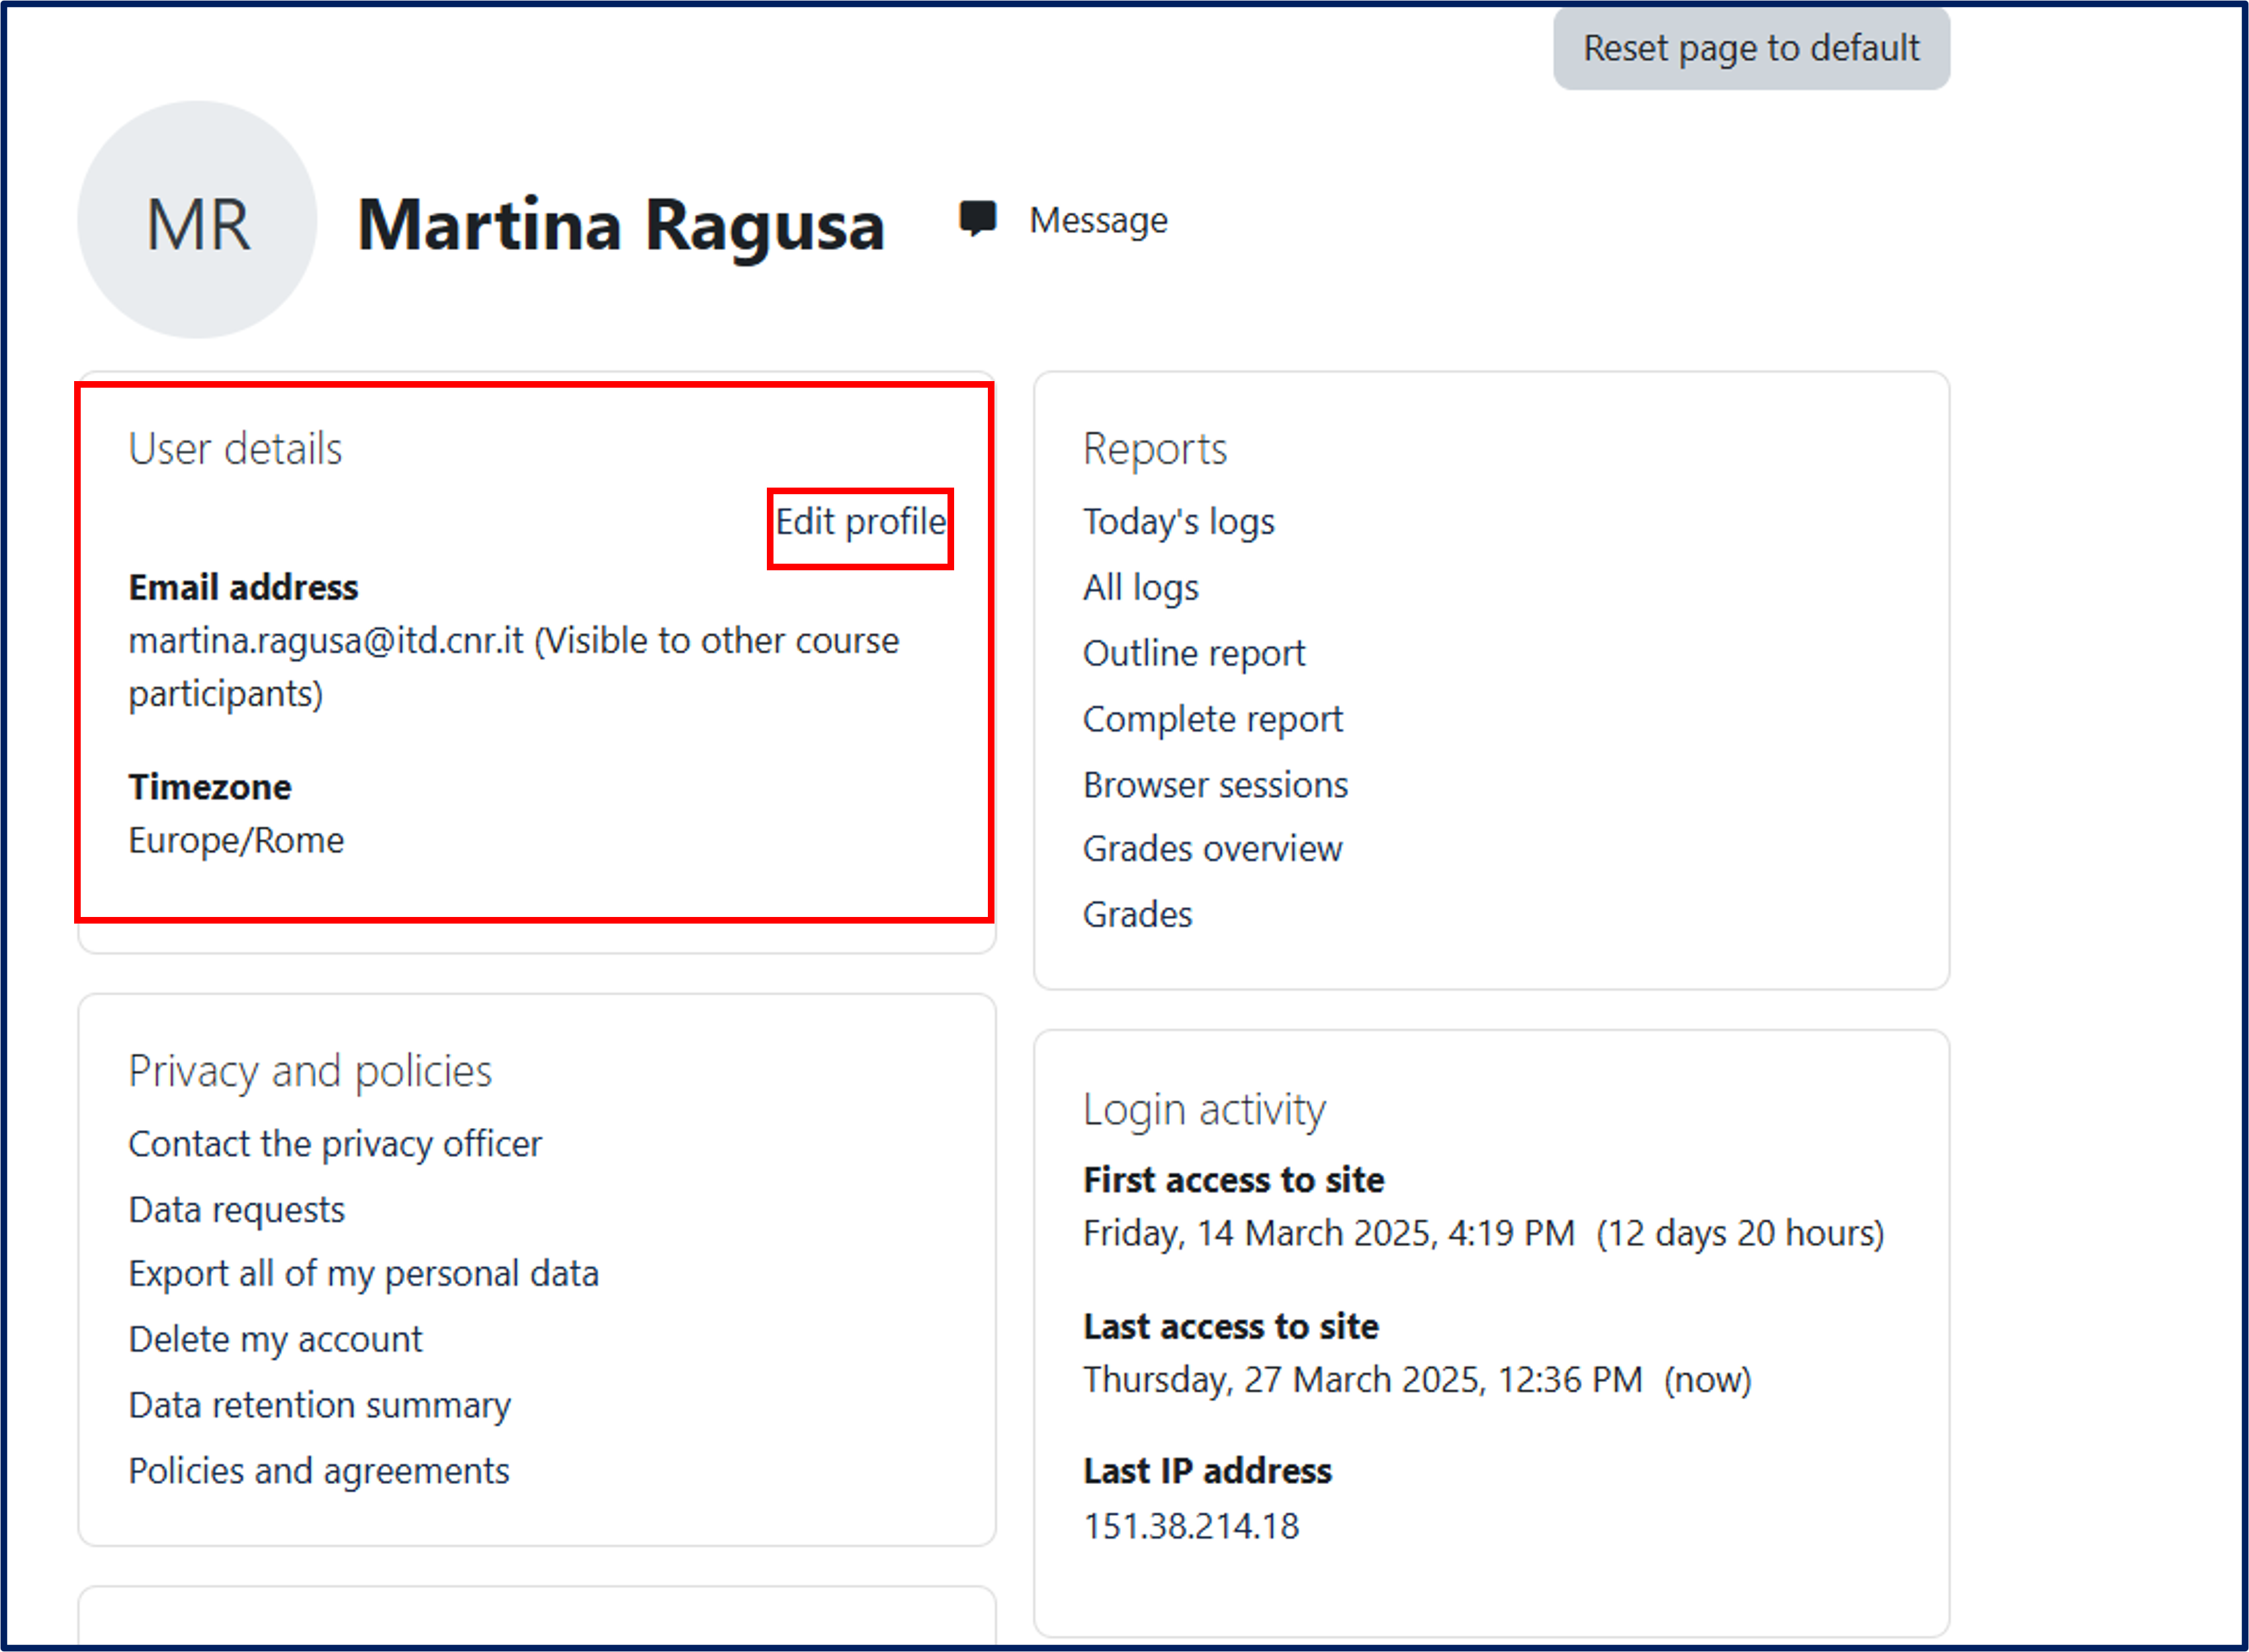
To access your profile, click on the icon with your initials at the top right of the page, then click on "Profile."

The user Profile page contains, among others, the following information:
User details:
-
The user’s email address
-
A direct link to the Edit profile page
Privacy and policies:
-
A summary of the project’s data retention policies
Miscellaneous:
-
A list of all forum posts and discussions created by the user
-
The user’s earned certificates
-
The user’s blog entries
You can change your profile details by clicking the "Edit" button.
The Preferences page gives users access to various settings they might wish to edit, such as:
-
Profile information
-
Currently set password
-
Preferred language
-
Forum preferences
-
Notification settings
-
Blog preferences
5. Modules

5.1. Main Section
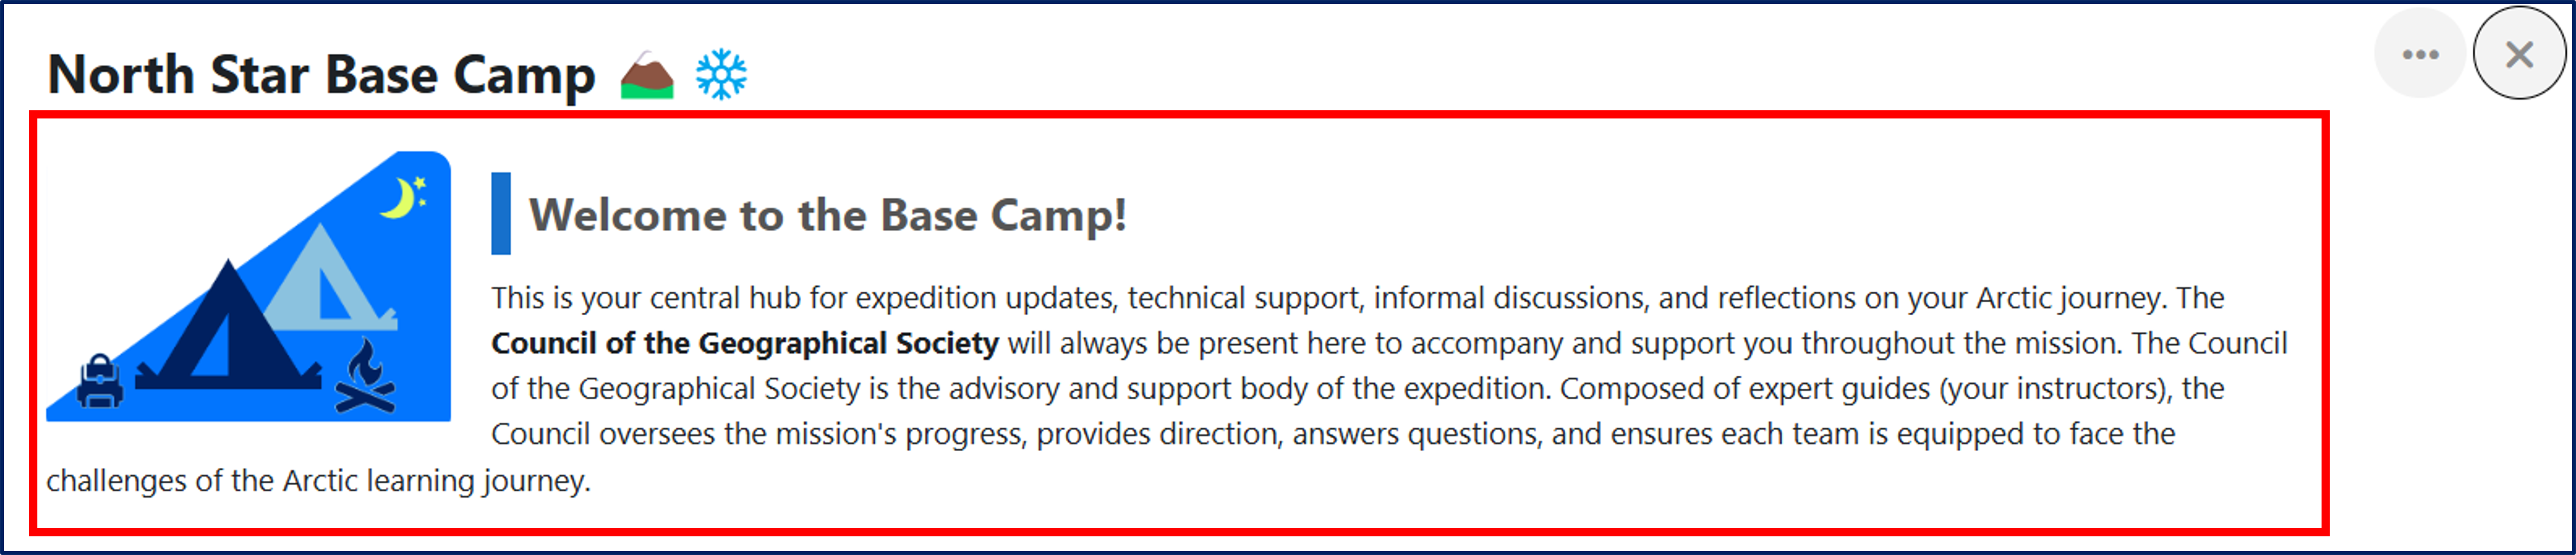
The main section of the North Star Base Camp 🏔️❄️ course is designed as a reference point for the entire learning journey.
Inside, there are two key subsections:
-
Base Camp Communication Zone 📡, which gathers course updates and news, as well as forums dedicated to specific activities, such as spaces for personal reflections and informal discussions (see Chapter 5, Forums).
-
Navigation & Support Cabin 🛠️, which provides technical and guidance support, including a platform guide, a forum dedicated to technical assistance, and detailed instructions for earning Badges (see Chapter 11, Badges).
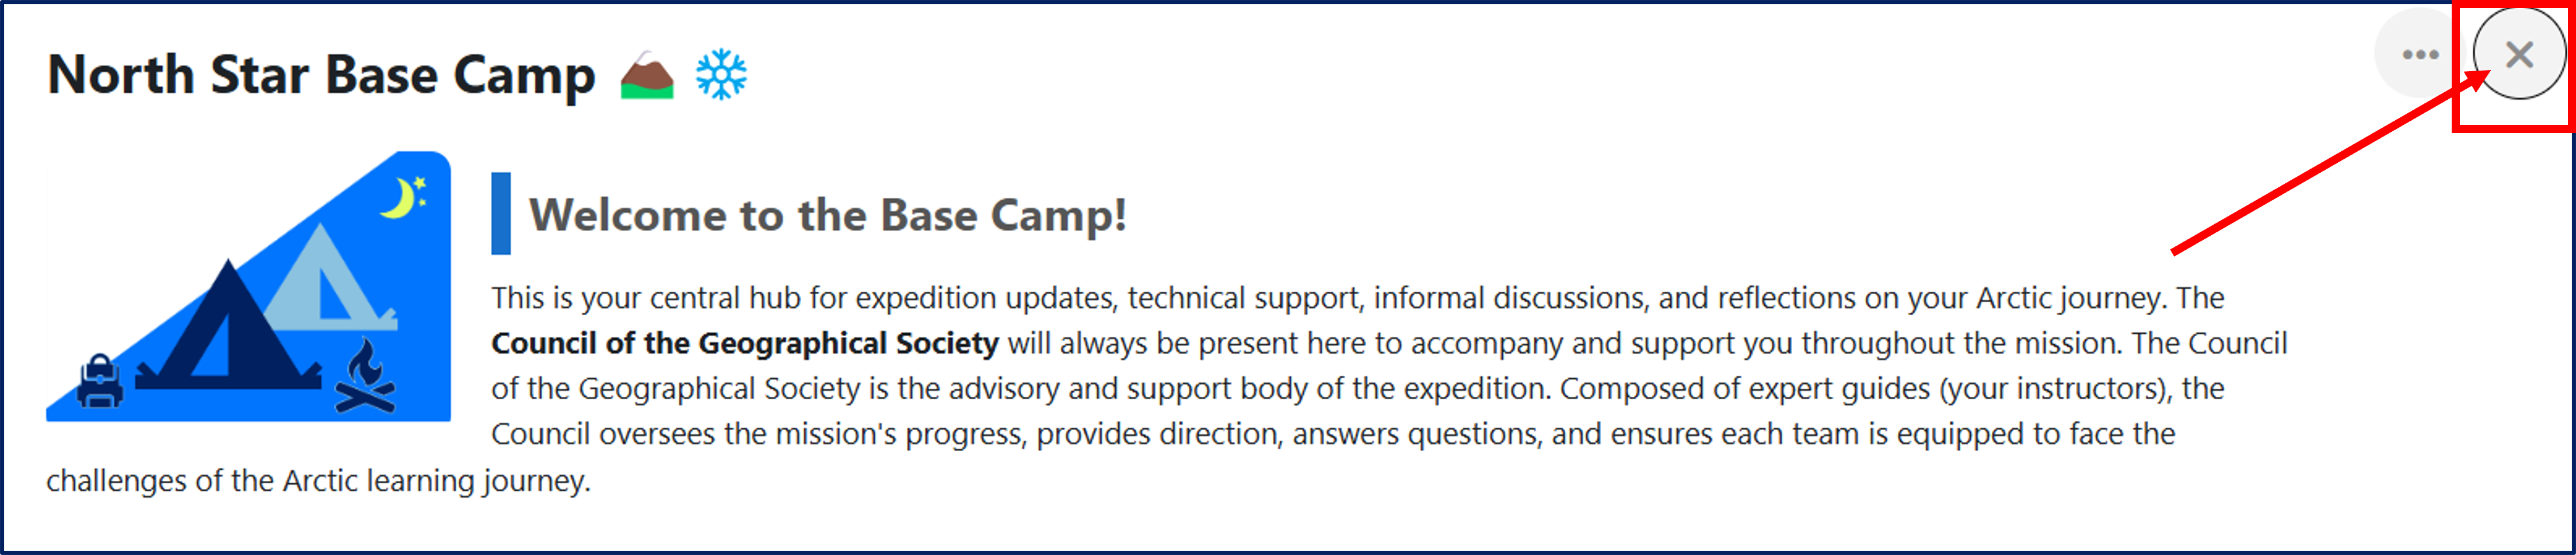
The main section can be expanded (1) or collapsed (2) using a button located at the top right of the page.

5.2. Thematic Modules
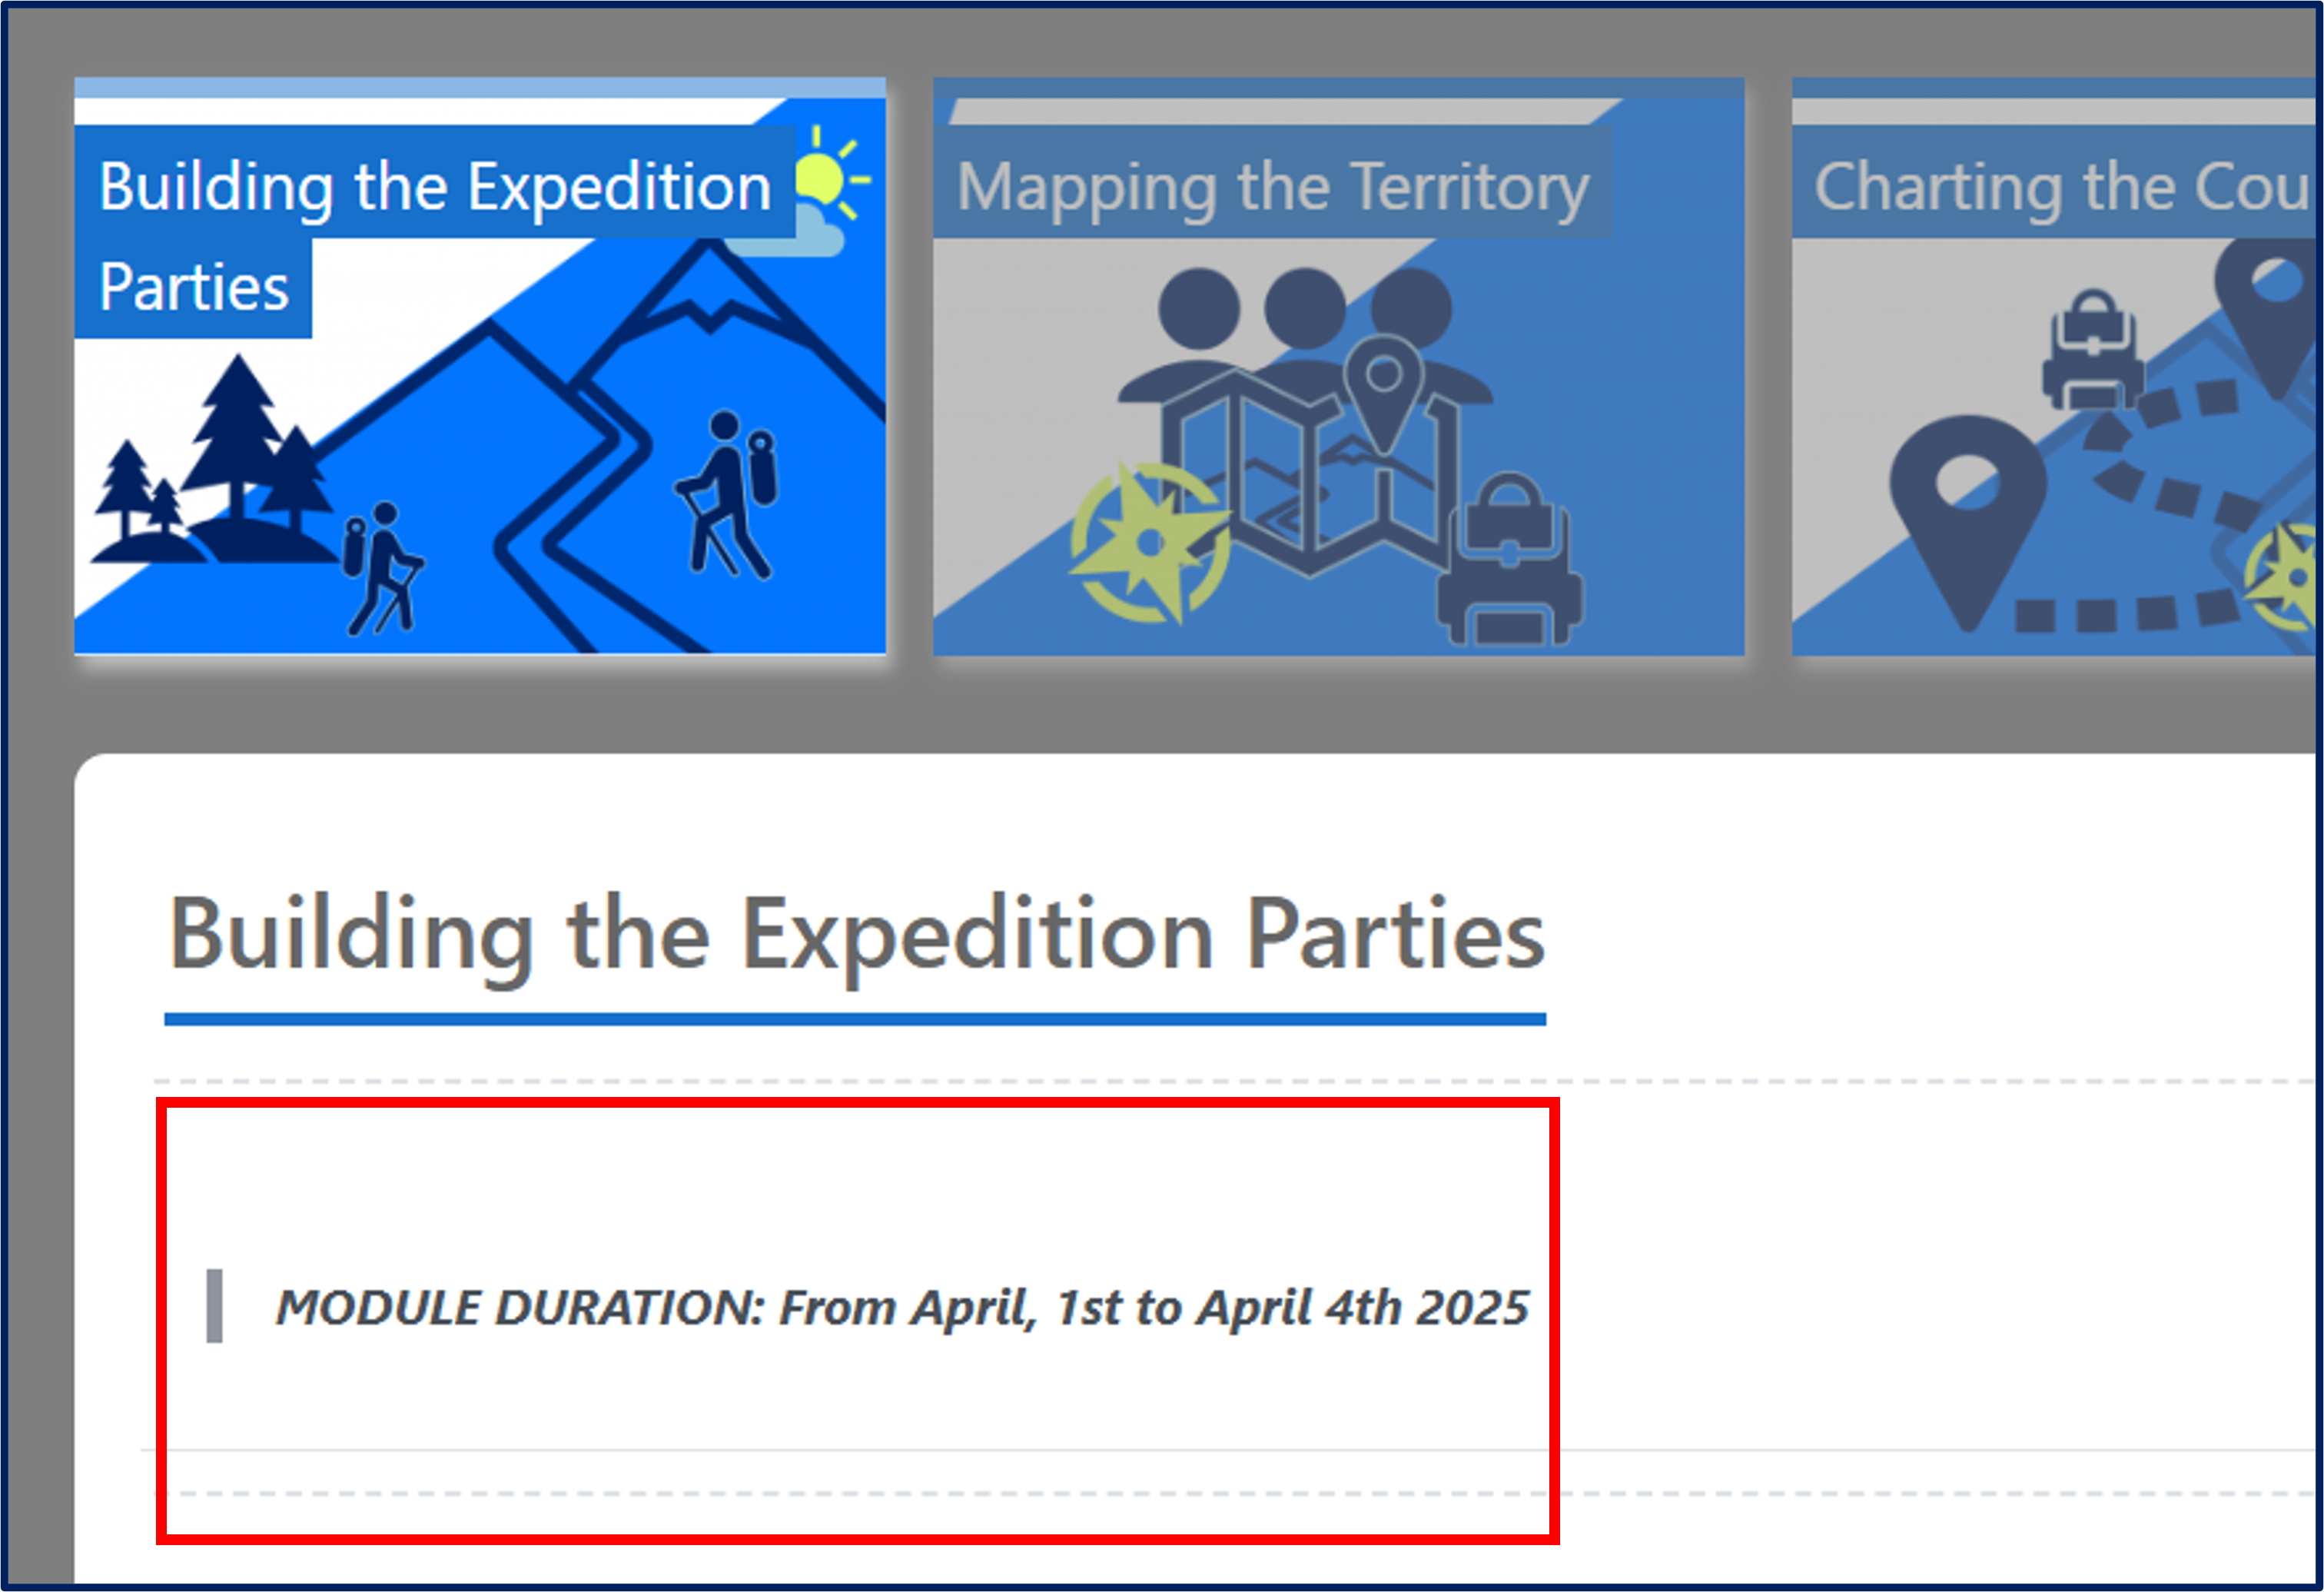
The five thematic modules in which the course is structured are:
-
Building the Expedition Parties
-
Mapping the Territory
-
Charting the Course
-
Building the Toolkit
-
Preparing for the Expedition
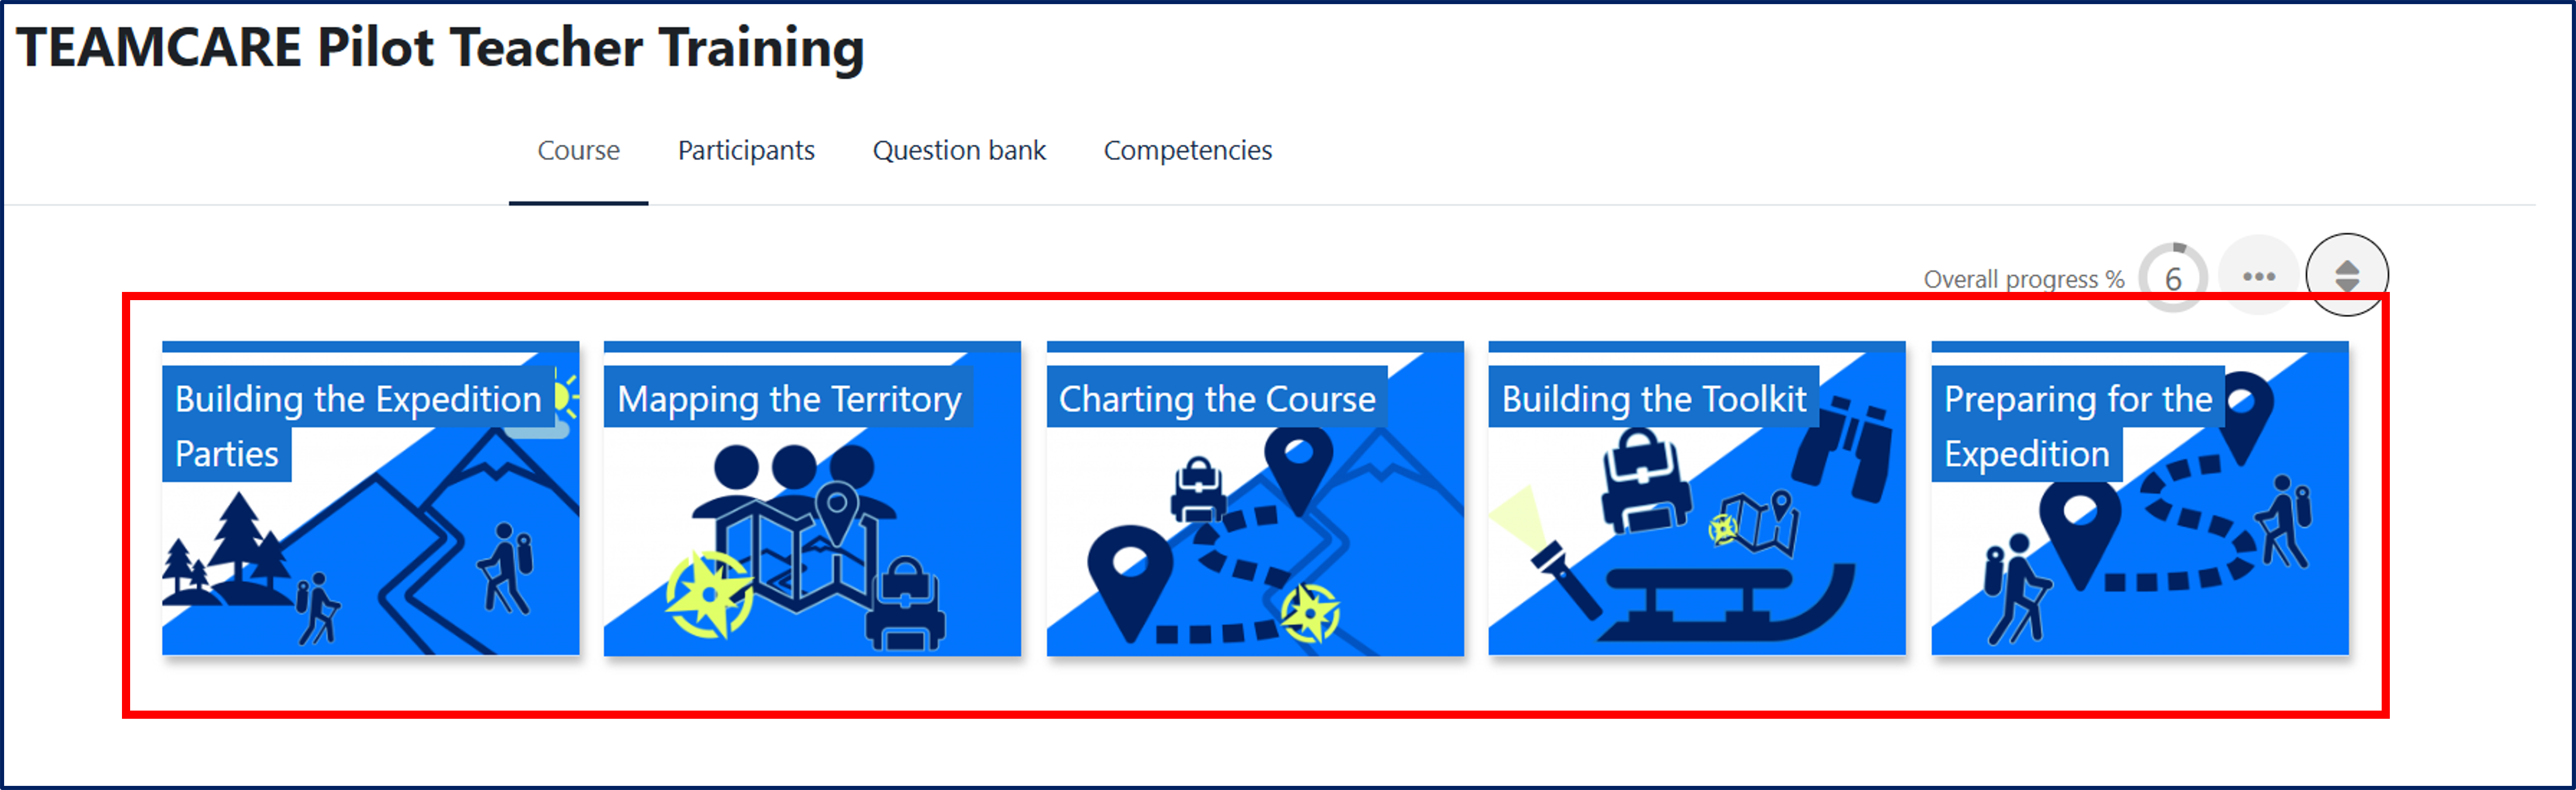
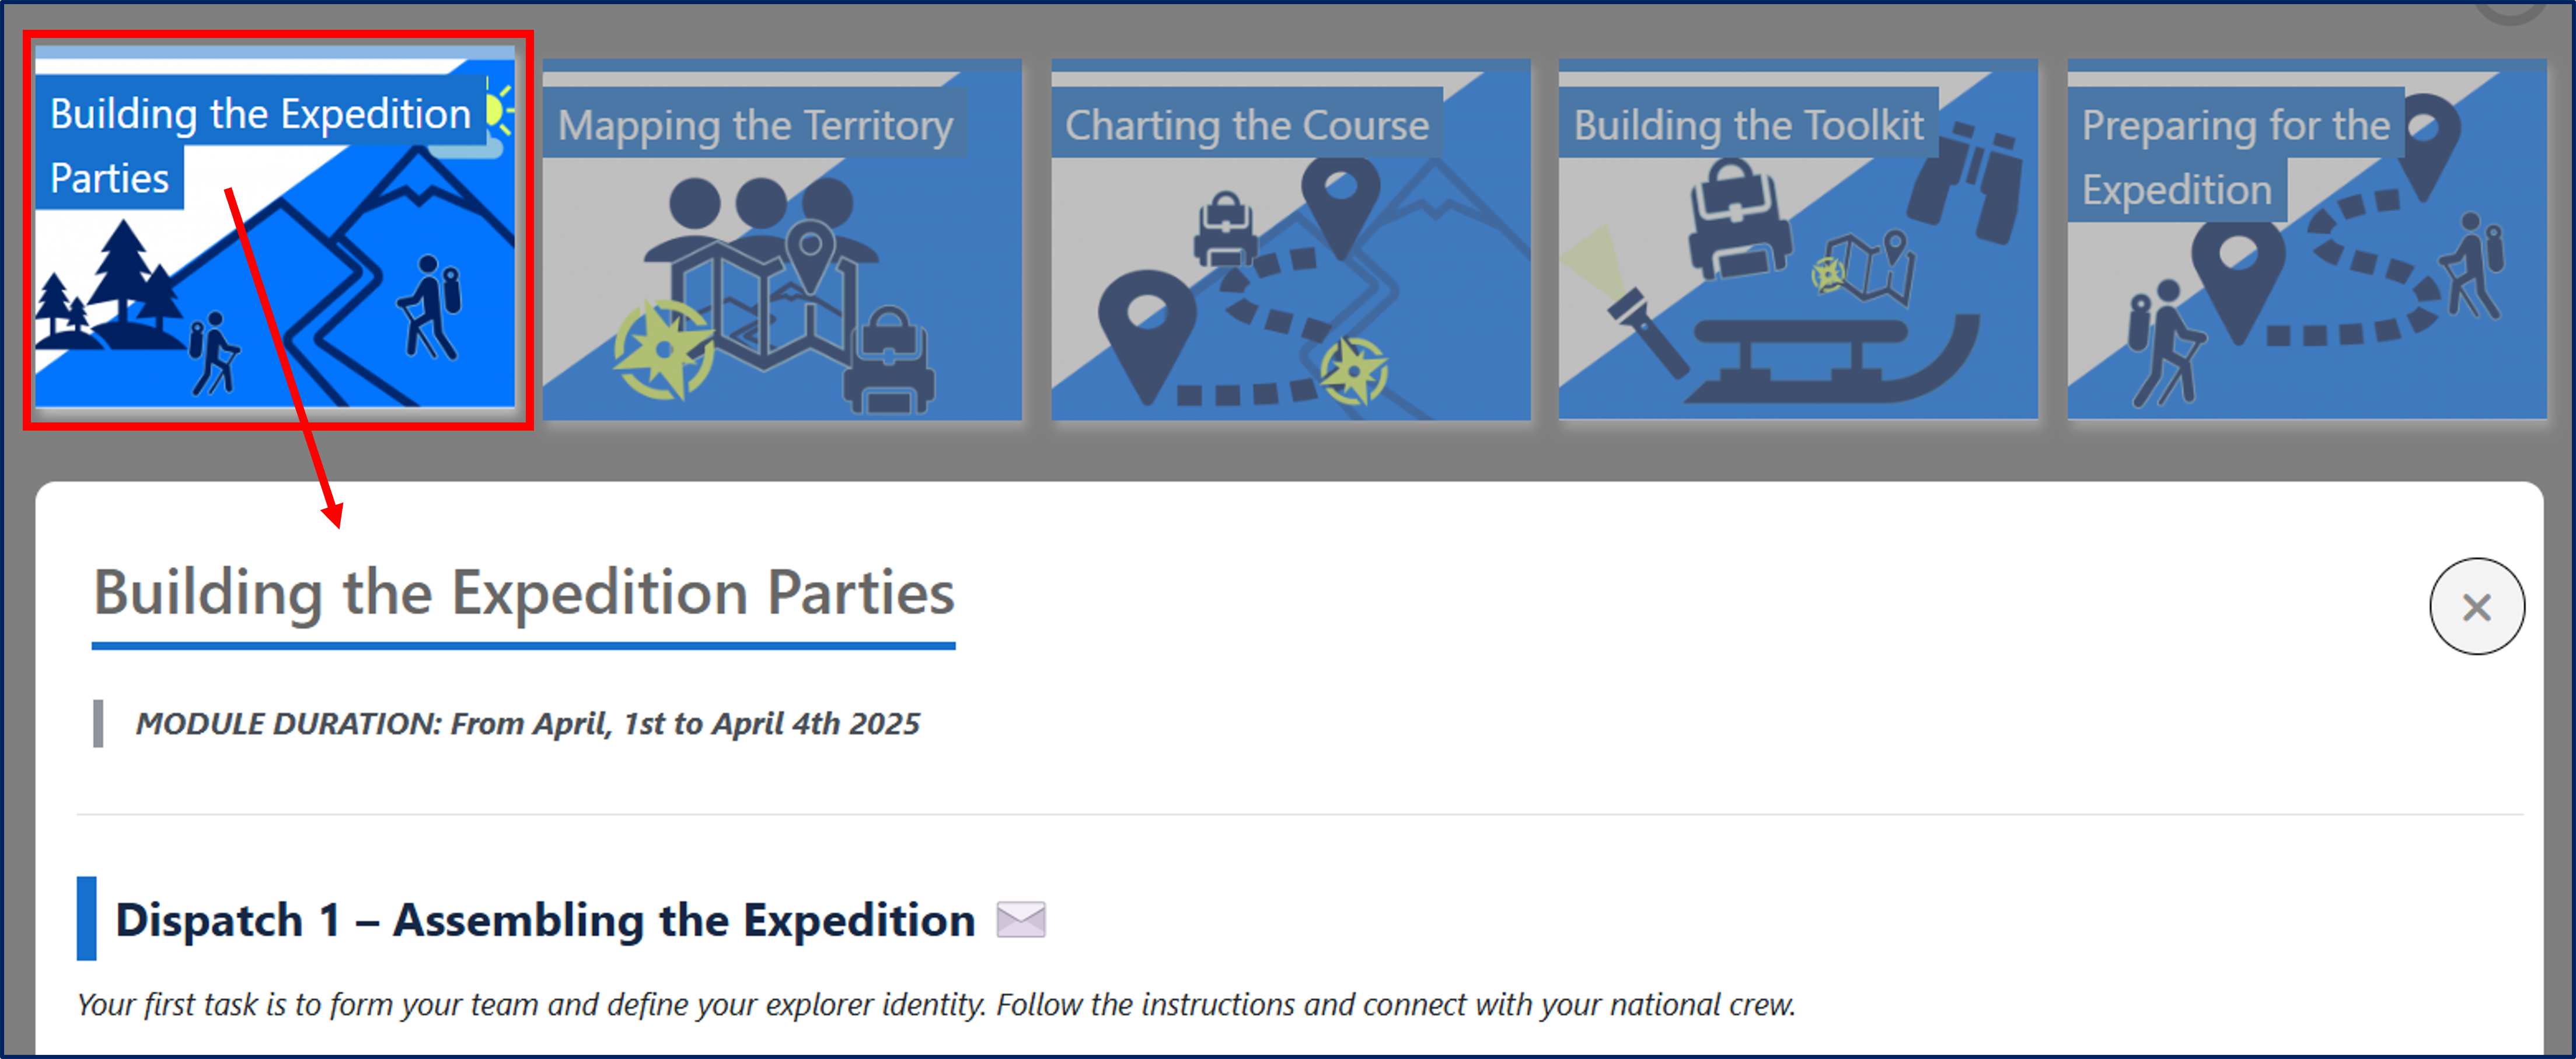
To view the content of a module, click on the corresponding icon.
Each module follows a specific schedule with activities to be completed within the established dates.
Each section explicitly indicates the start and end period during which synchronous and asynchronous activities must be carried out and/or completed.
The modules include real-time and asynchronous interaction moments, as well as individual tasks to be completed independently.
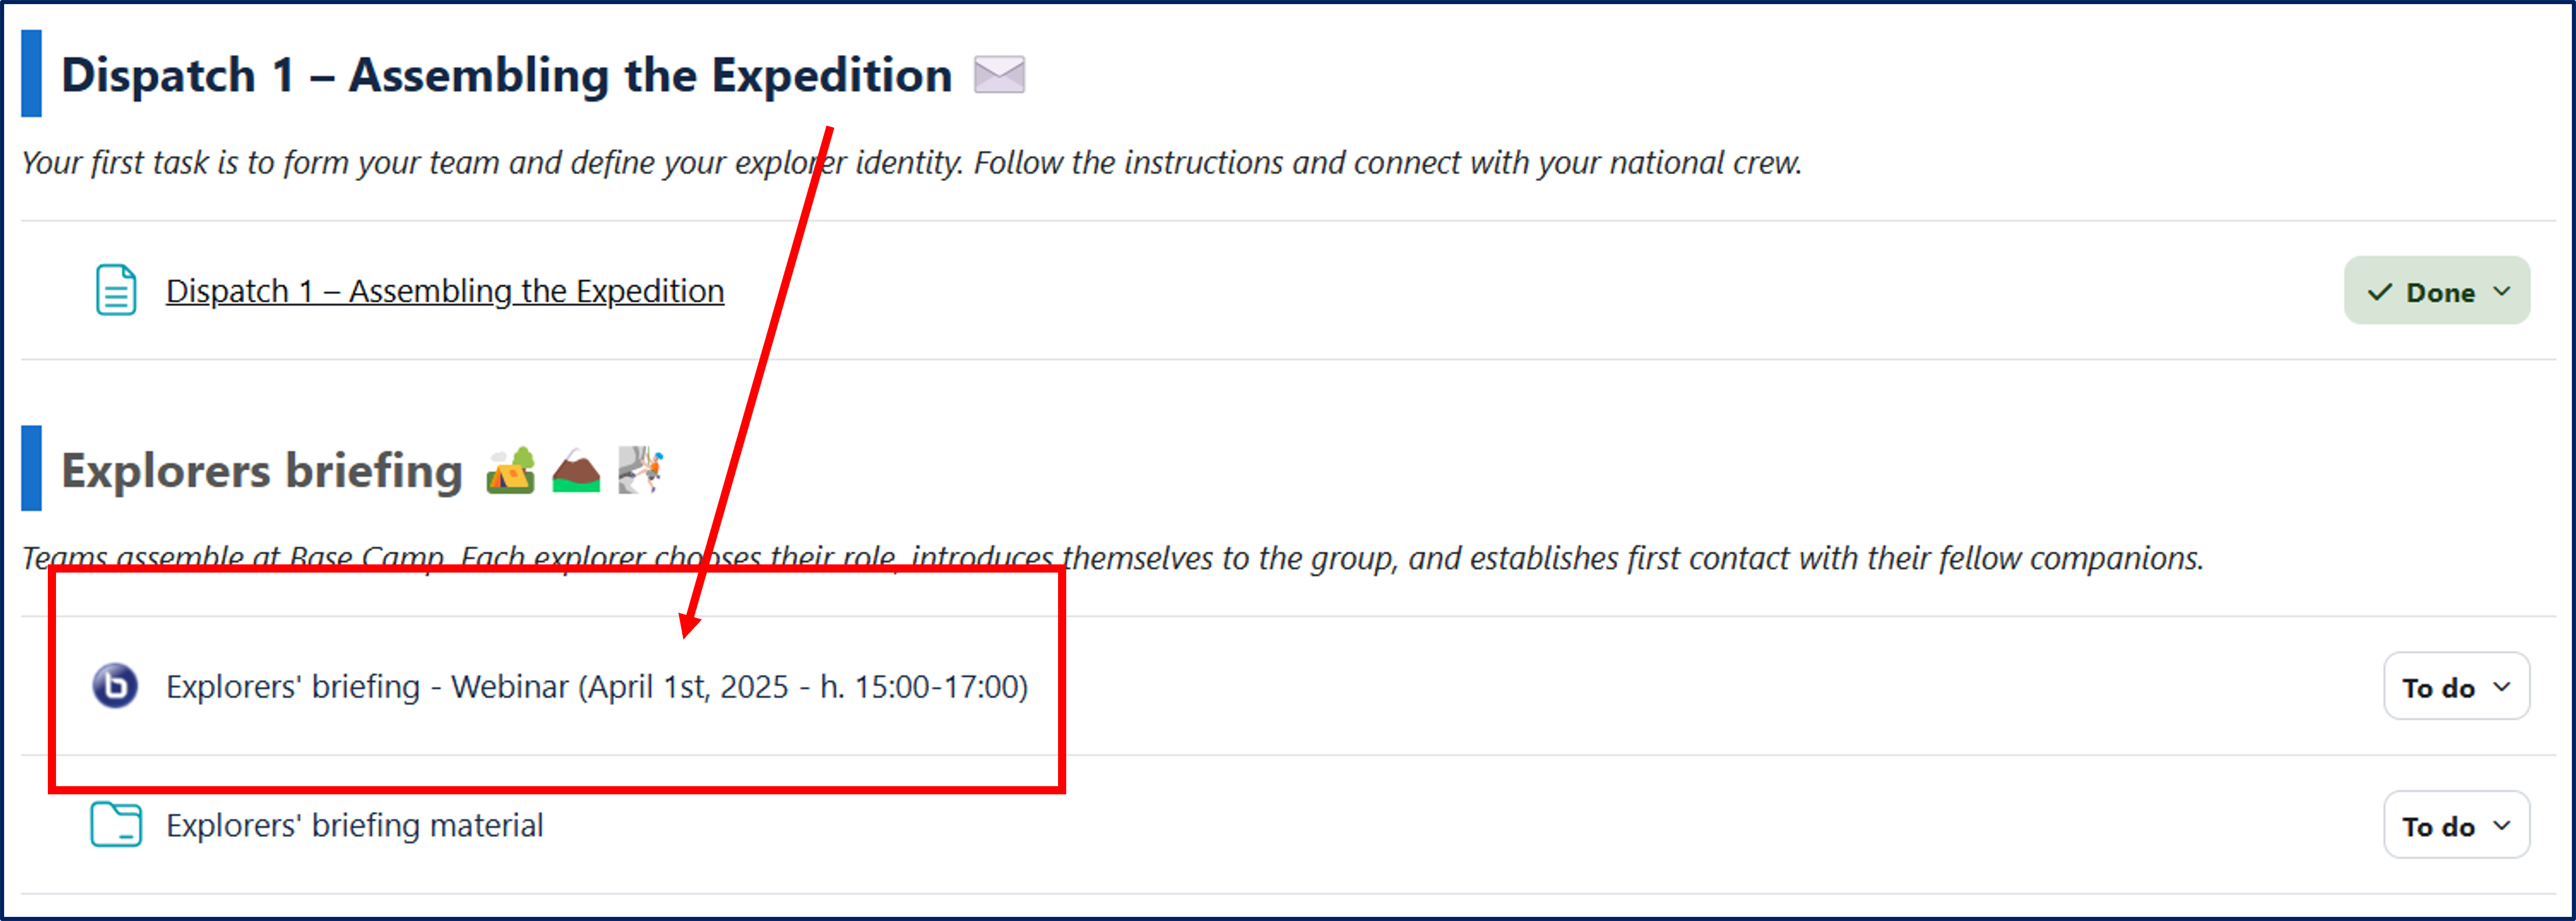
Within each module, there is an introductory "Dispatch" that contains:
-
Mission Objectives, describing the specific learning goals of the module;
-
Session Flow, detailing the planned activities, divided into synchronous and asynchronous moments;
-
Expected Outputs, outlining the results to be achieved by the end of the module;
-
CoI Competency Activation, indicating which parts of the module reflect the three presences of the Community of Inquiry Framework.
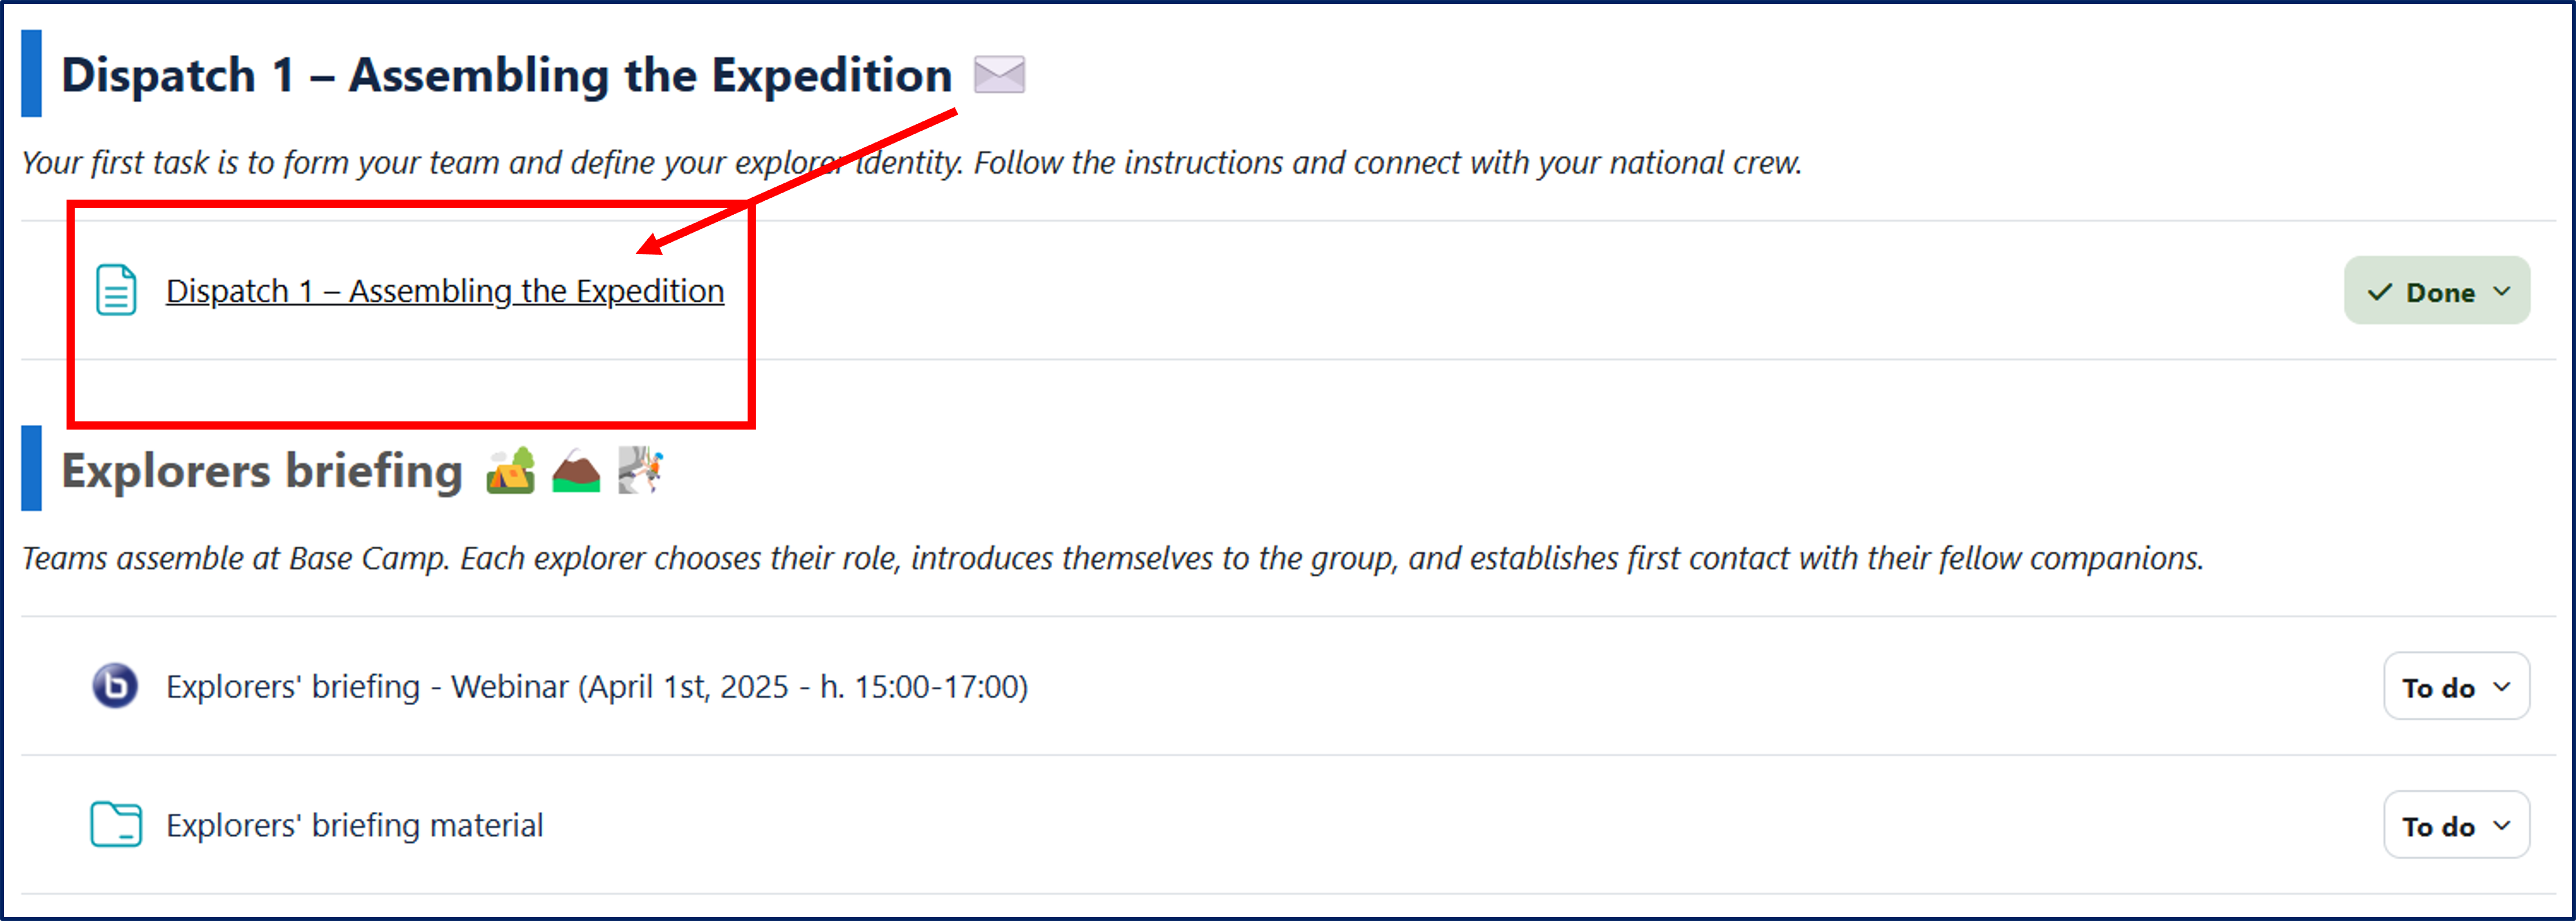
Each section includes a Webinar (see Chapter 6, Webinars), which will take place on the date and time specified next to the activity.
Each module includes thematic forums, where participants will be asked to actively engage with others by posting reflections and/or personal contributions.

6. Forum

Forums allow participants to hold asynchronous discussions on various topics. To access a forum, click on the forum title in the course homepage.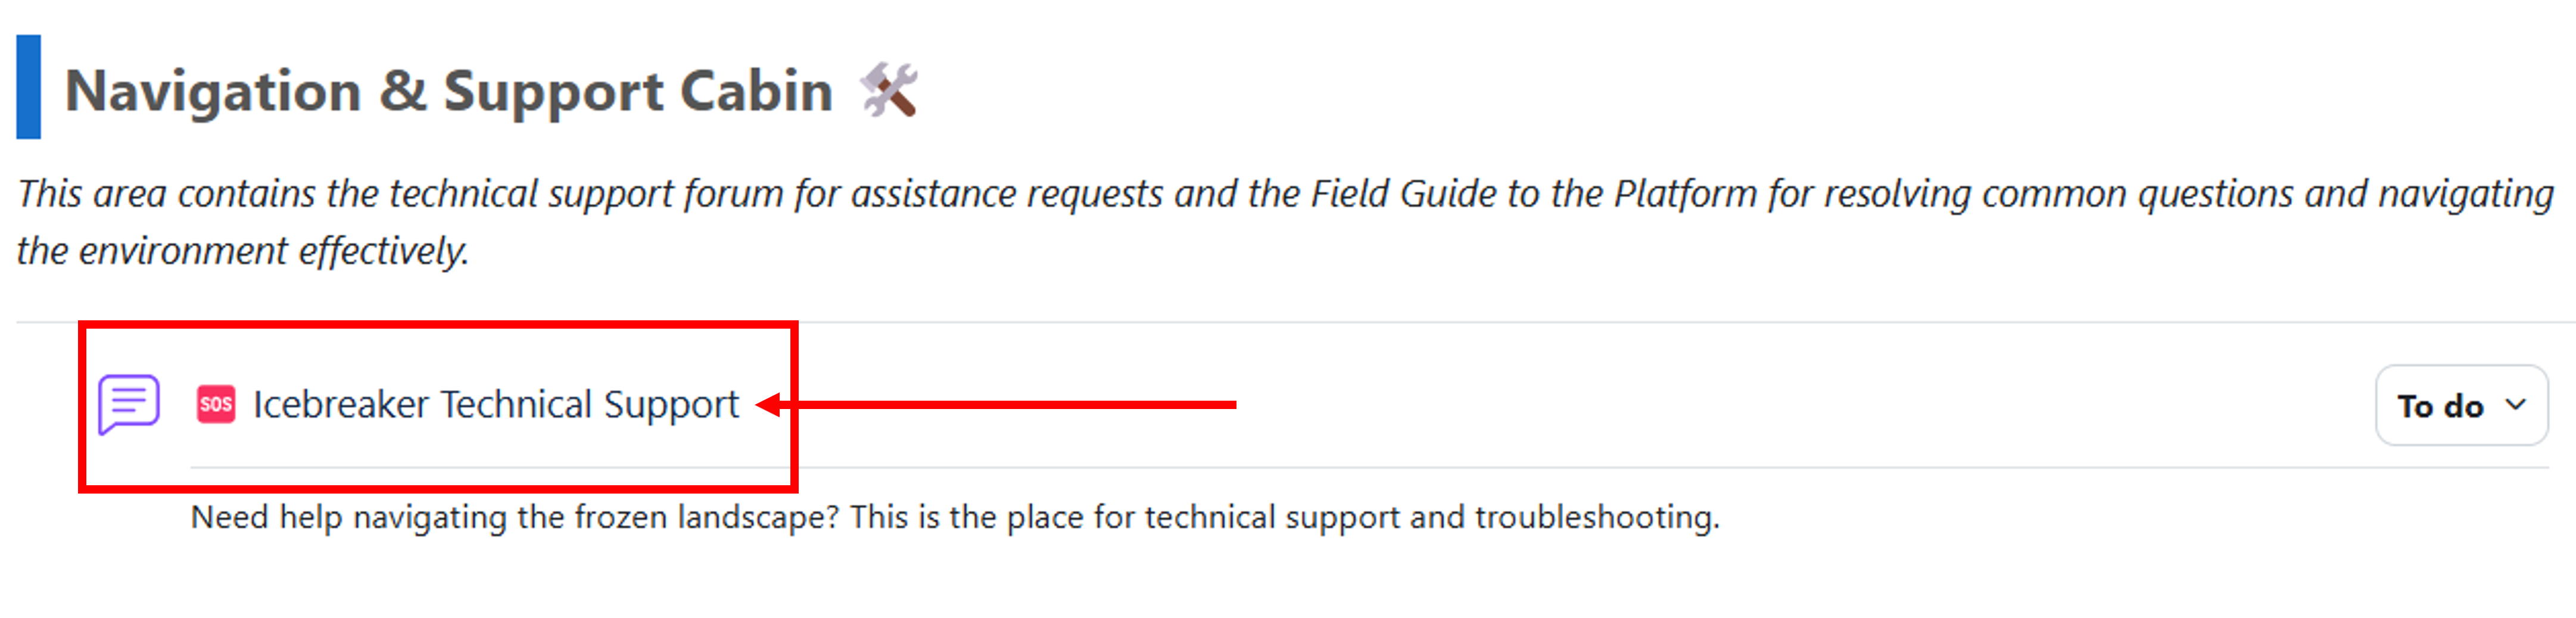
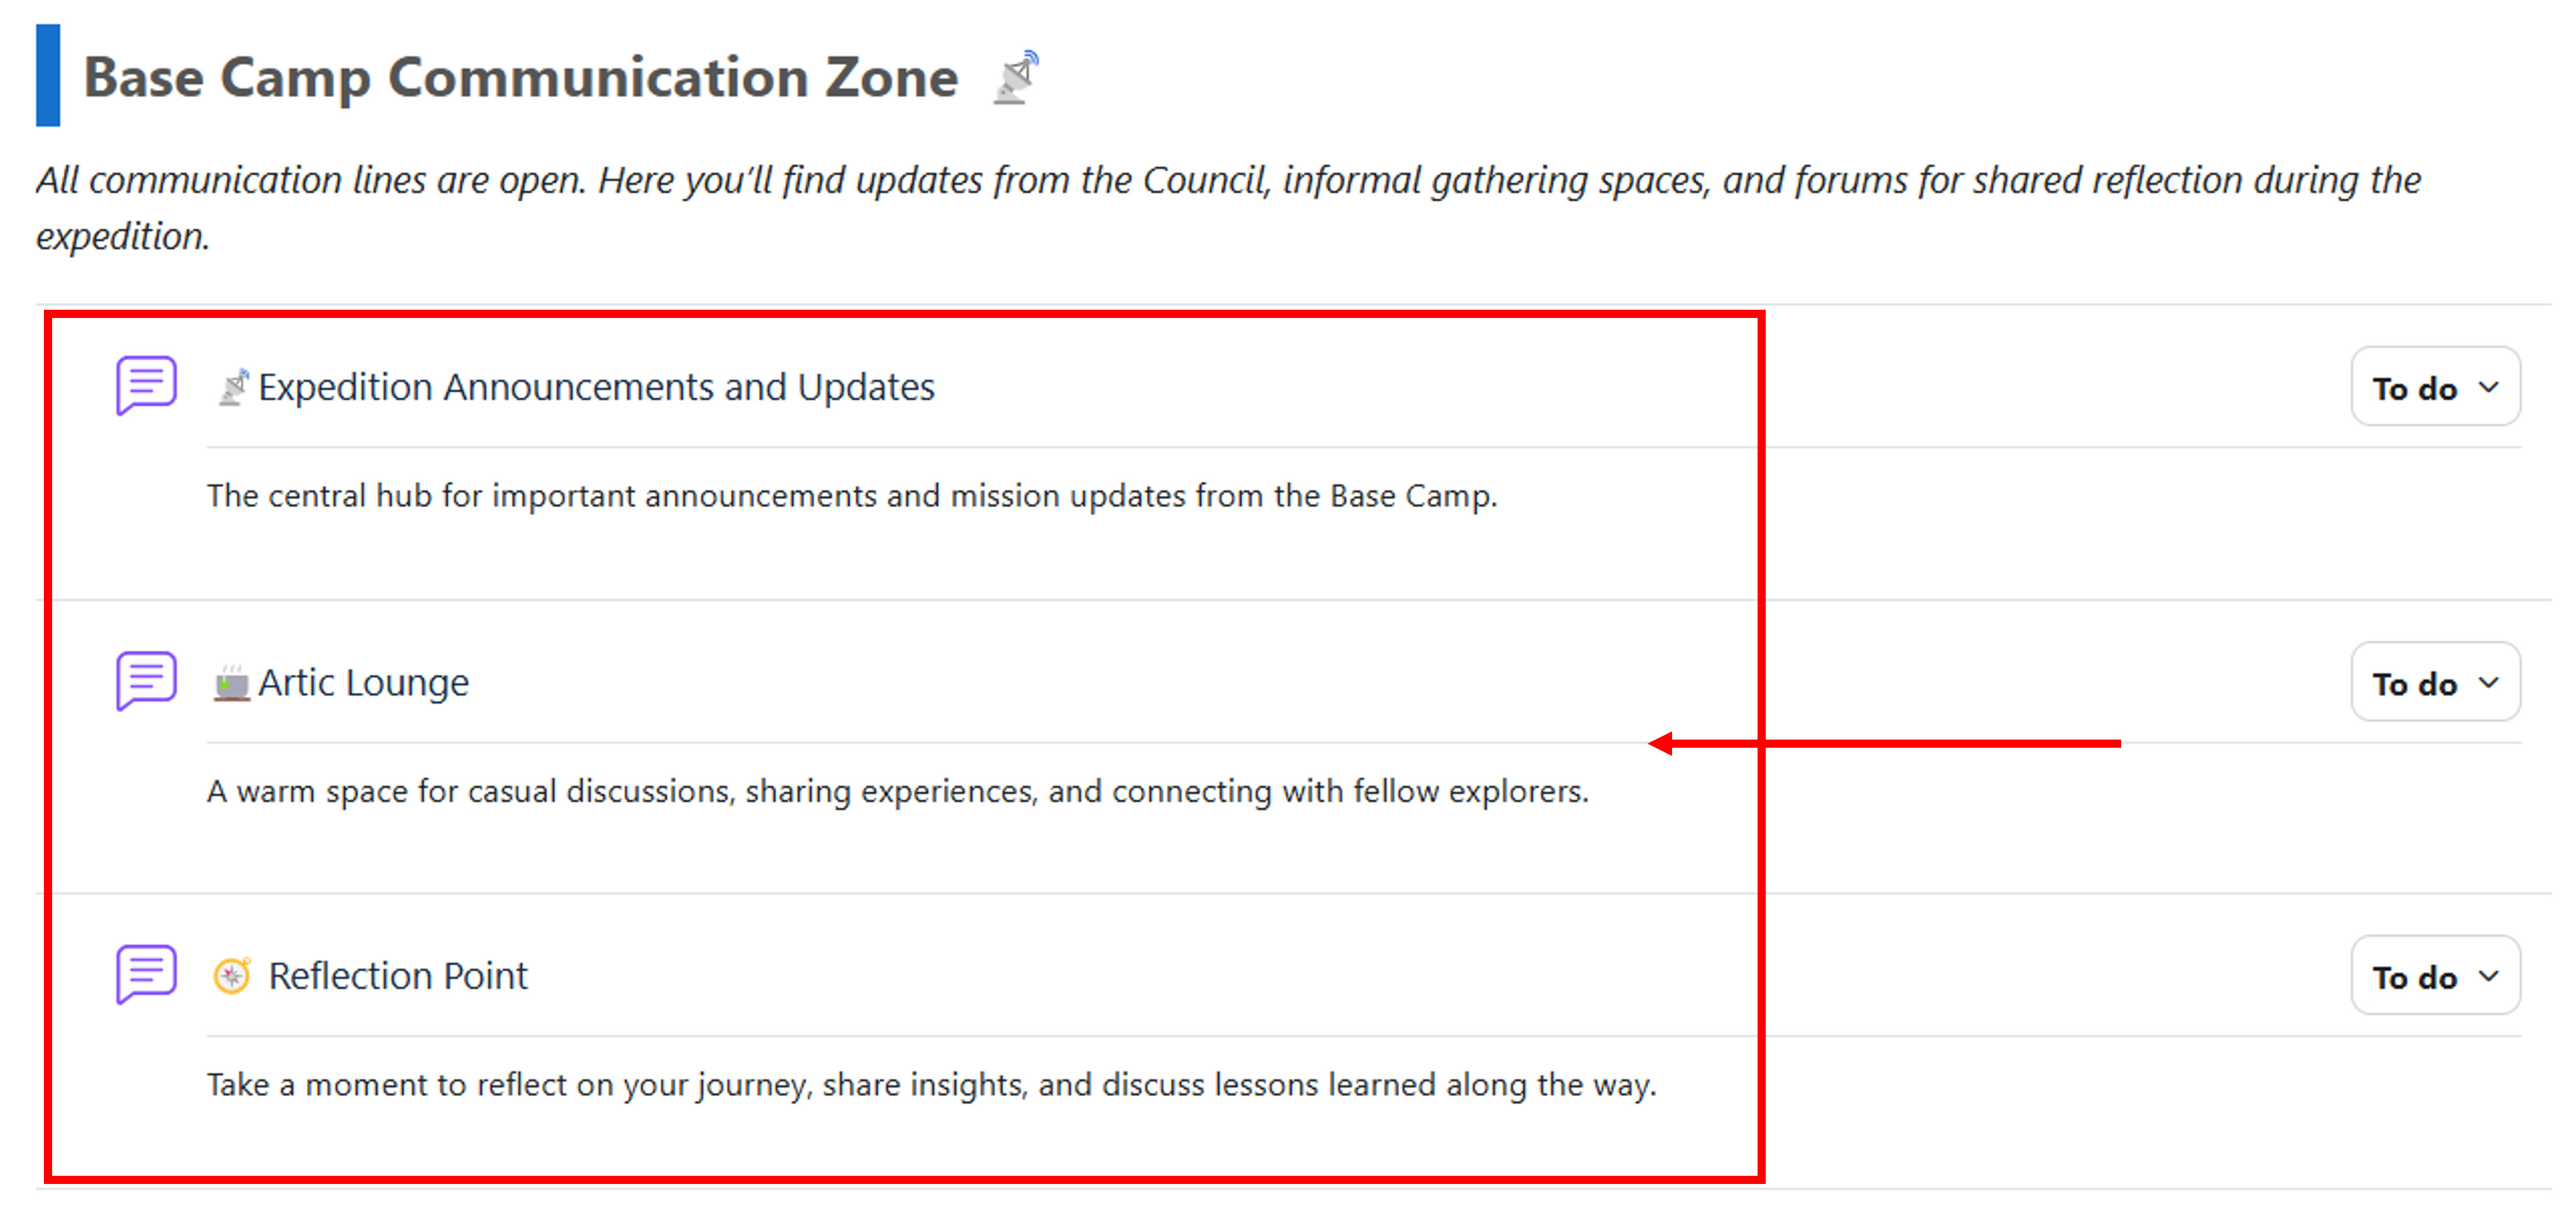
Note that the platform will have four ‘general’ forums, which will be used throughout the course (see below). These are:
- 🆘Icebreaker Technical Support forum, which is the place to ask for help regarding issues with the platform, the webinar platform, or other technical tools employed during the course;
- 📡Expedition Announcements and Updates forum, which you should regularly check to keep updated on important course-related information;
- 🍵Artic Lounge forum, which is a space for informal discussion, including discussion on topics not related to the course;
- 🧭 Reflection Point forum, which is a space you can use to reflect with your colleagues about the learning process.
In addition to these, you will find more forums accessible from each specific course module, which will be the place where you’ll do the main module activities.
When you click on a forum, previously started discussions are listed and available to all users. Clicking the button “add a new discussion topic” will let you post a new discussion thread. Clicking on a discussion title will open it and allow you to reply to it.
It is also possible to subscribe to discussions (i.e. be notified of new posts) by clicking the envelope beside them . You can also subscribe to the whole forum by clicking on the gear icon and selecting “Subscribe to this forum”. You will then be notified whenever a new discussion or reply is added to the forum.
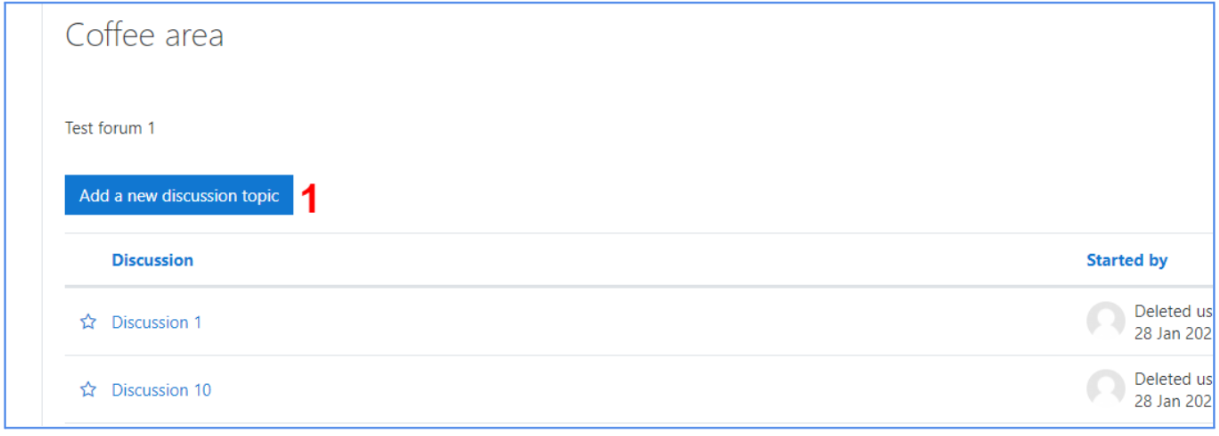
6.1. Start a new forum discussion
To start a new thread (1), click on the Add a new discussion topic button (1 in the image above) to access the New Discussion Topic panel.
Both a subject and a message are required. Try to keep the subject short, but informative on the message contents. Make sure that your discussion is in-topic for the forum you are posting it in.
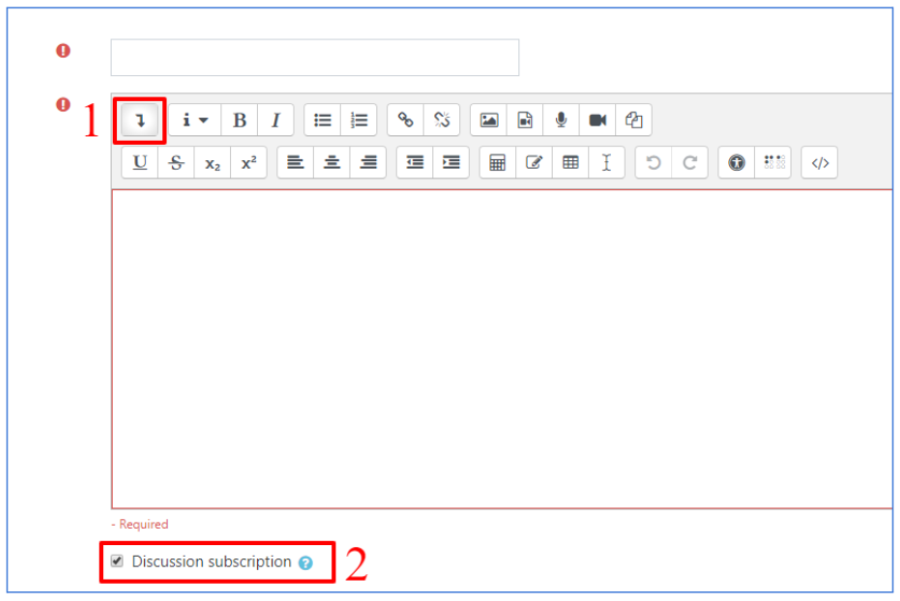
The message text field has some simple formatting options for changing font style and size, and add lists, links or multimedia files. You can access more advanced formatting options by clicking the downward arrow (see 1, above).
By clicking on the ‘advanced’ button, just under the text editor, you’ll be able to access additional options.
For example, it’s possible to subscribe to your post (see 2, above). If you do, you will be notified whenever someone posts a reply to your discussion.
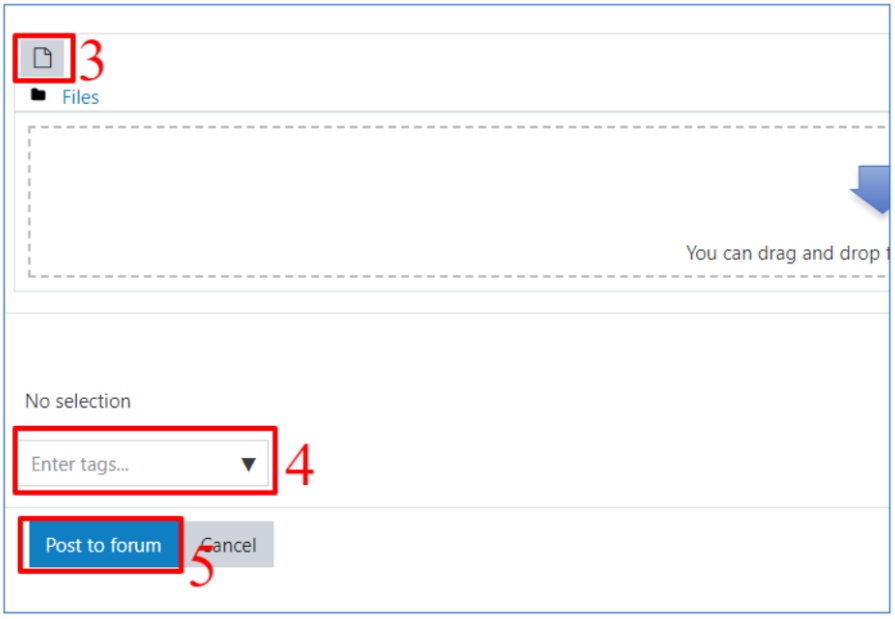
You can also add attachments to your discussion by opening the file picker (3, below) or by dragging and dropping files to the area just beneath it. Using the file picker, you can upload a file from your device, retrieve a file using an URL, or select one file you already uploaded on the platform. You can additionally add tags to your post (4, below) to make it easier for other participants to find your discussion. Both attachments and tags are optional and accessible only after clicking the ‘advanced’ button.
When you are ready to post your discussion, click the button labeled “Post to forum” (5, below). Your post will now be visible to all other participants.
6.2. View and reply to discussions
When you open a discussion, you can add a reply to it.
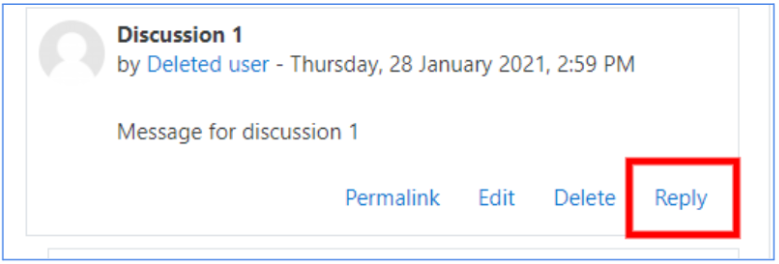
The reply form is the same as the one for adding a post, but it won’t appear in the discussion list. It will only be visible when someone views the discussion you are responding to.
7. Webinar

7.1. Accessing a webinar
Webinars will be delivered directly from inside the platform through a dedicated plugin.
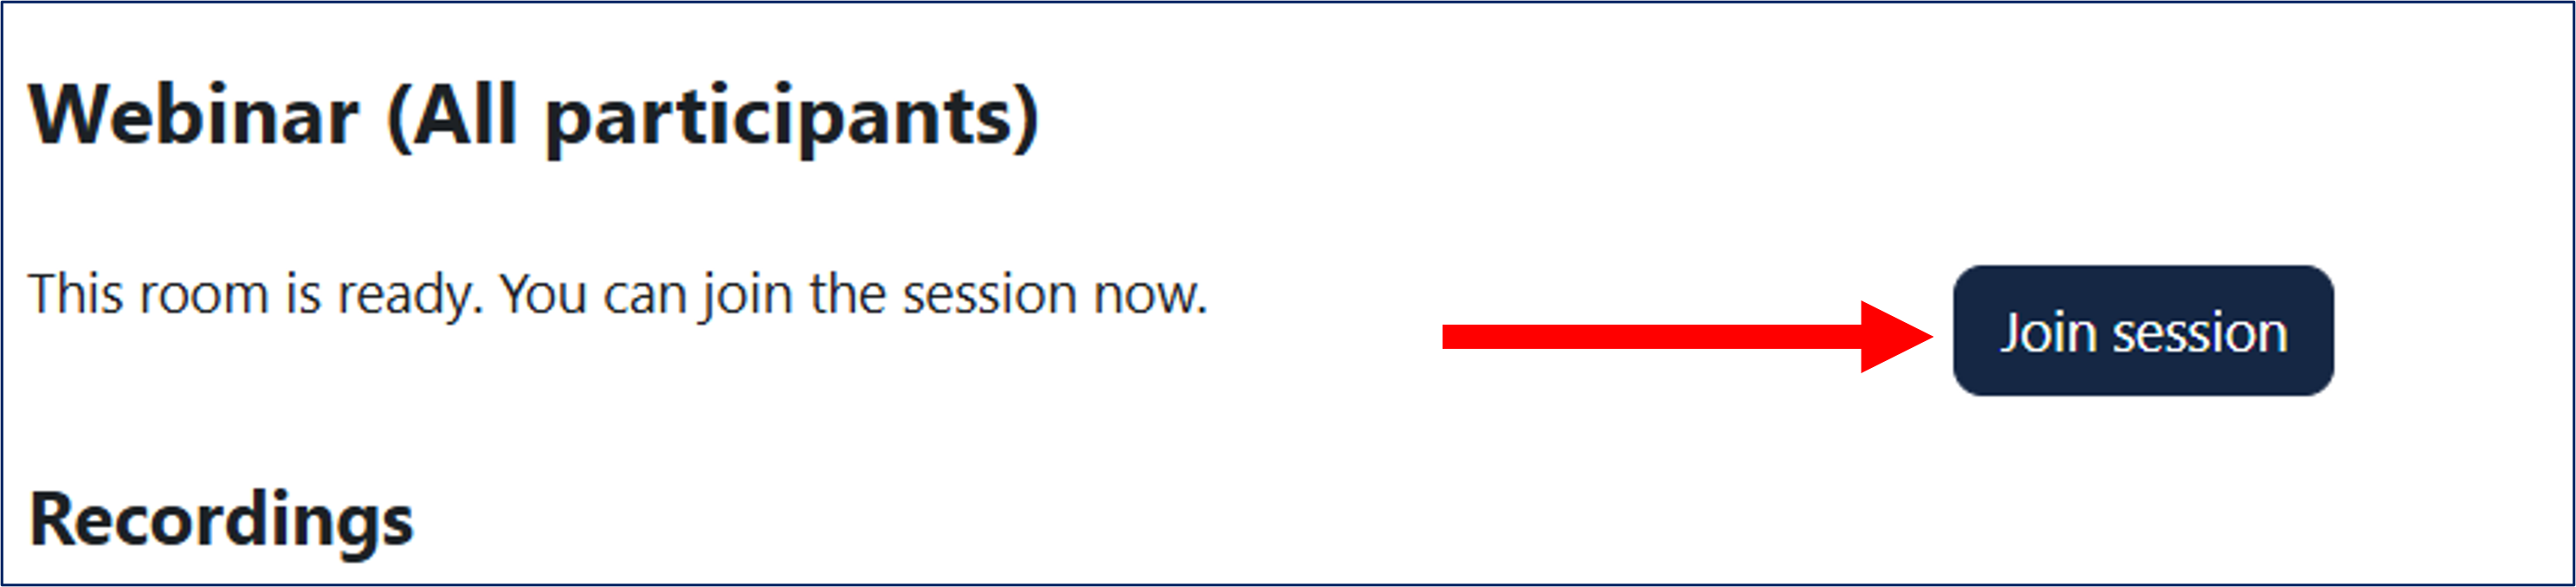
To access a Webinar in the platform as a crew member, click on the Webinar title in the homepage of the course.

You will be directed to the Webinar page. Click on ‘Join session’ to enter the Webinar room. This will open a new browser tab.
Before accessing the Webinar room it is possible to choose how to join:

To be able to actively speak during the Webinar, click on the Microphone icon.
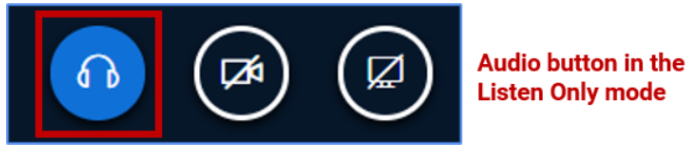
To only enter as a listener, click on the Listen only headset icon.
If you chose to activate your microphone, an audio test will be offered.
If you are using the Webinar functionality on your device for the first time, while you are connecting to the echo test, your browser may ask you for permission to use the microphone. Please allow that permission.
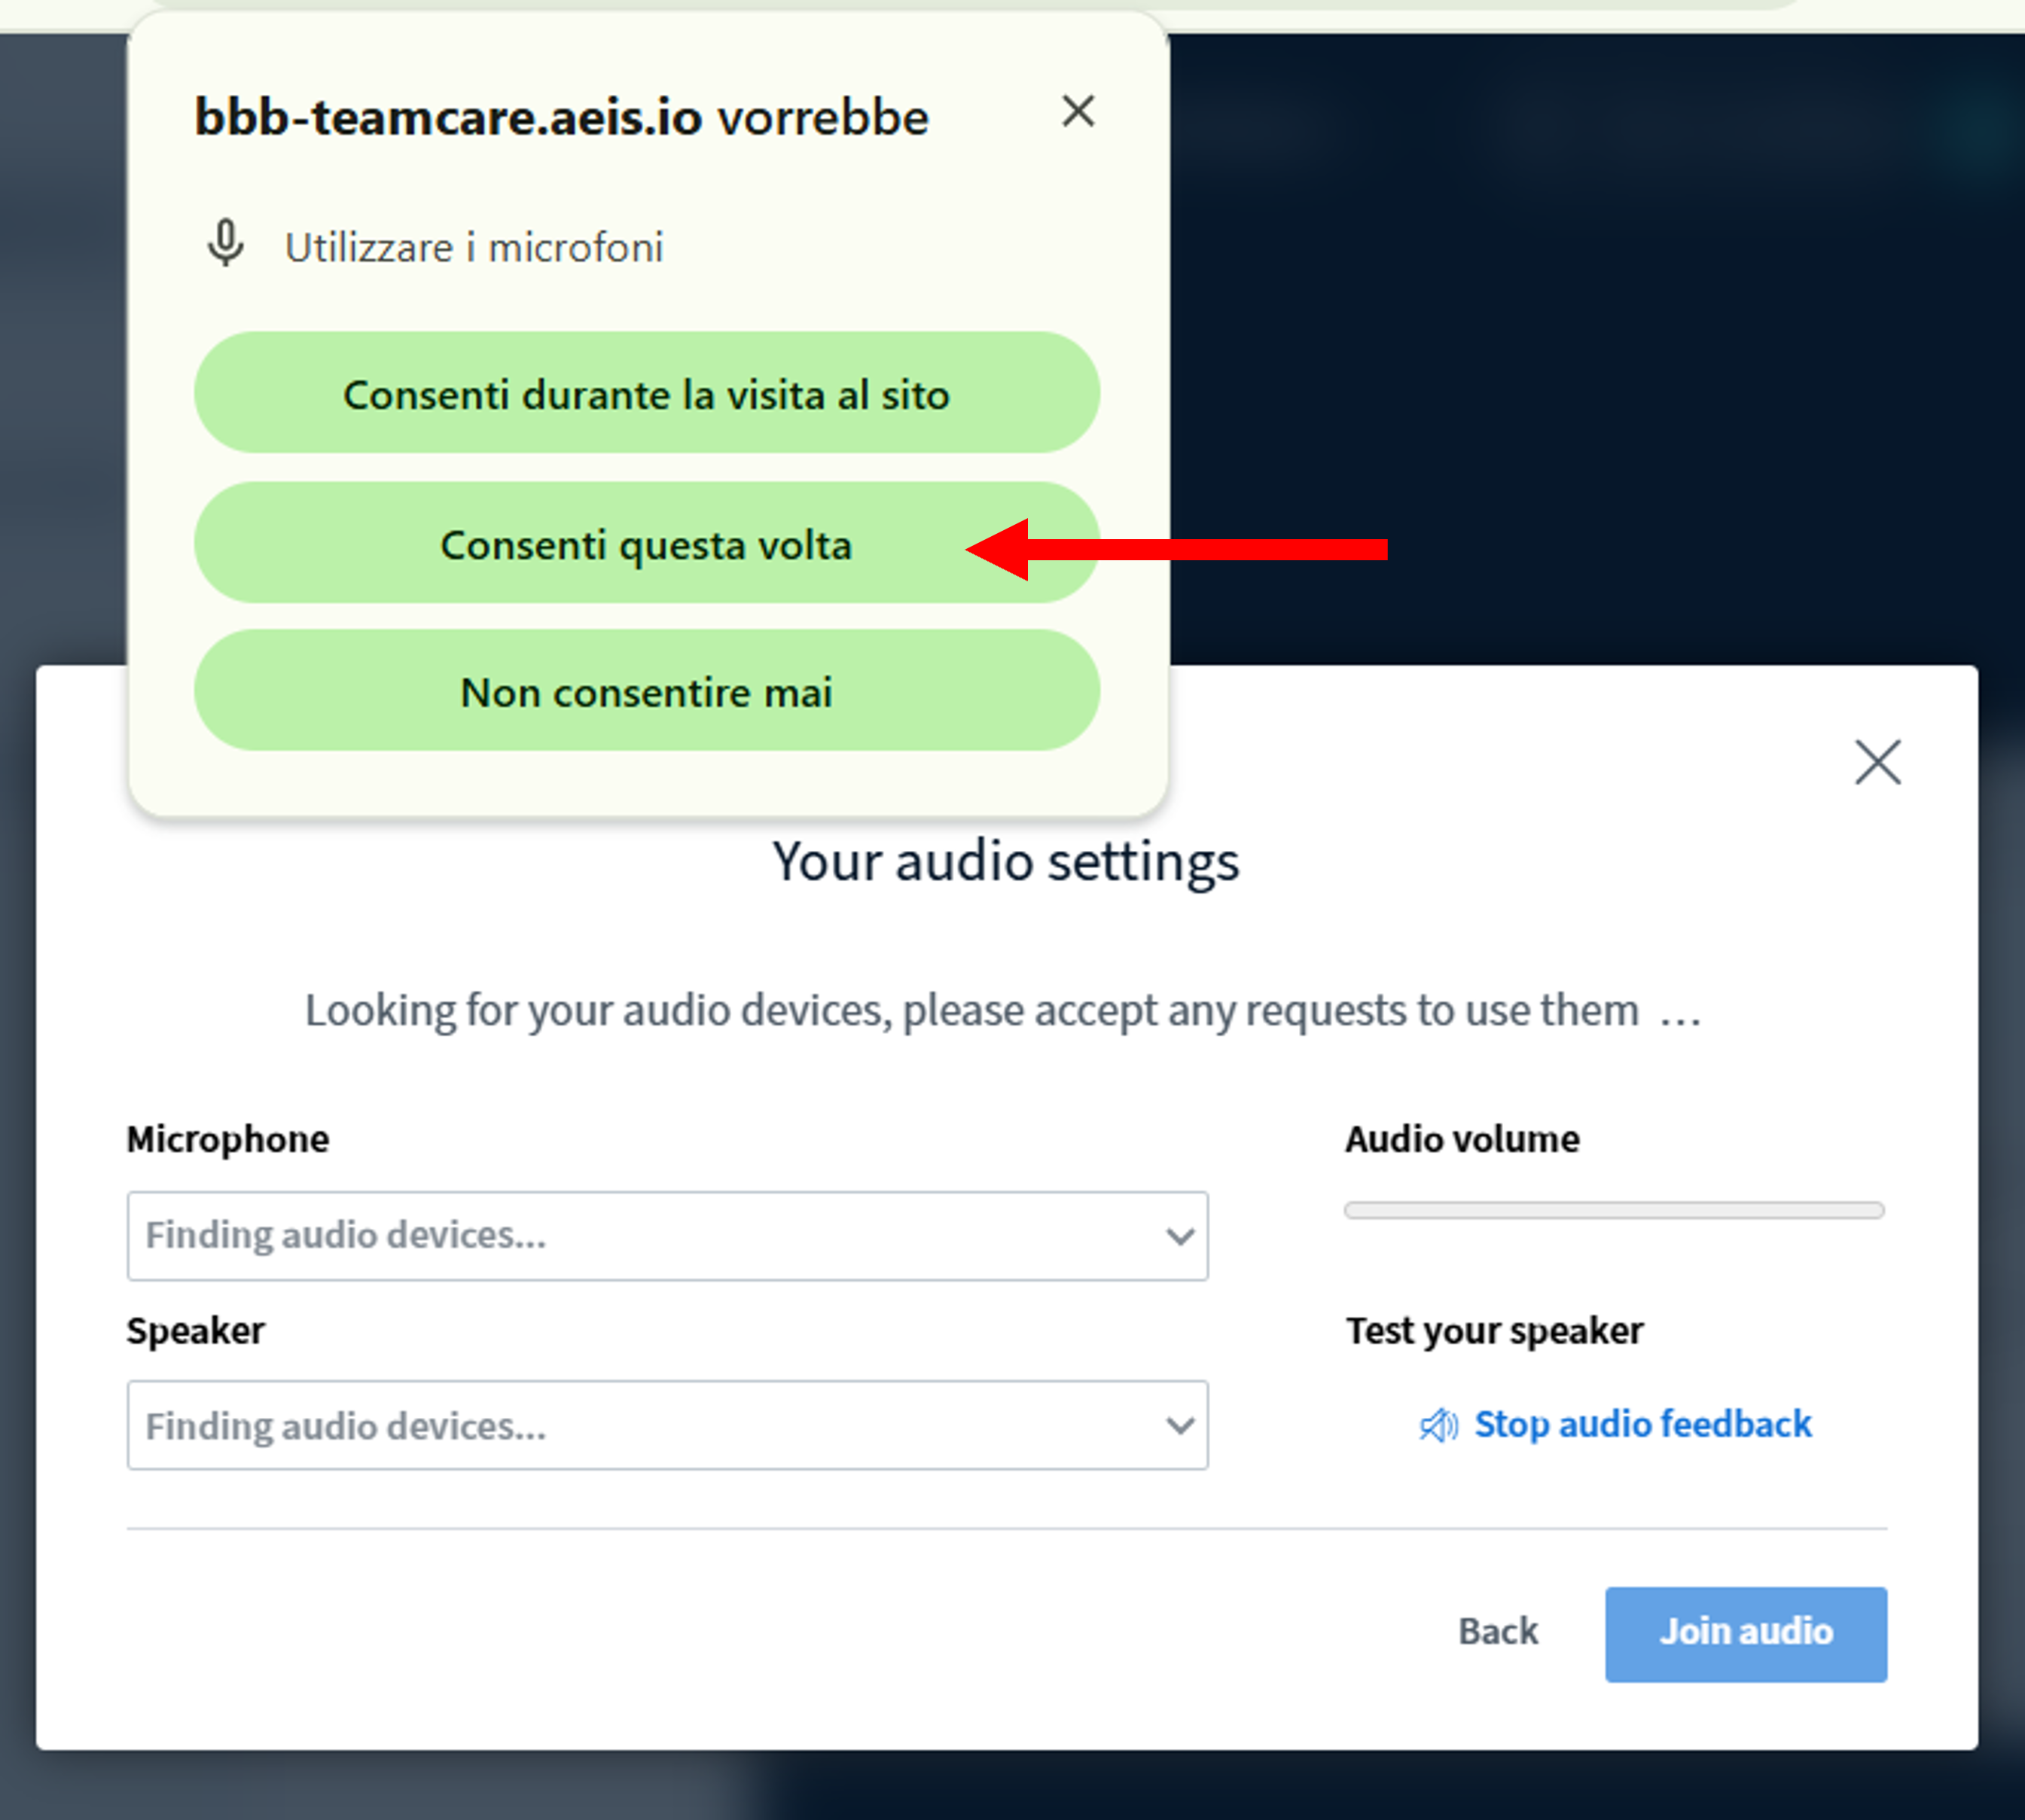
To test your audio connection, speak into the microphone: if you hear your voice back then everything has been set up correctly, and you can continue by clicking on the green thumbs-up button (Yes). Other participants in the Webinar room will not hear you at this stage.
7.2. Webinar interface
The default main screen of a webinar on the platform consists of:
- The list of connected participants
- The presentation screen
- The screen with connected users
- A public chat
- Shared notes
- Controls to enable/disable audio, video, and raise hand
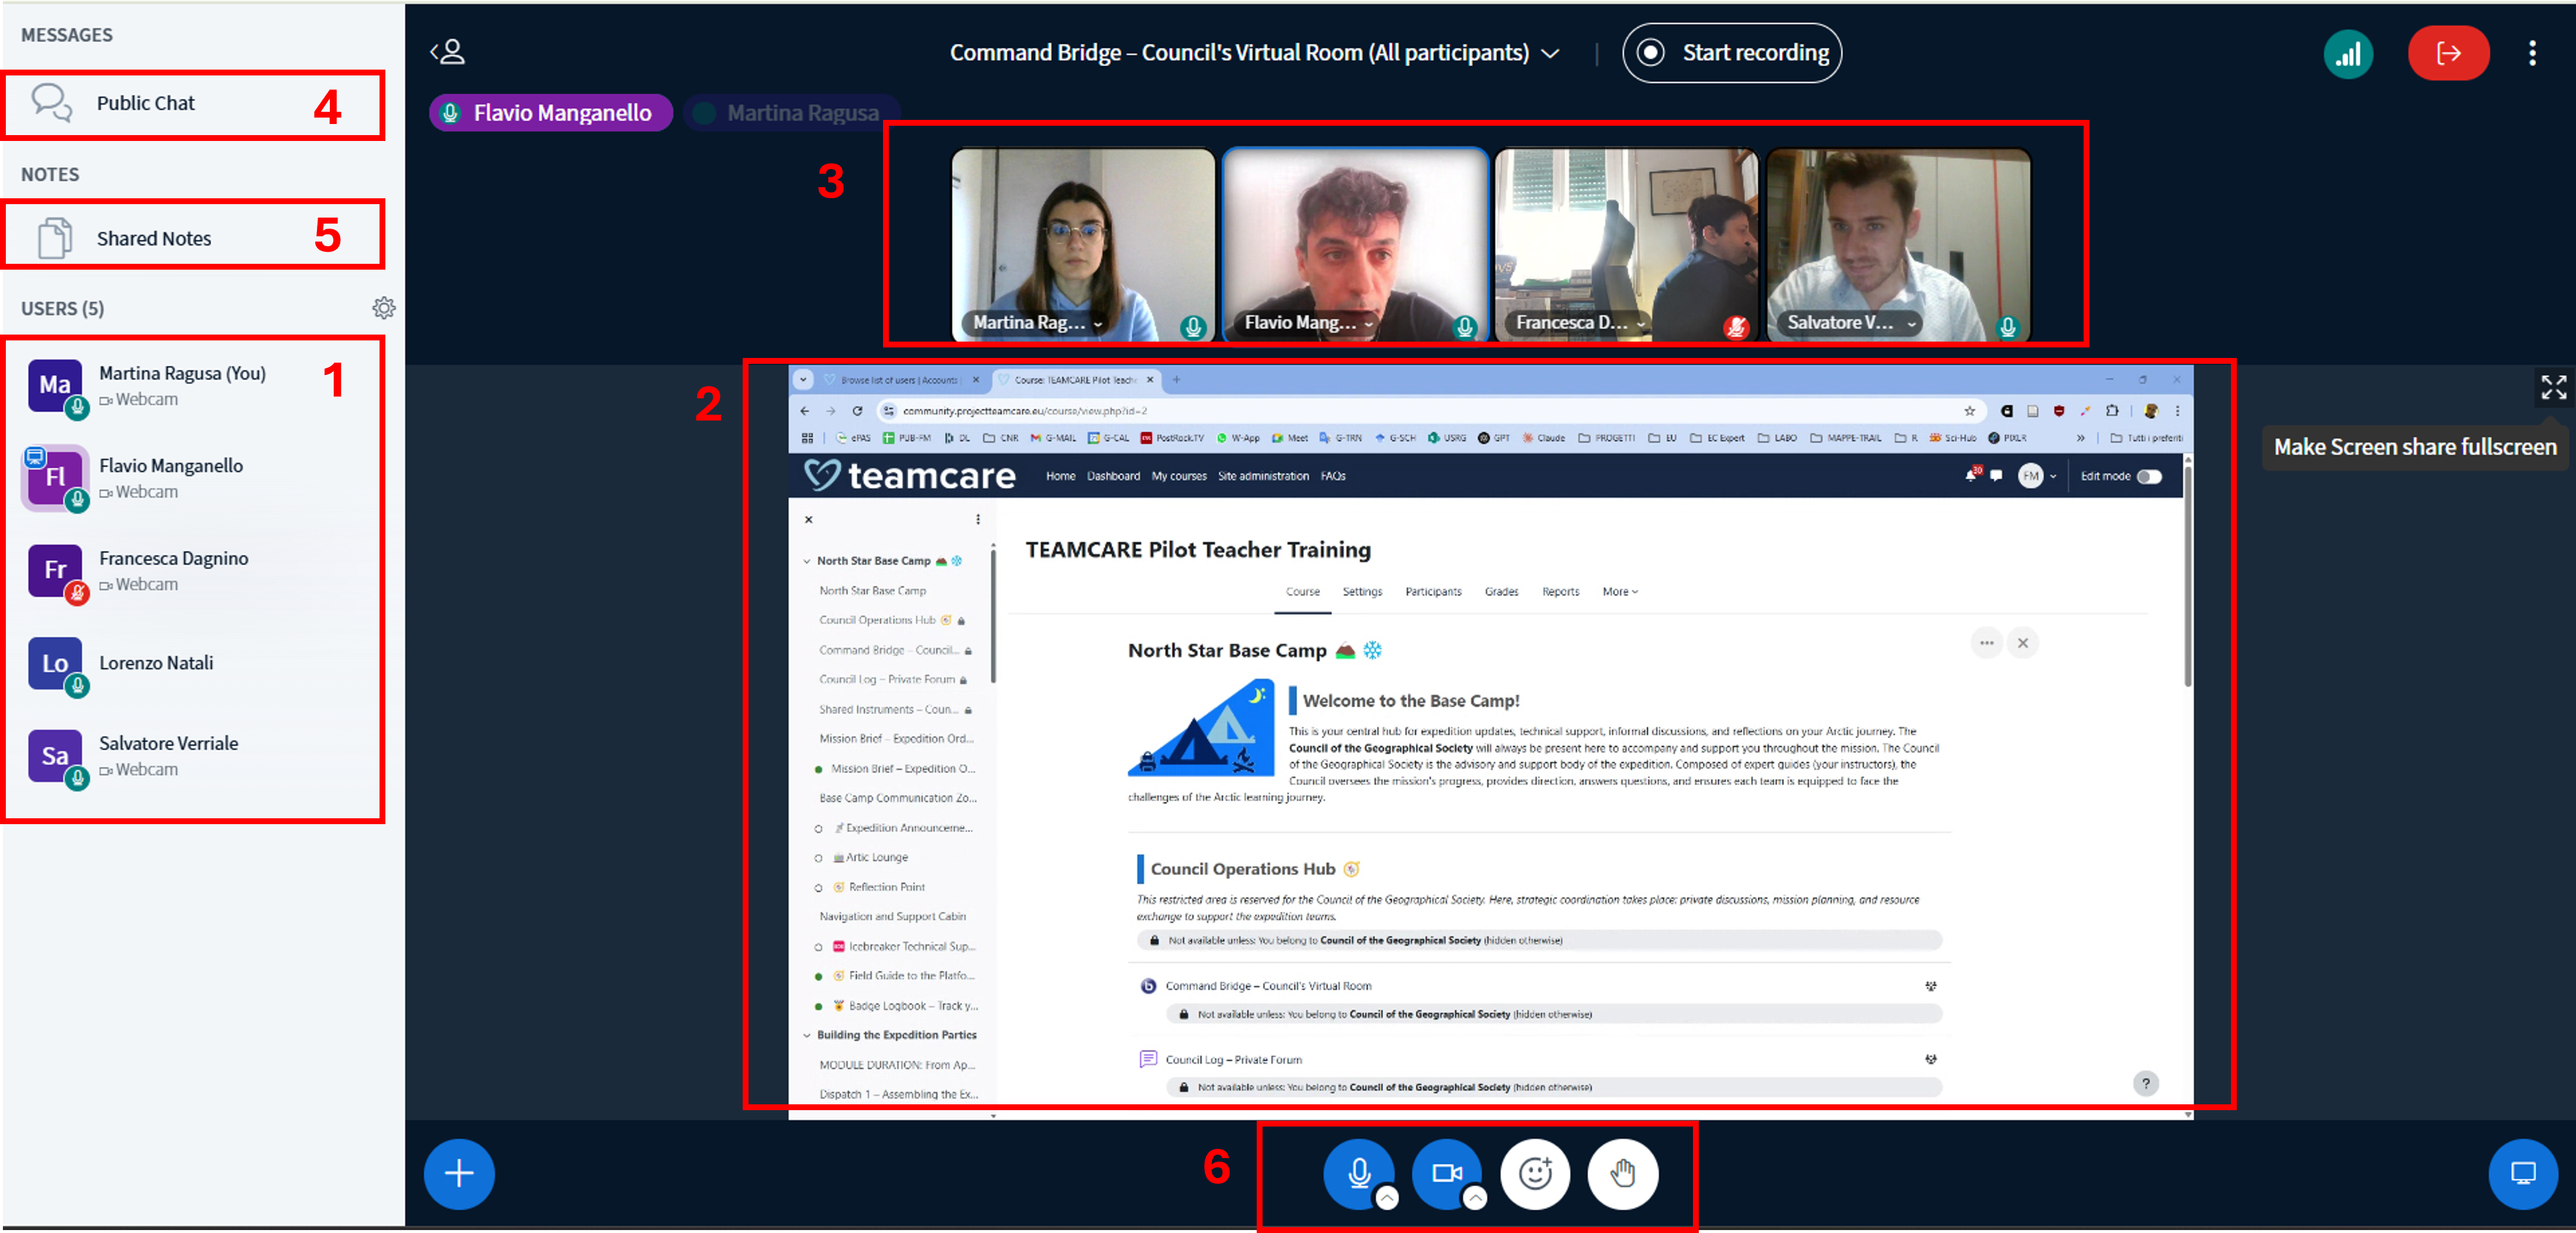
The Users panel lists all the Webinar participants’ names along with a series of icons useful to understand what action each user is able to do, and their roles:
- Moderator (can activate and deactivate audio & video for other users, select a presenter among the participants, make other users moderators…)
- Presenter (has full access to the presentation screen; only one participant can be presenter at a time)
- User with Video and Audio activated. All currently active video streams are visible in the Webcams section.
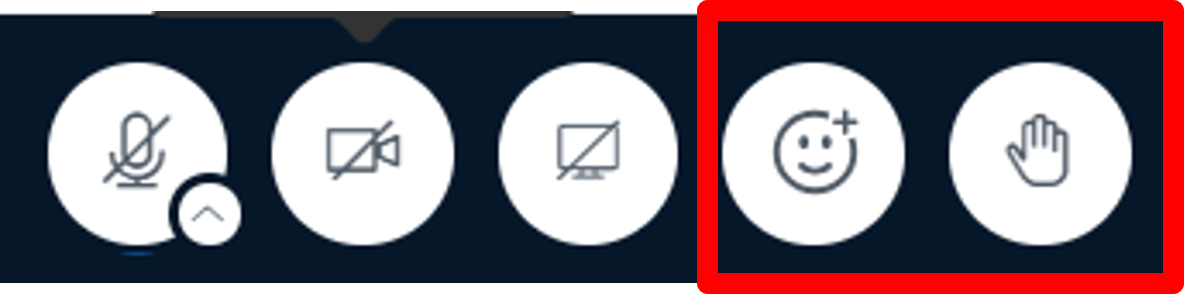
Participants can use the Emoji Tool to update their status icon. This functionality allows users with deactivated microphones to make their voices heard by selecting one of the available icons.
Particularly important is the Raise hand icon, that can be used to ask a moderator for the right to speak.
The Presentation panel is the main section of the Webinar module. All the documents and slides shared by the Presenter will be shown here.
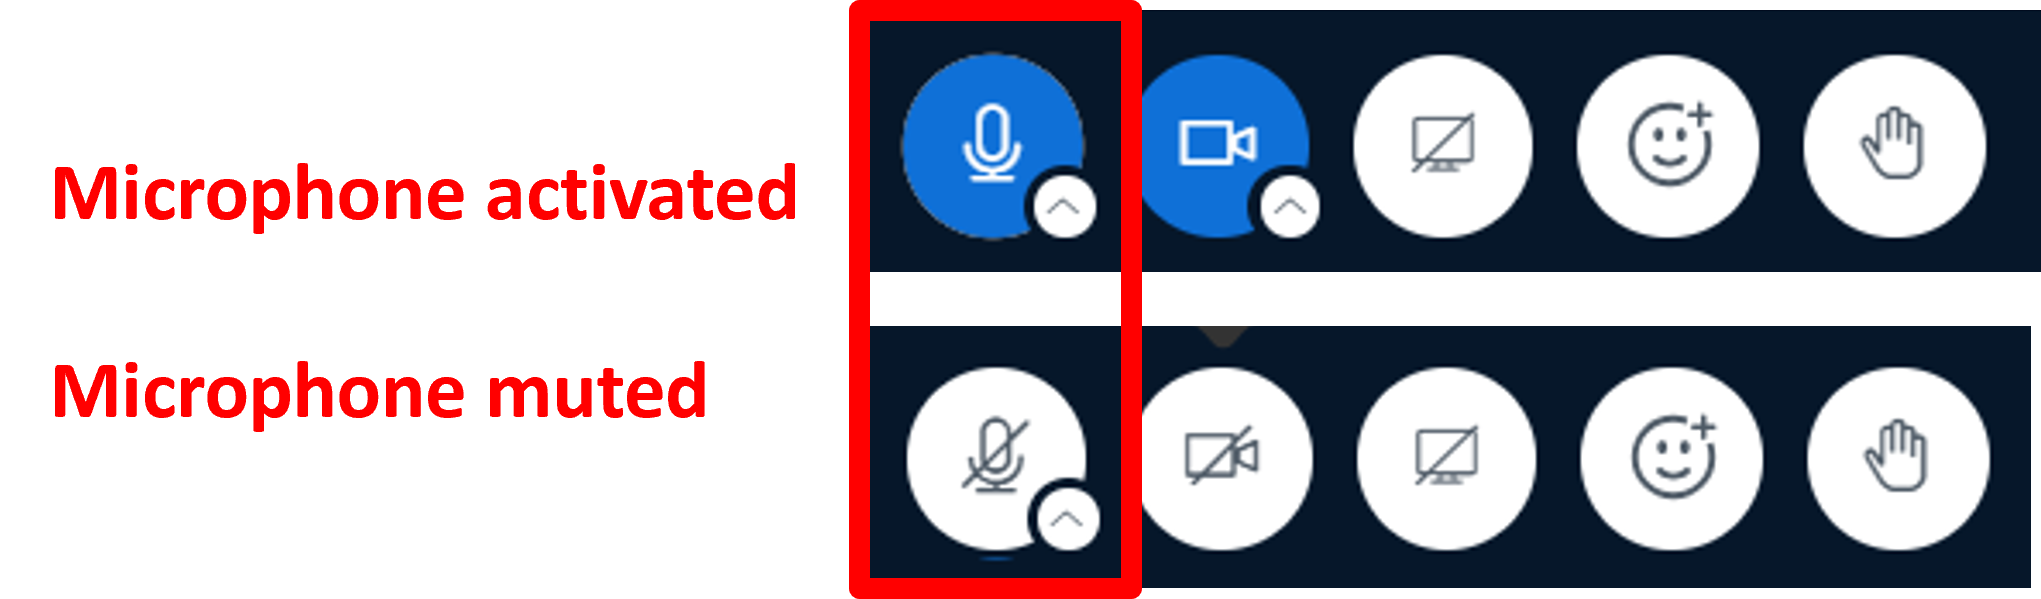
Depending on the Webinar settings, you may find when you join the room that your microphone is muted or unmuted. You can mute and unmute yourself by clicking on the microphone button.
Additionally, you can always switch between Microphone mode and Listen only mode.
Click the Telephone shape icon to switch to Listen only mode.

Click on the Headset shape icon to switch to the Microphone mode.
The Public Chat panel is located in the upper left-hand corner of the BigBlueButton interface.
If you do not see the public chat option available, you may need to select the Users List / Chat Toggle to expand the users list panel and public chat.
Select Public Chat to expand the public chat panel. To hide the public chat panel, select the “<” symbol.
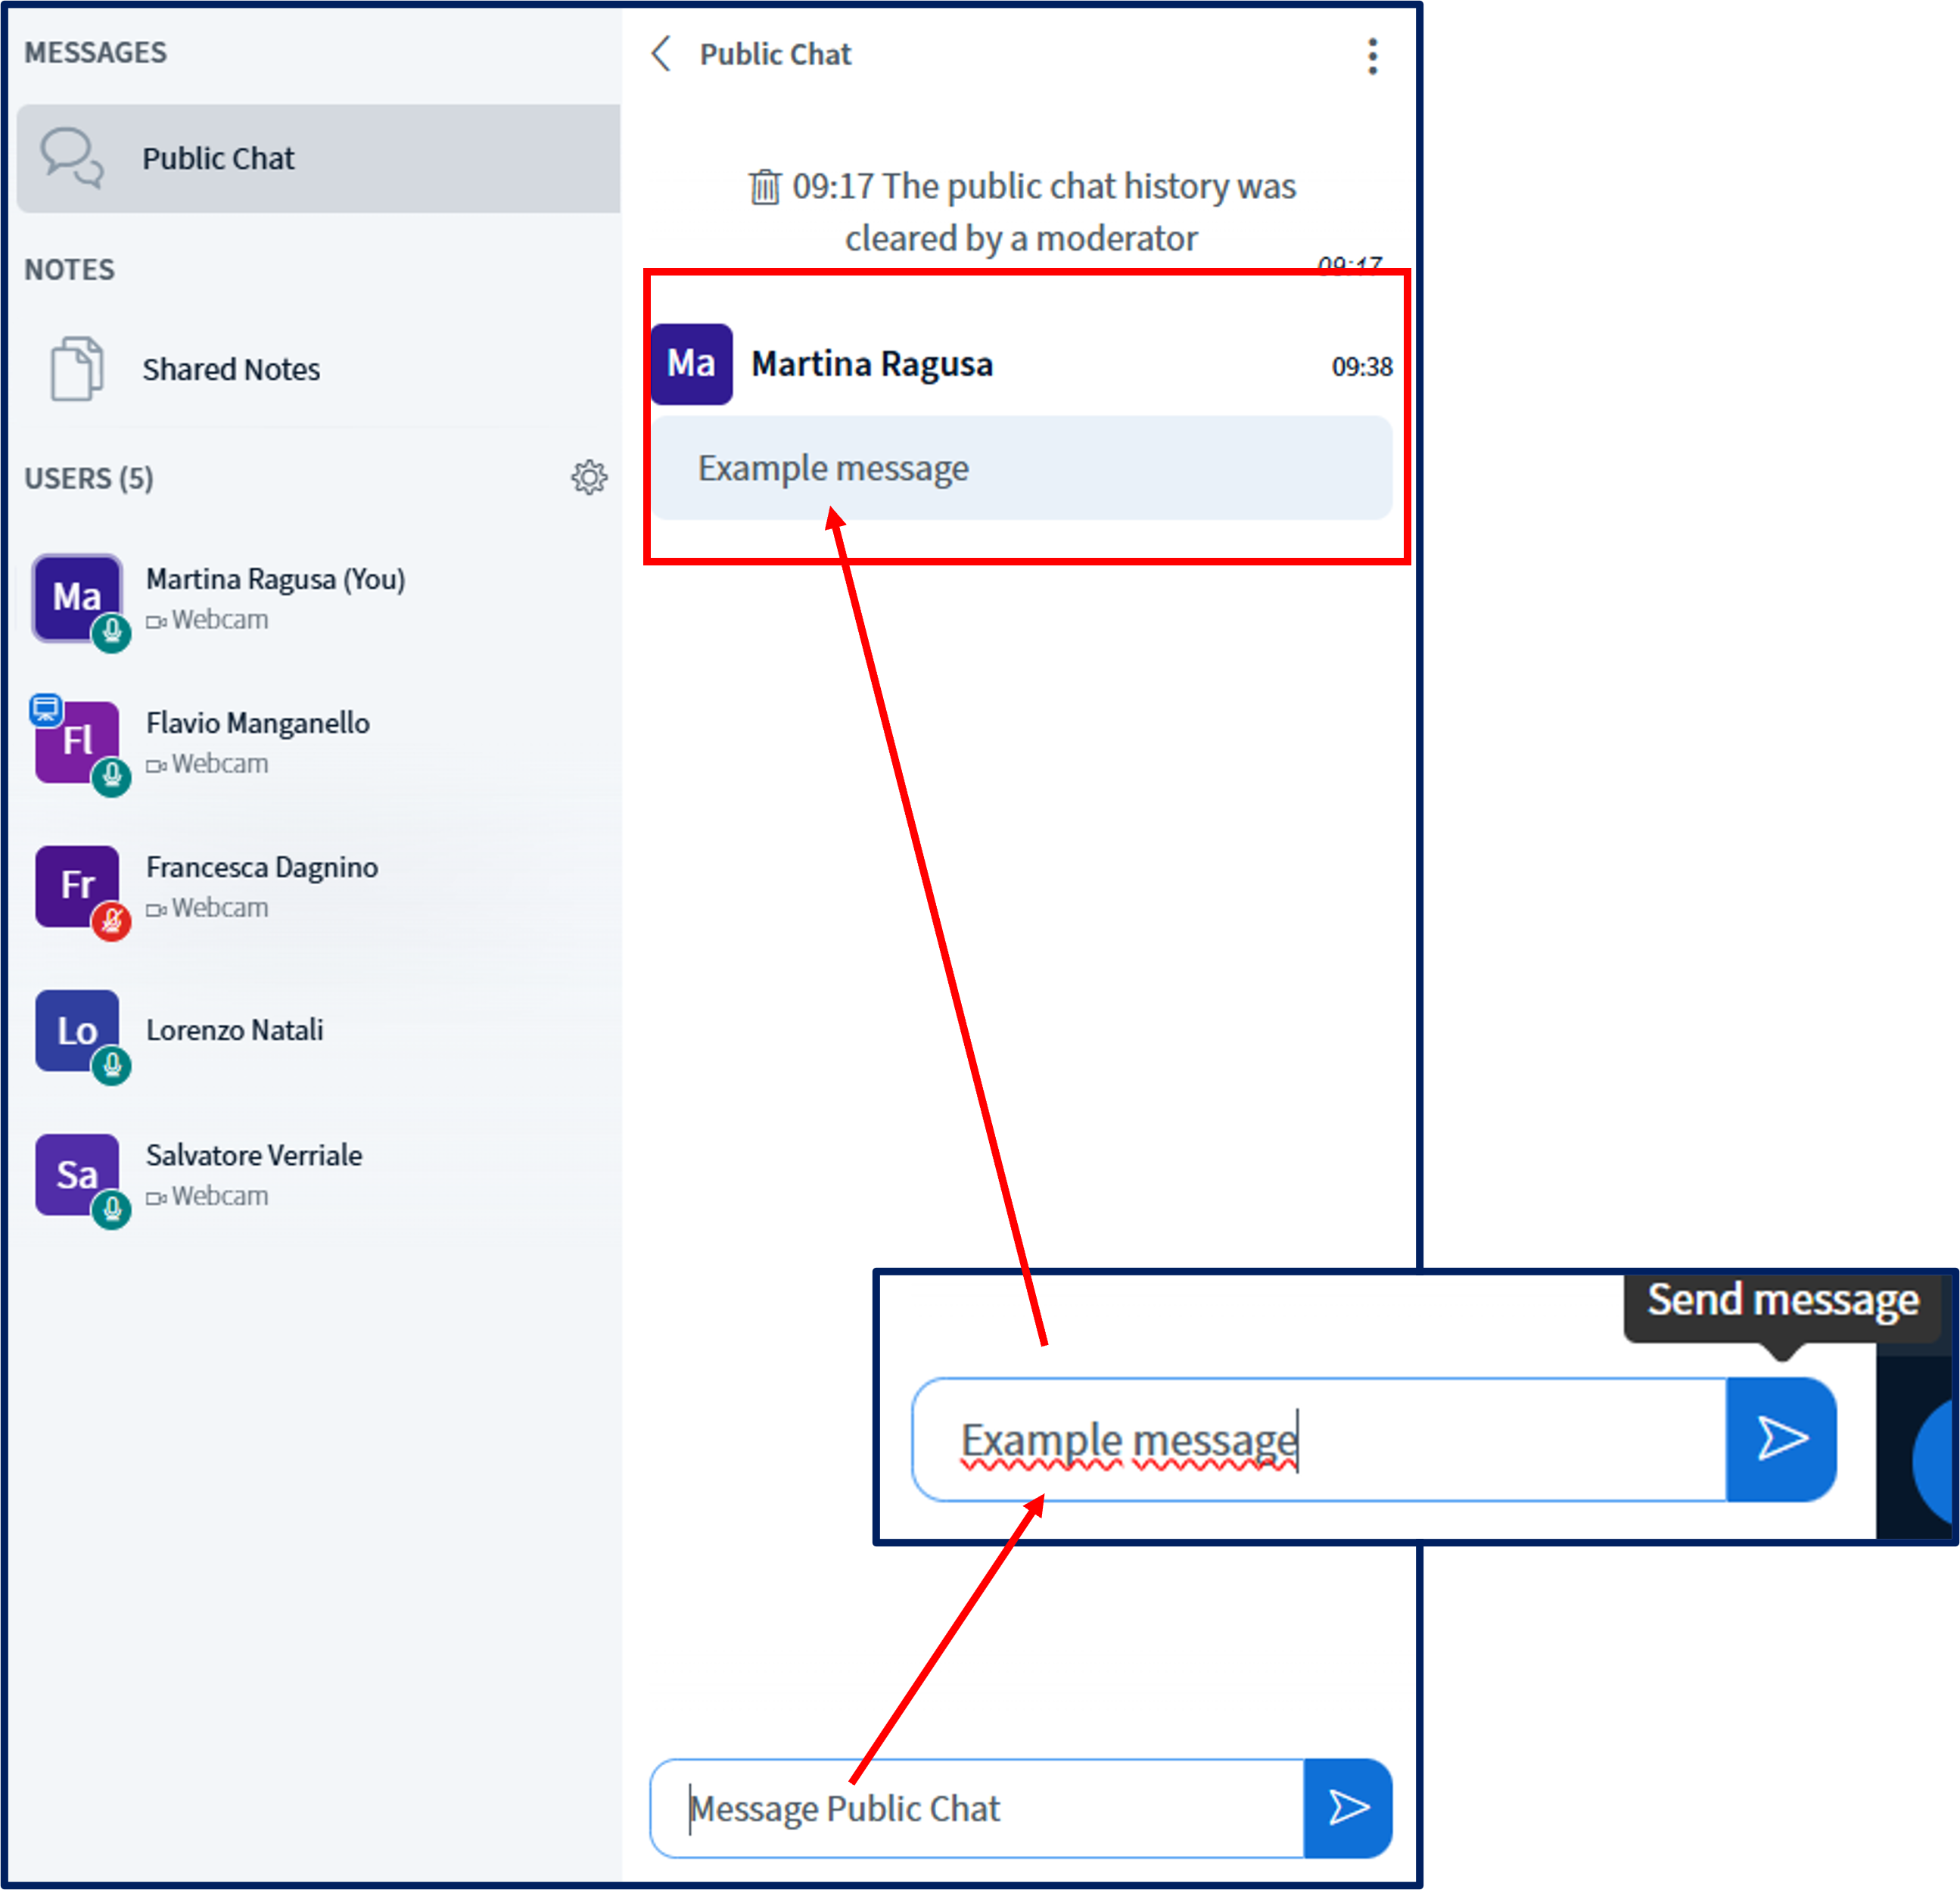
Use the Chat Input field to type messages into the public chat. Your chat messages (and messages from other users) will appear in chronological order.
You can save or download public chat by selecting the Chat Options menu.
When the public chat pane is open, you can either Save (you will be prompted to download the public chat as a text file) or Copy (the public chat will be copied to the clipboard) the chat.
To private chat with another user, select their name (a pop-up menu will appear), then choose Chat.
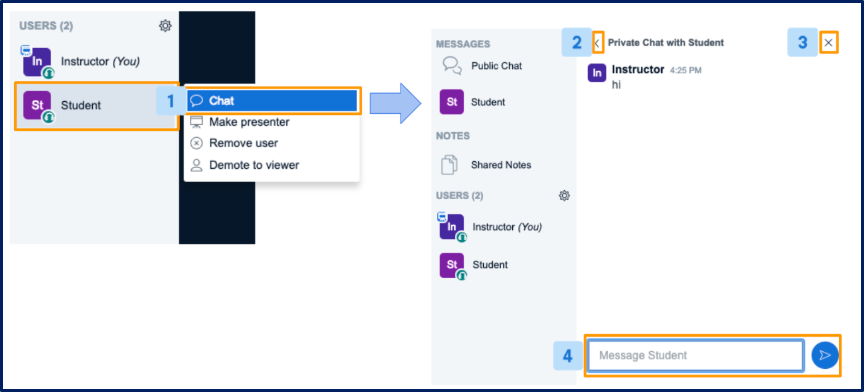
A Private Chat panel will appear. To hide the panel, select either “<” or “x”.
Use the Chat Input field to type messages into the private chat.
In addition to public and private chats, all users in BigBlueButton can access the Shared Notes panel.
Shared notes enable all the users in a meeting to contribute to a common text-based file. You can use formatting options and always export the shared notes later.
Located under the notes section, select Shared Notes to expand the notes panel. Formatting options such as Bold, Italic, and undo/redo can be found at the top of the notes panel.
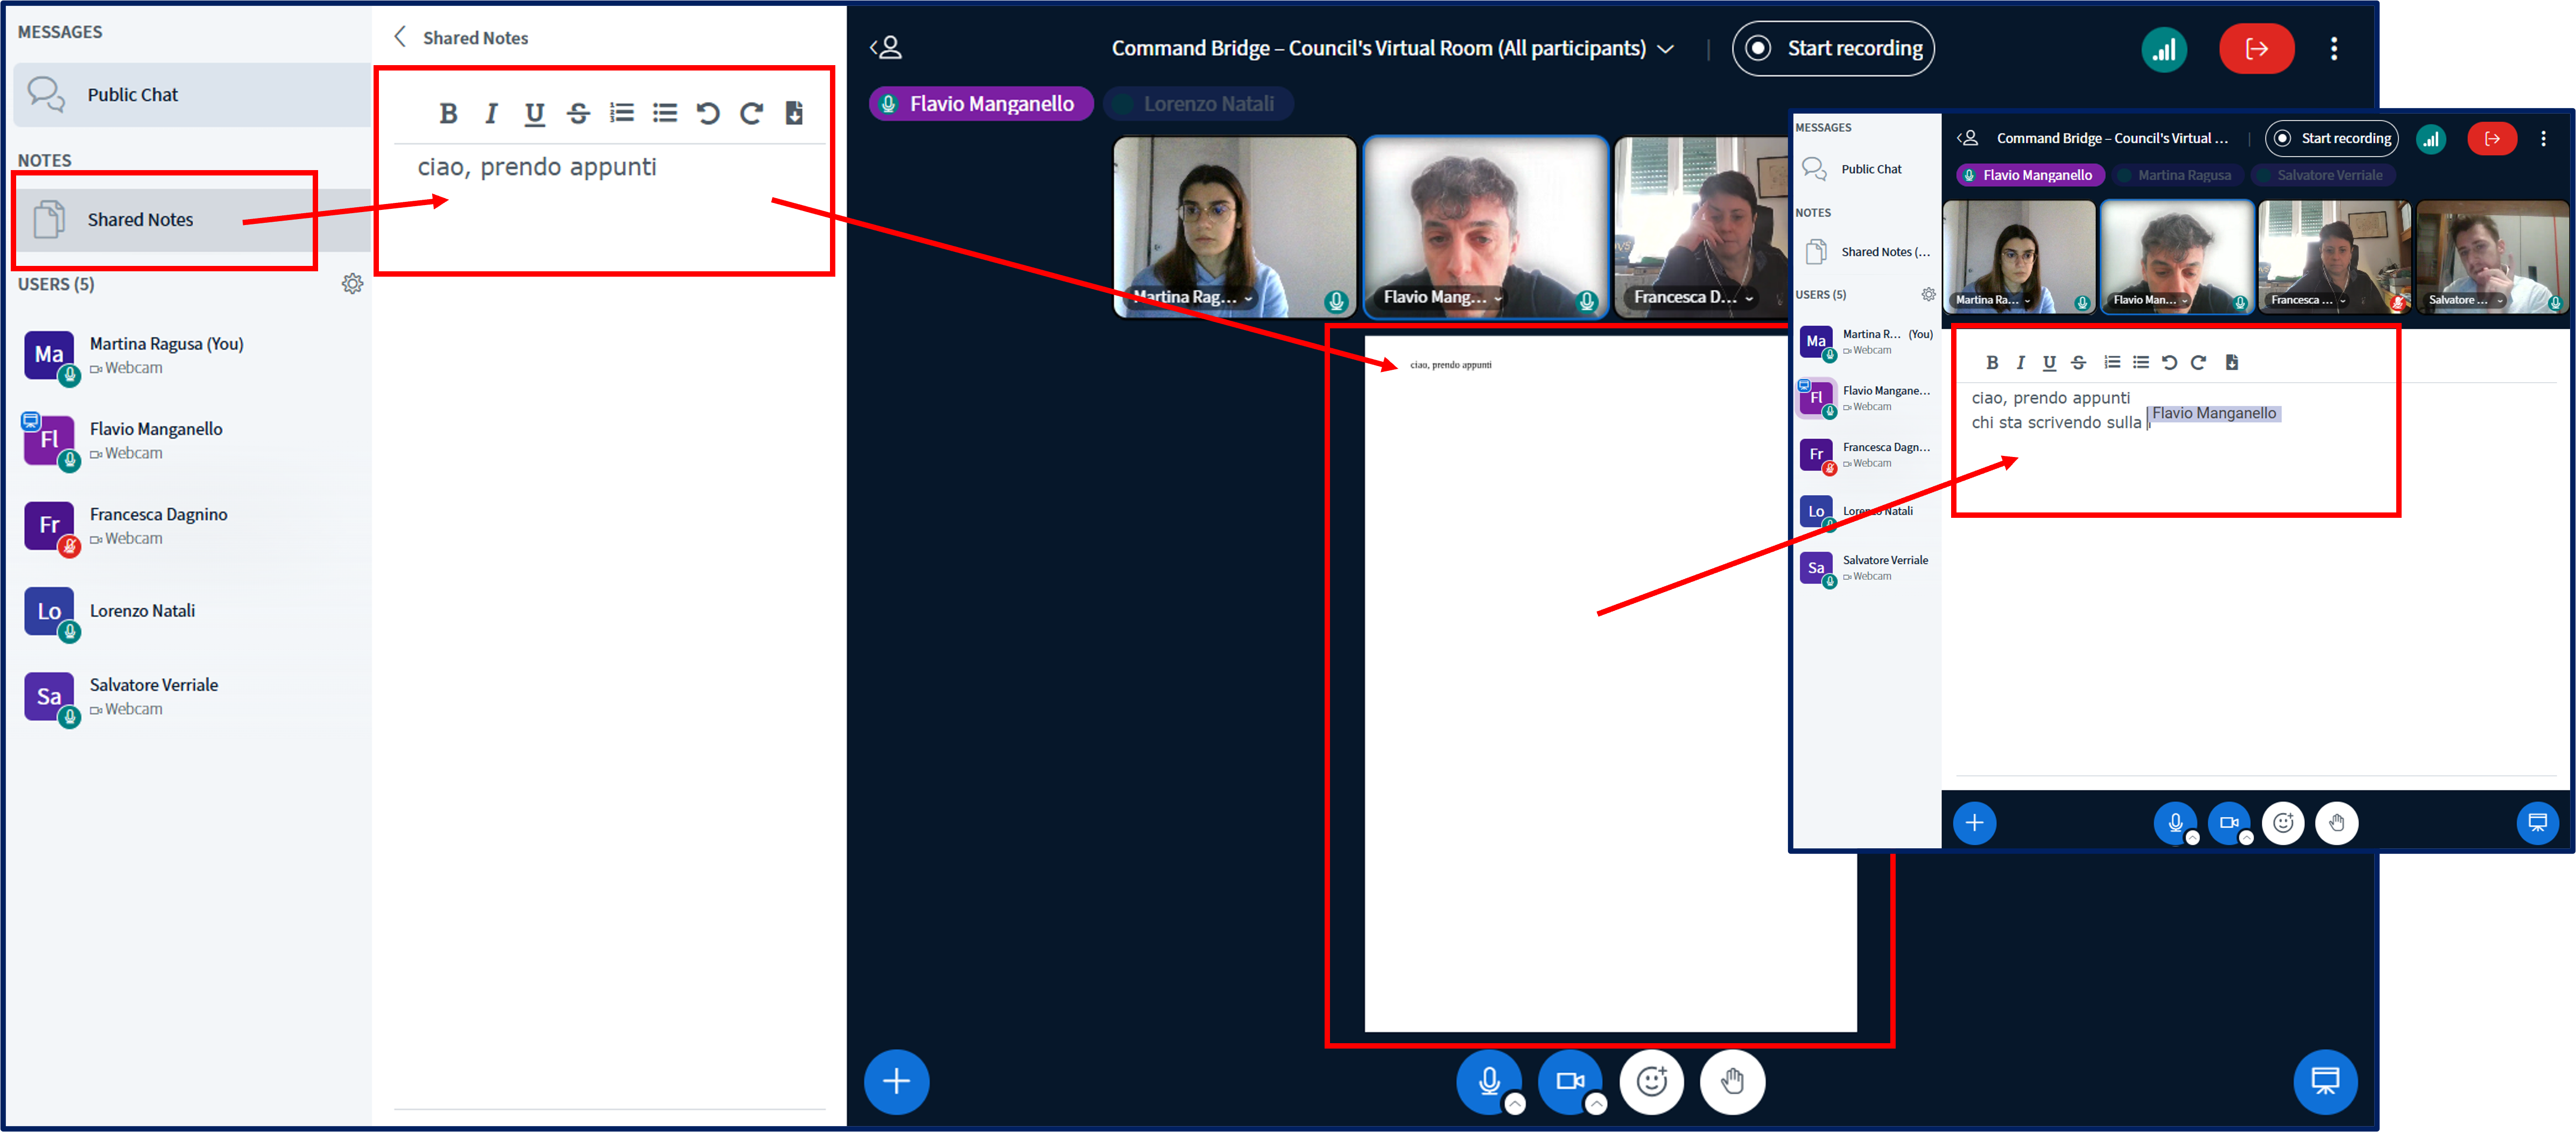
To find undo/redo and the download buttons, press the '+' button.
7.3. Participation in a BBB session
Please keep to the following rules during the session:
- Mute your microphone and camera in order to not interrupt the presenters.
- If you’d like to comment on something, please use the public chat.
- If you’d like to join the conversation, please ‘raise your hand’ by changing your status.
- If the presenter invites you to speak, unmute your microphone and camera. After you finish the conversation, please mute them again.
- You can use the private chat feature to connect privately with another participant in the session. Select the name of the person from the list and with the right button of the mouse select the option to start the private chat.
7.4. Breakout rooms
During a webinar activity, the moderator may decide to split the participants into separate groups called breakout rooms. To accept an invitation to join a breakout room, click on the blue Join Session button in the popup alert that will appear on the screen:
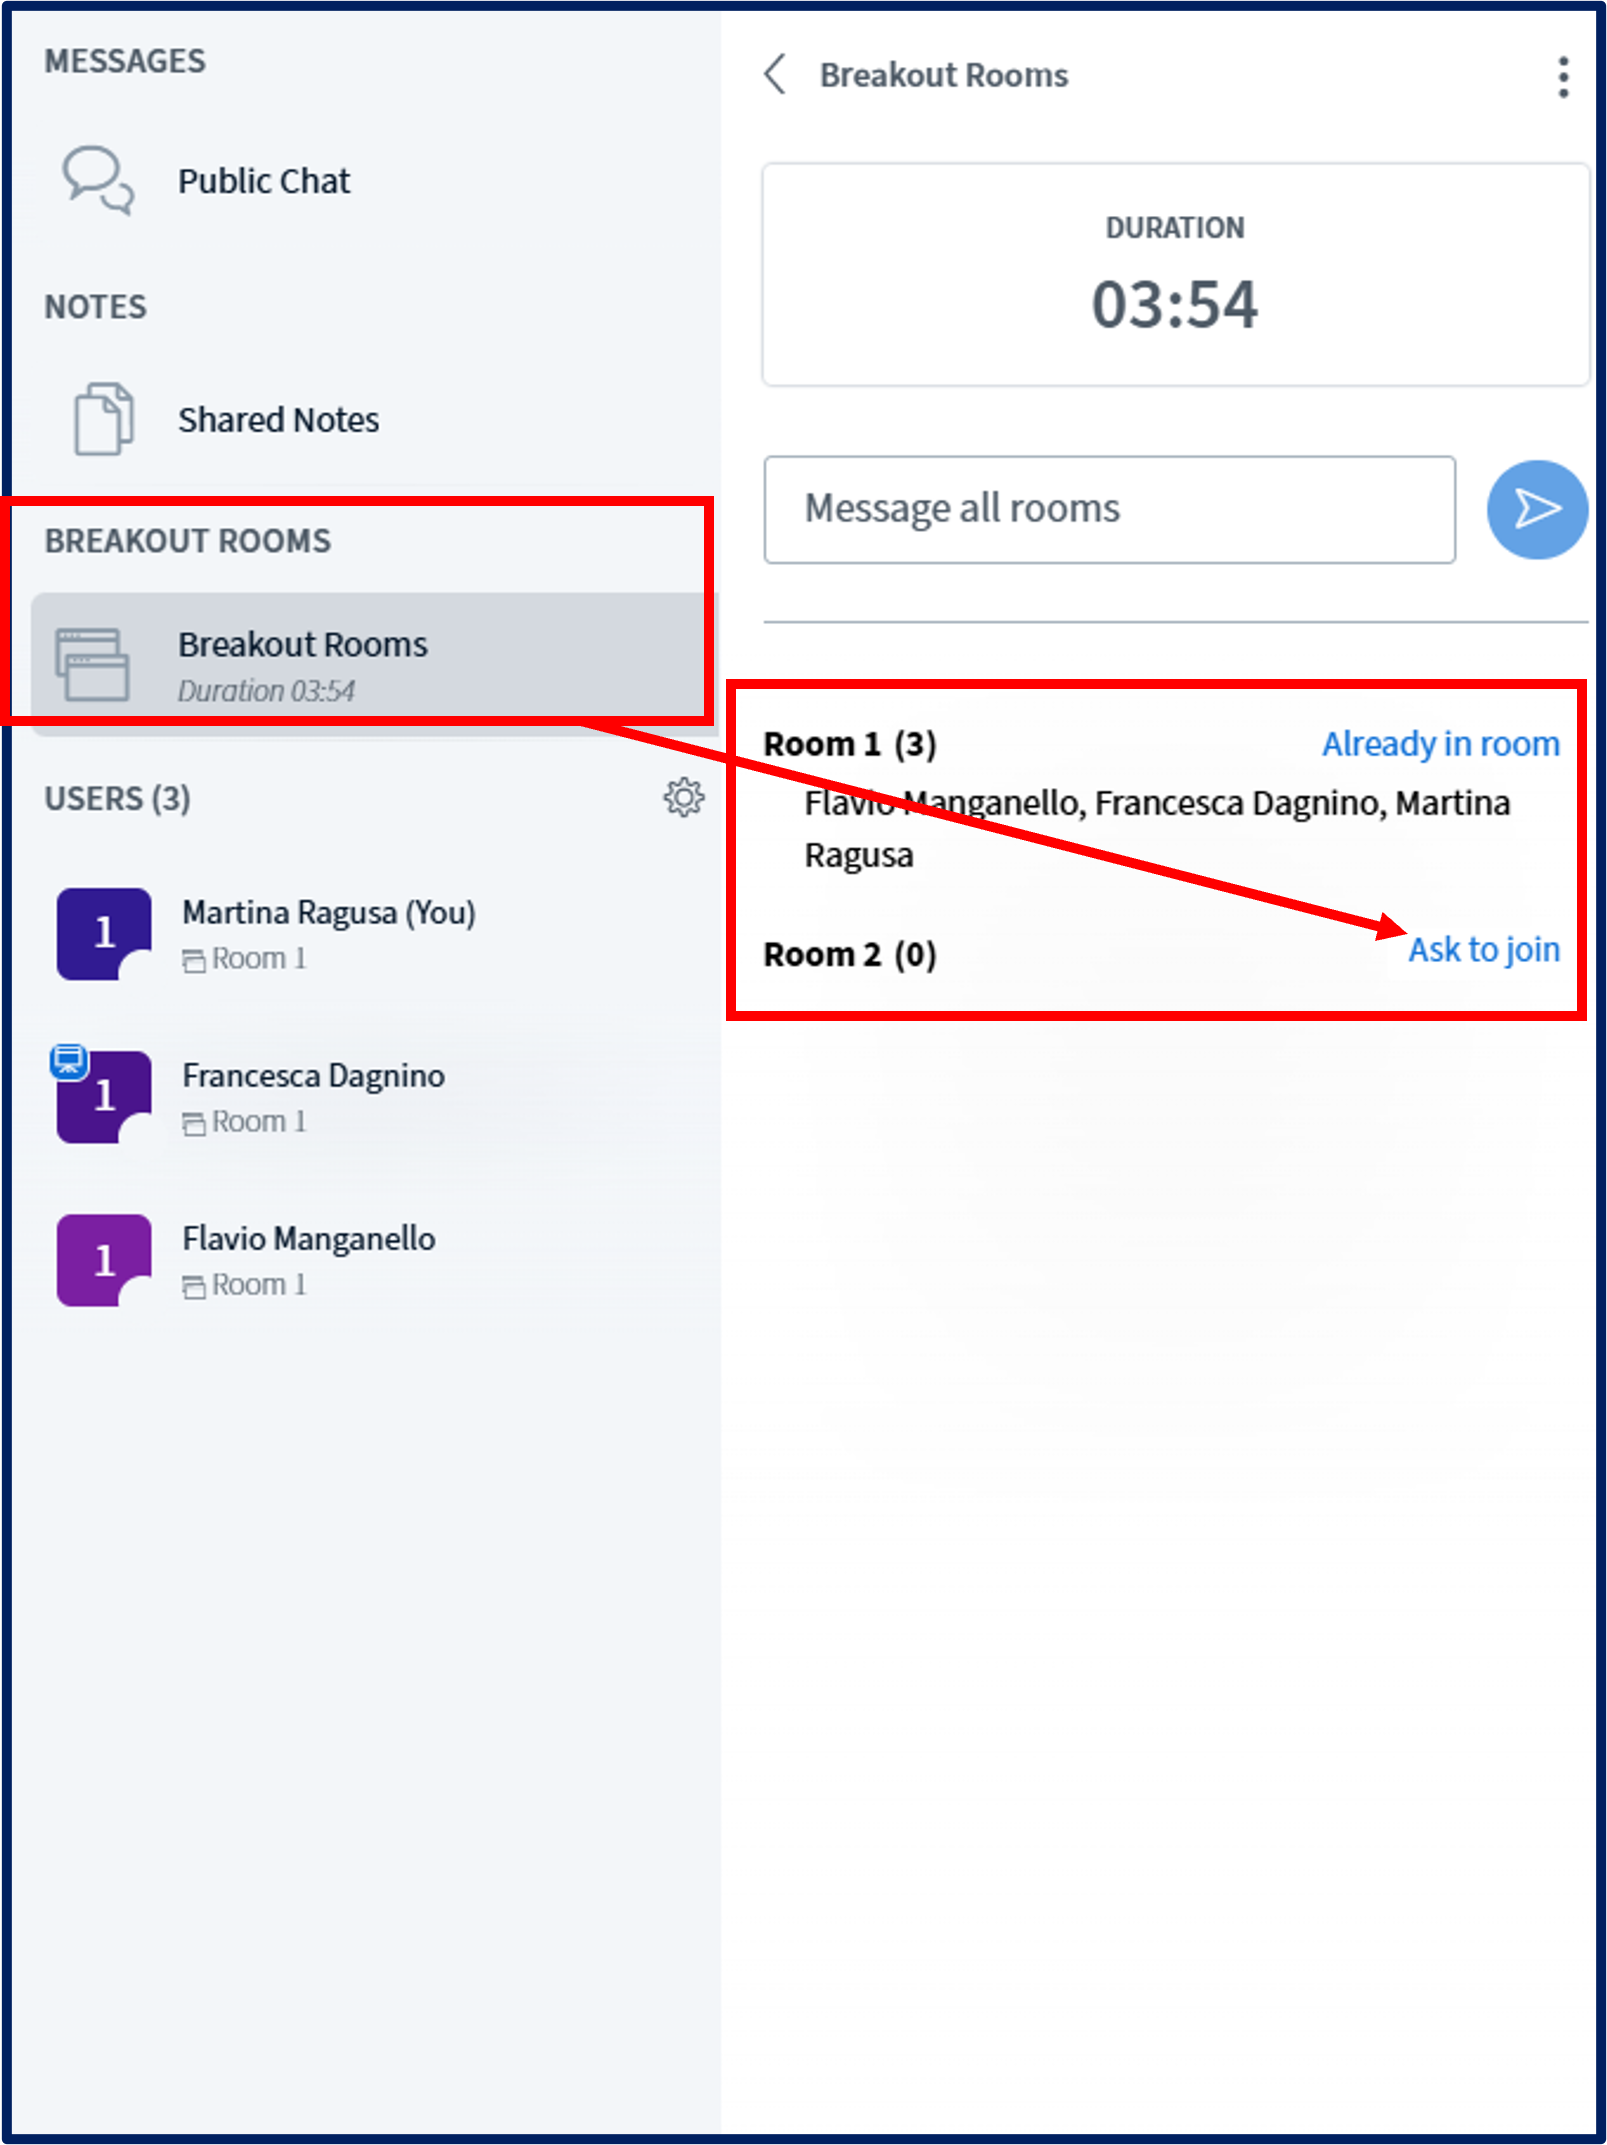
When requested, perform the audio test to enter the room, which will open in a separate tab:
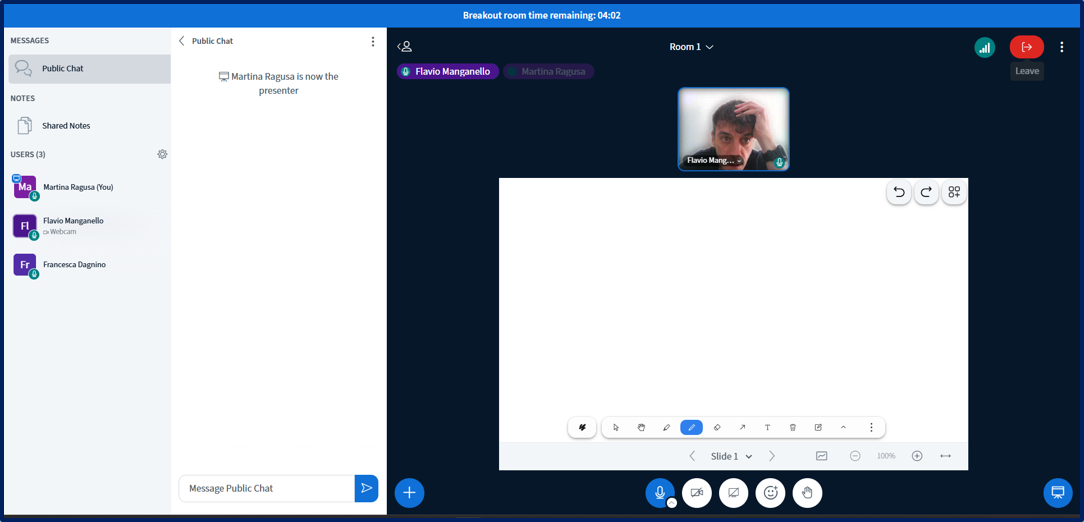
Breakout rooms work exactly like the main instance of the webinar, with the following exceptions:
- Documents shared in the Presentation panel will only be visible to members of the group.
- Chat messages will only be readable by members of the group.
8. Quiz

The Quiz activity module allows the teacher to design and build quizzes consisting of a large variety of question types, including multiple choice, true-false, and short answers.
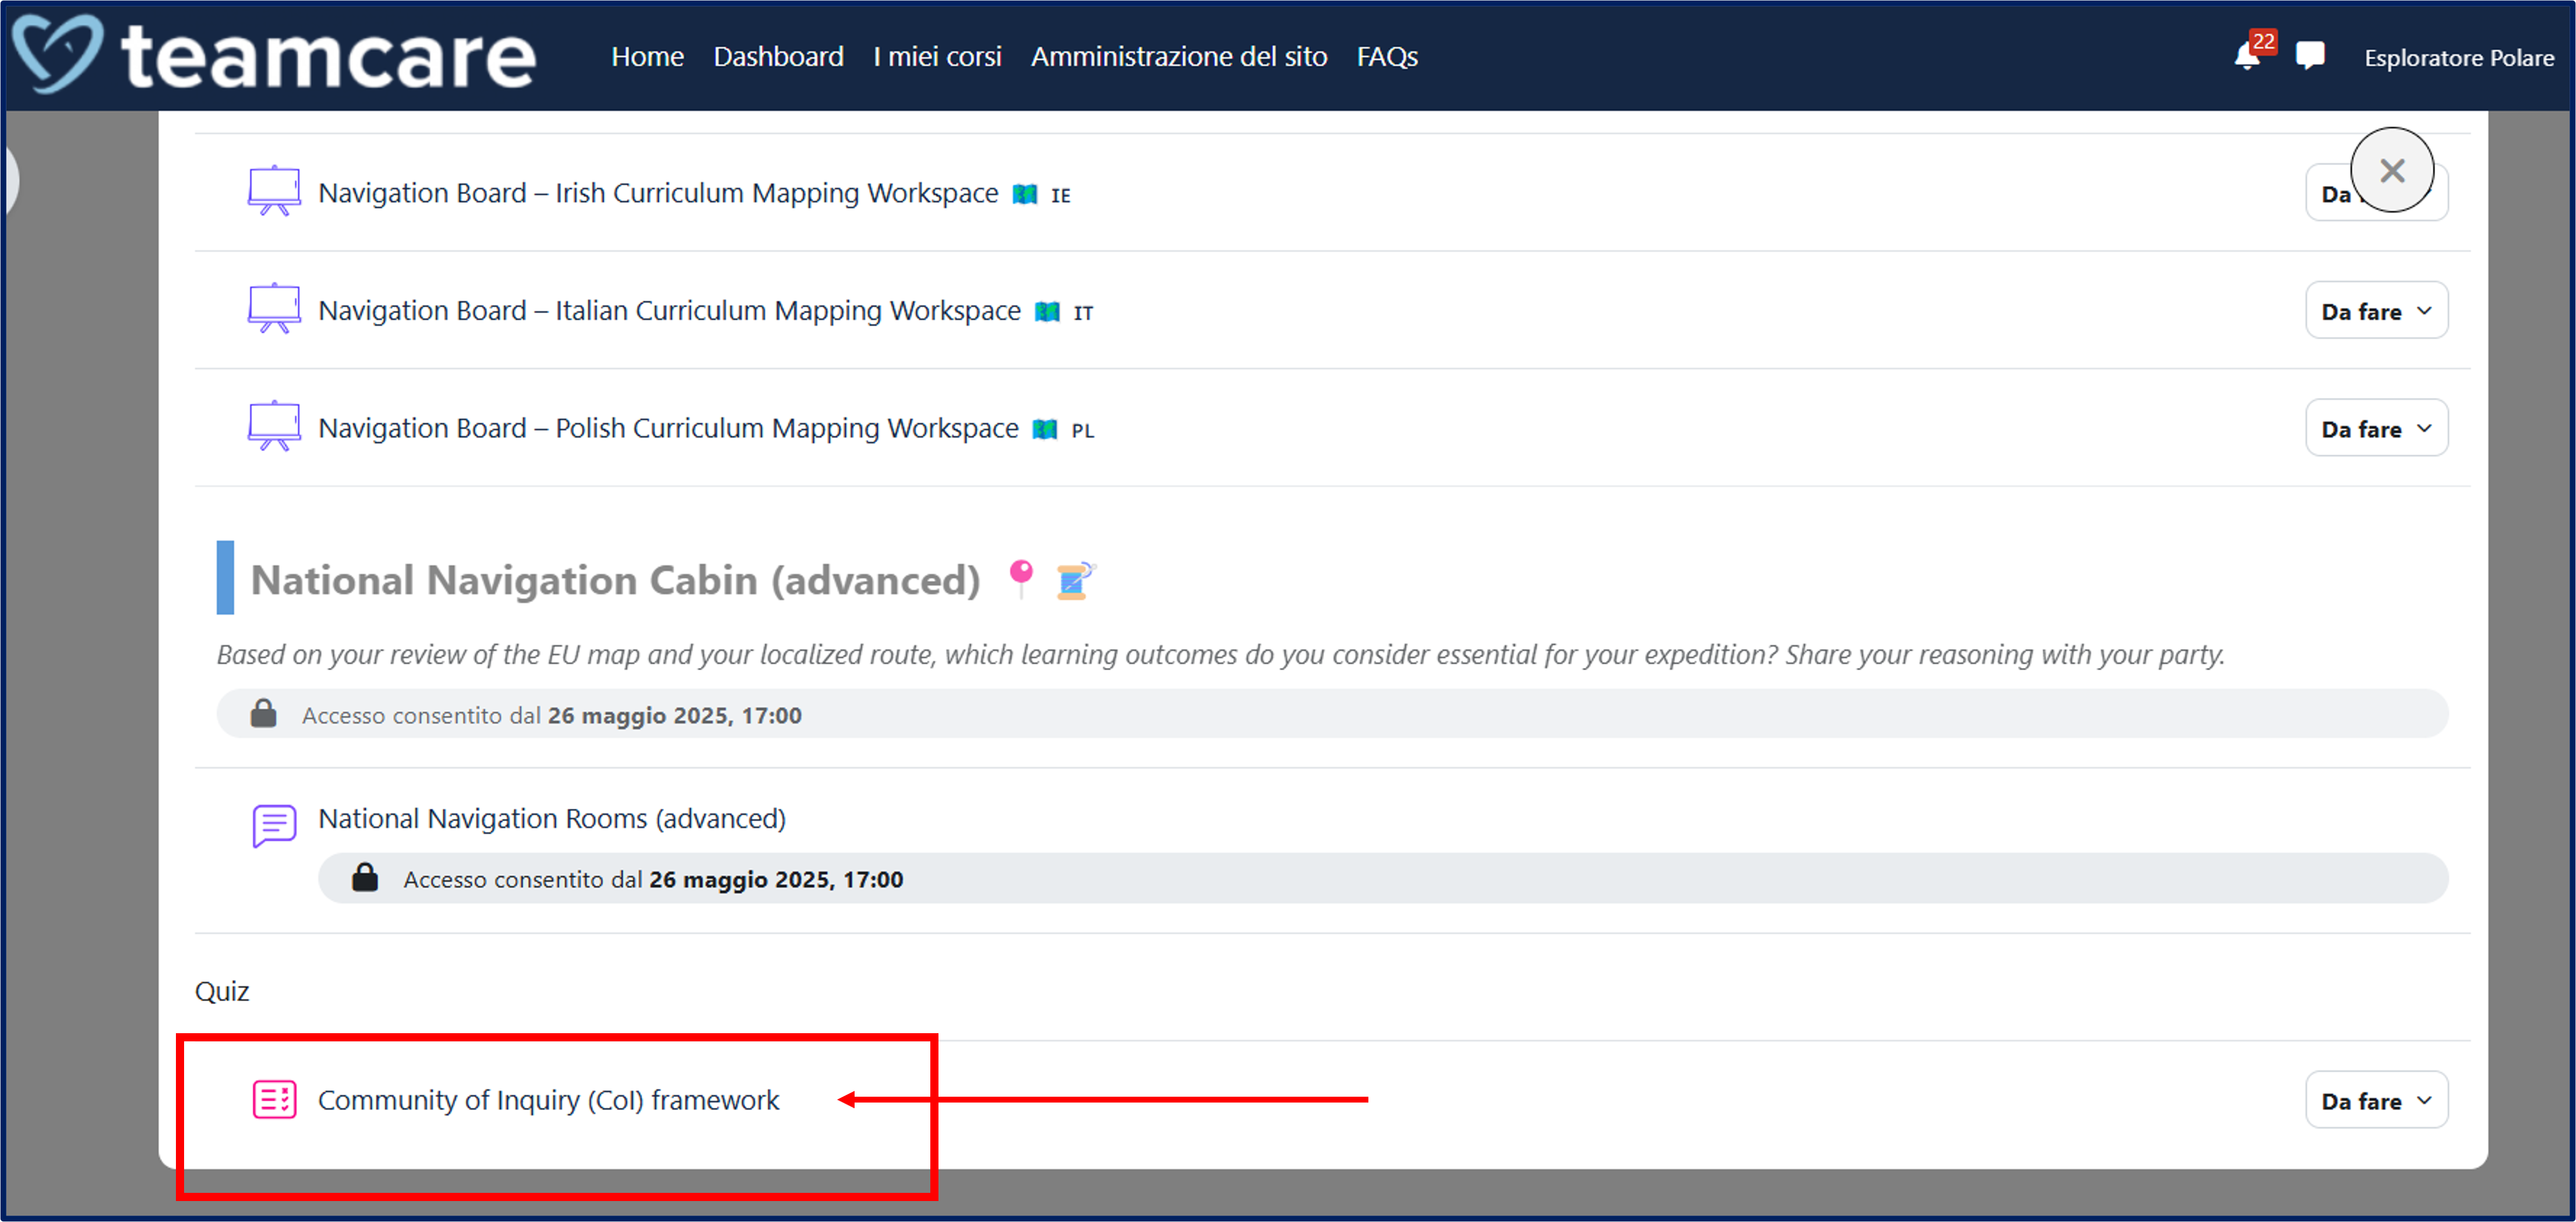
To access a quiz on the platform, click on the Quiz title in the homepage of the course.
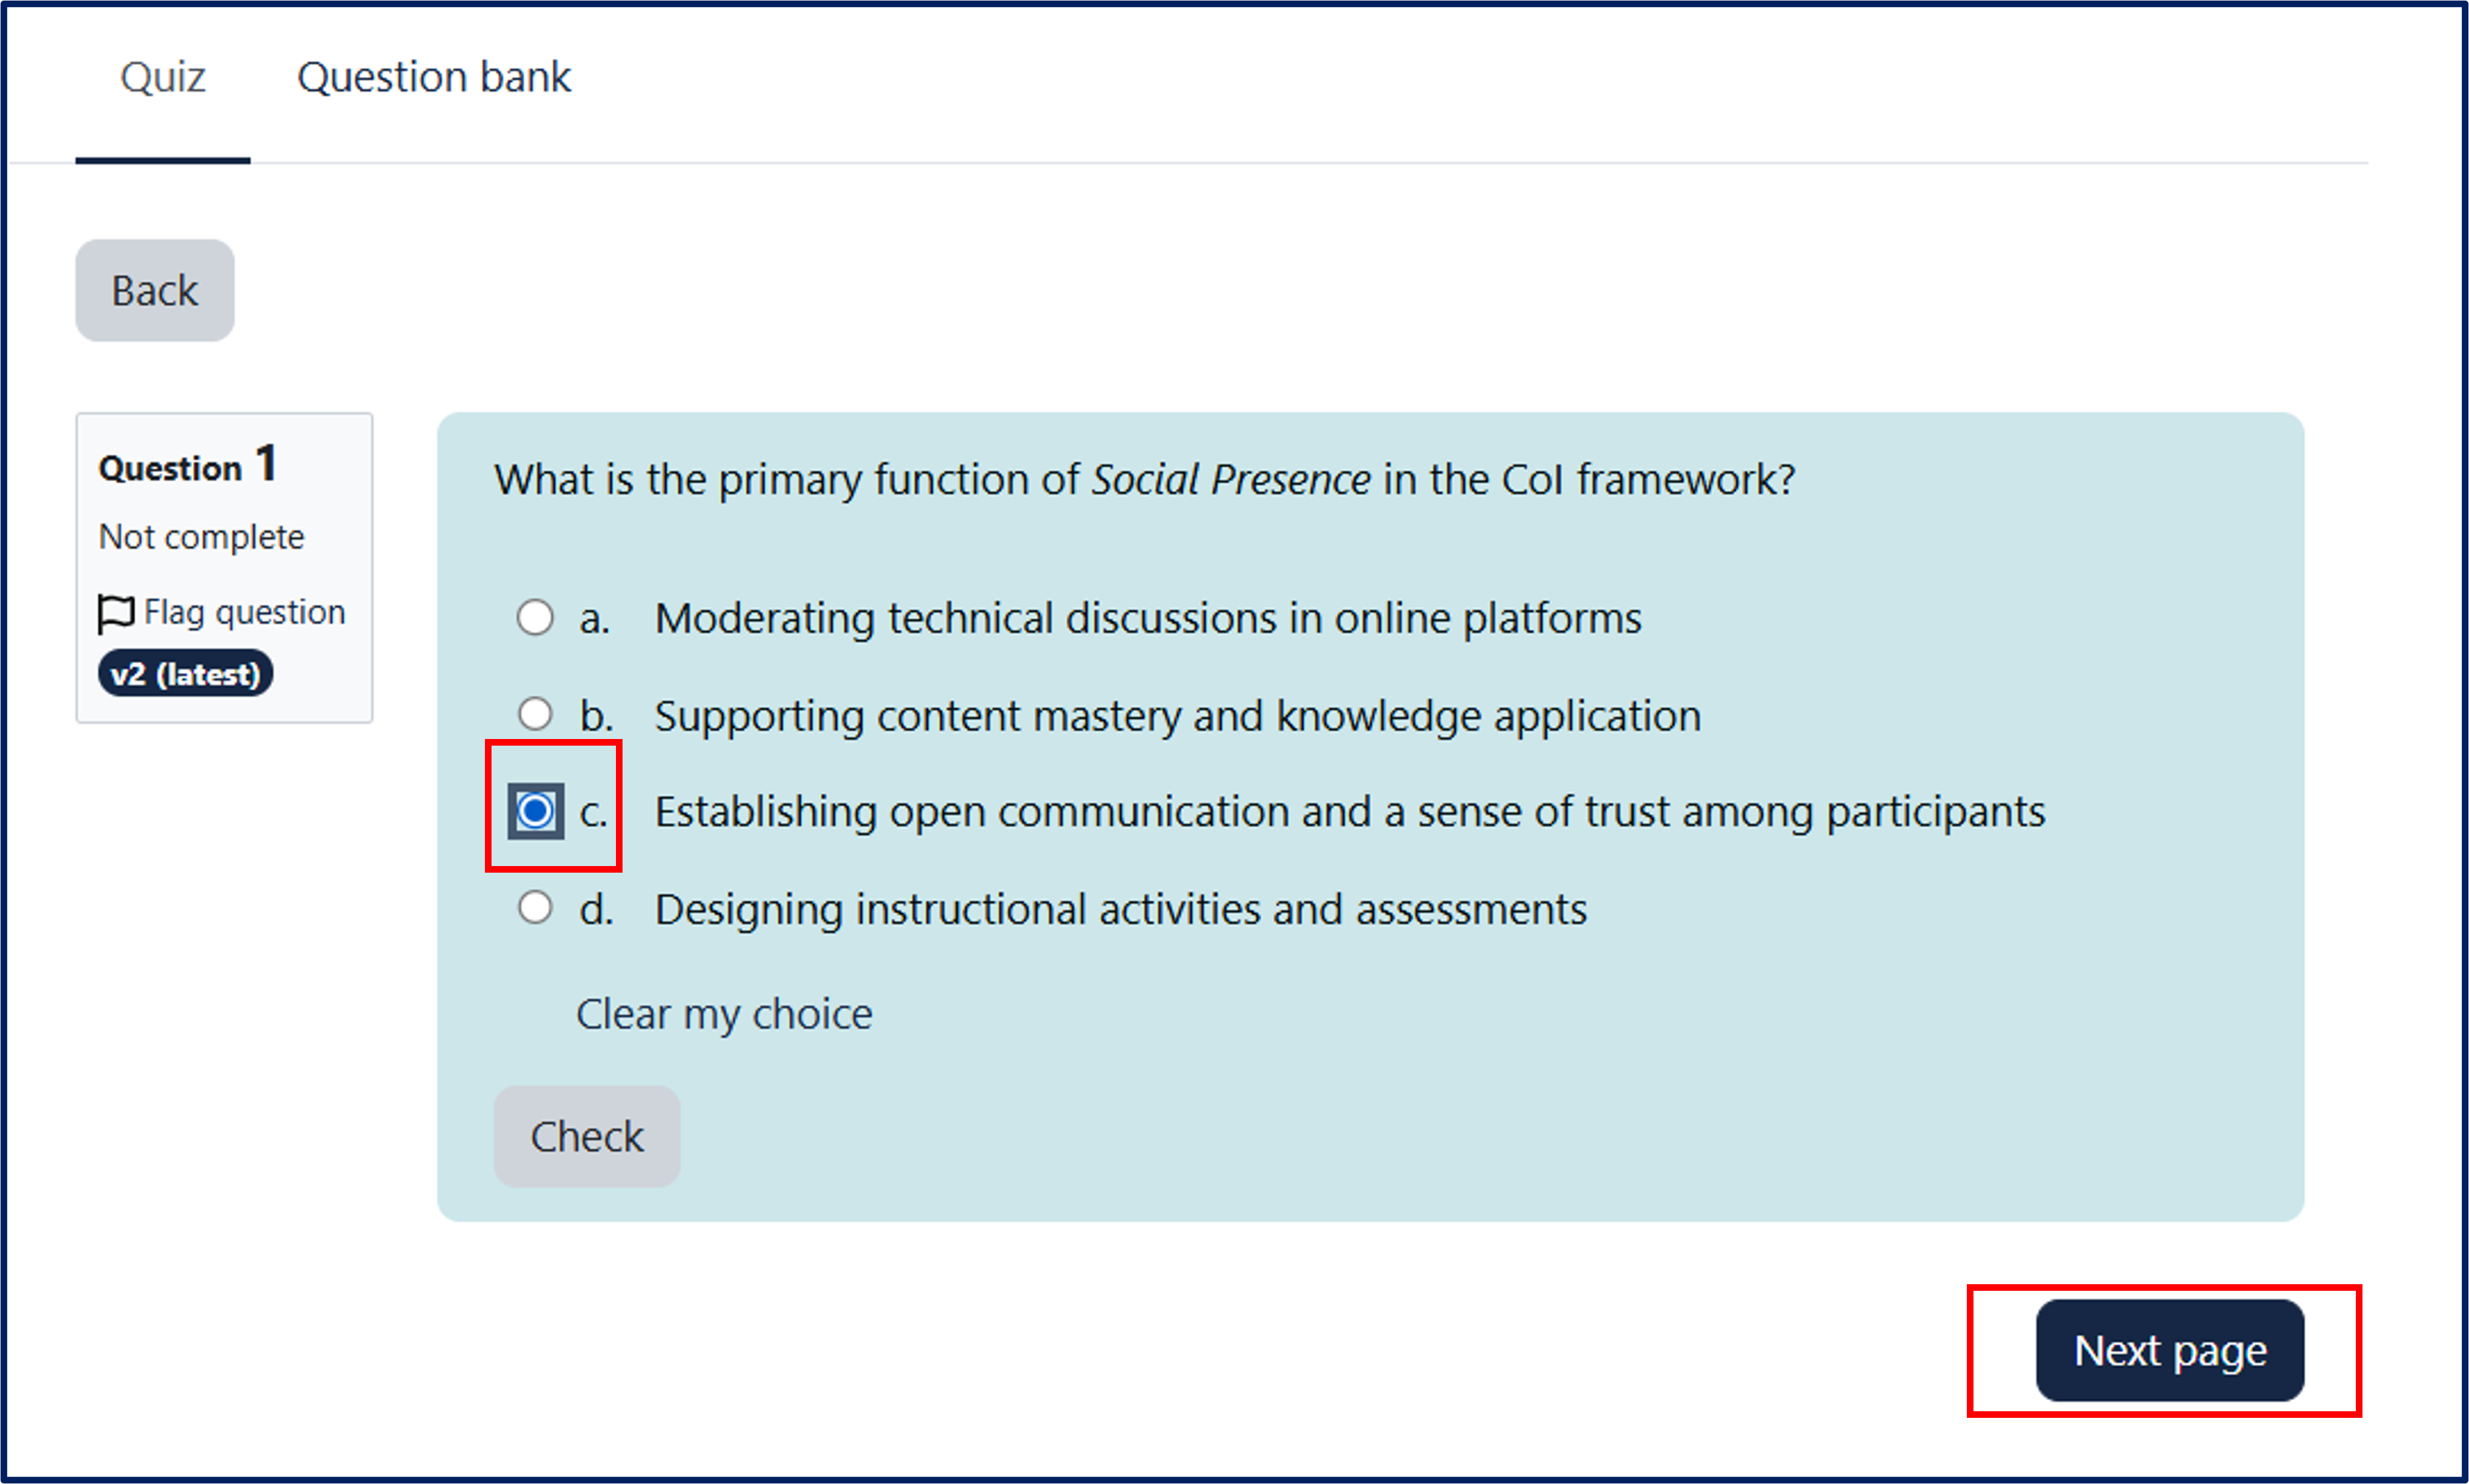
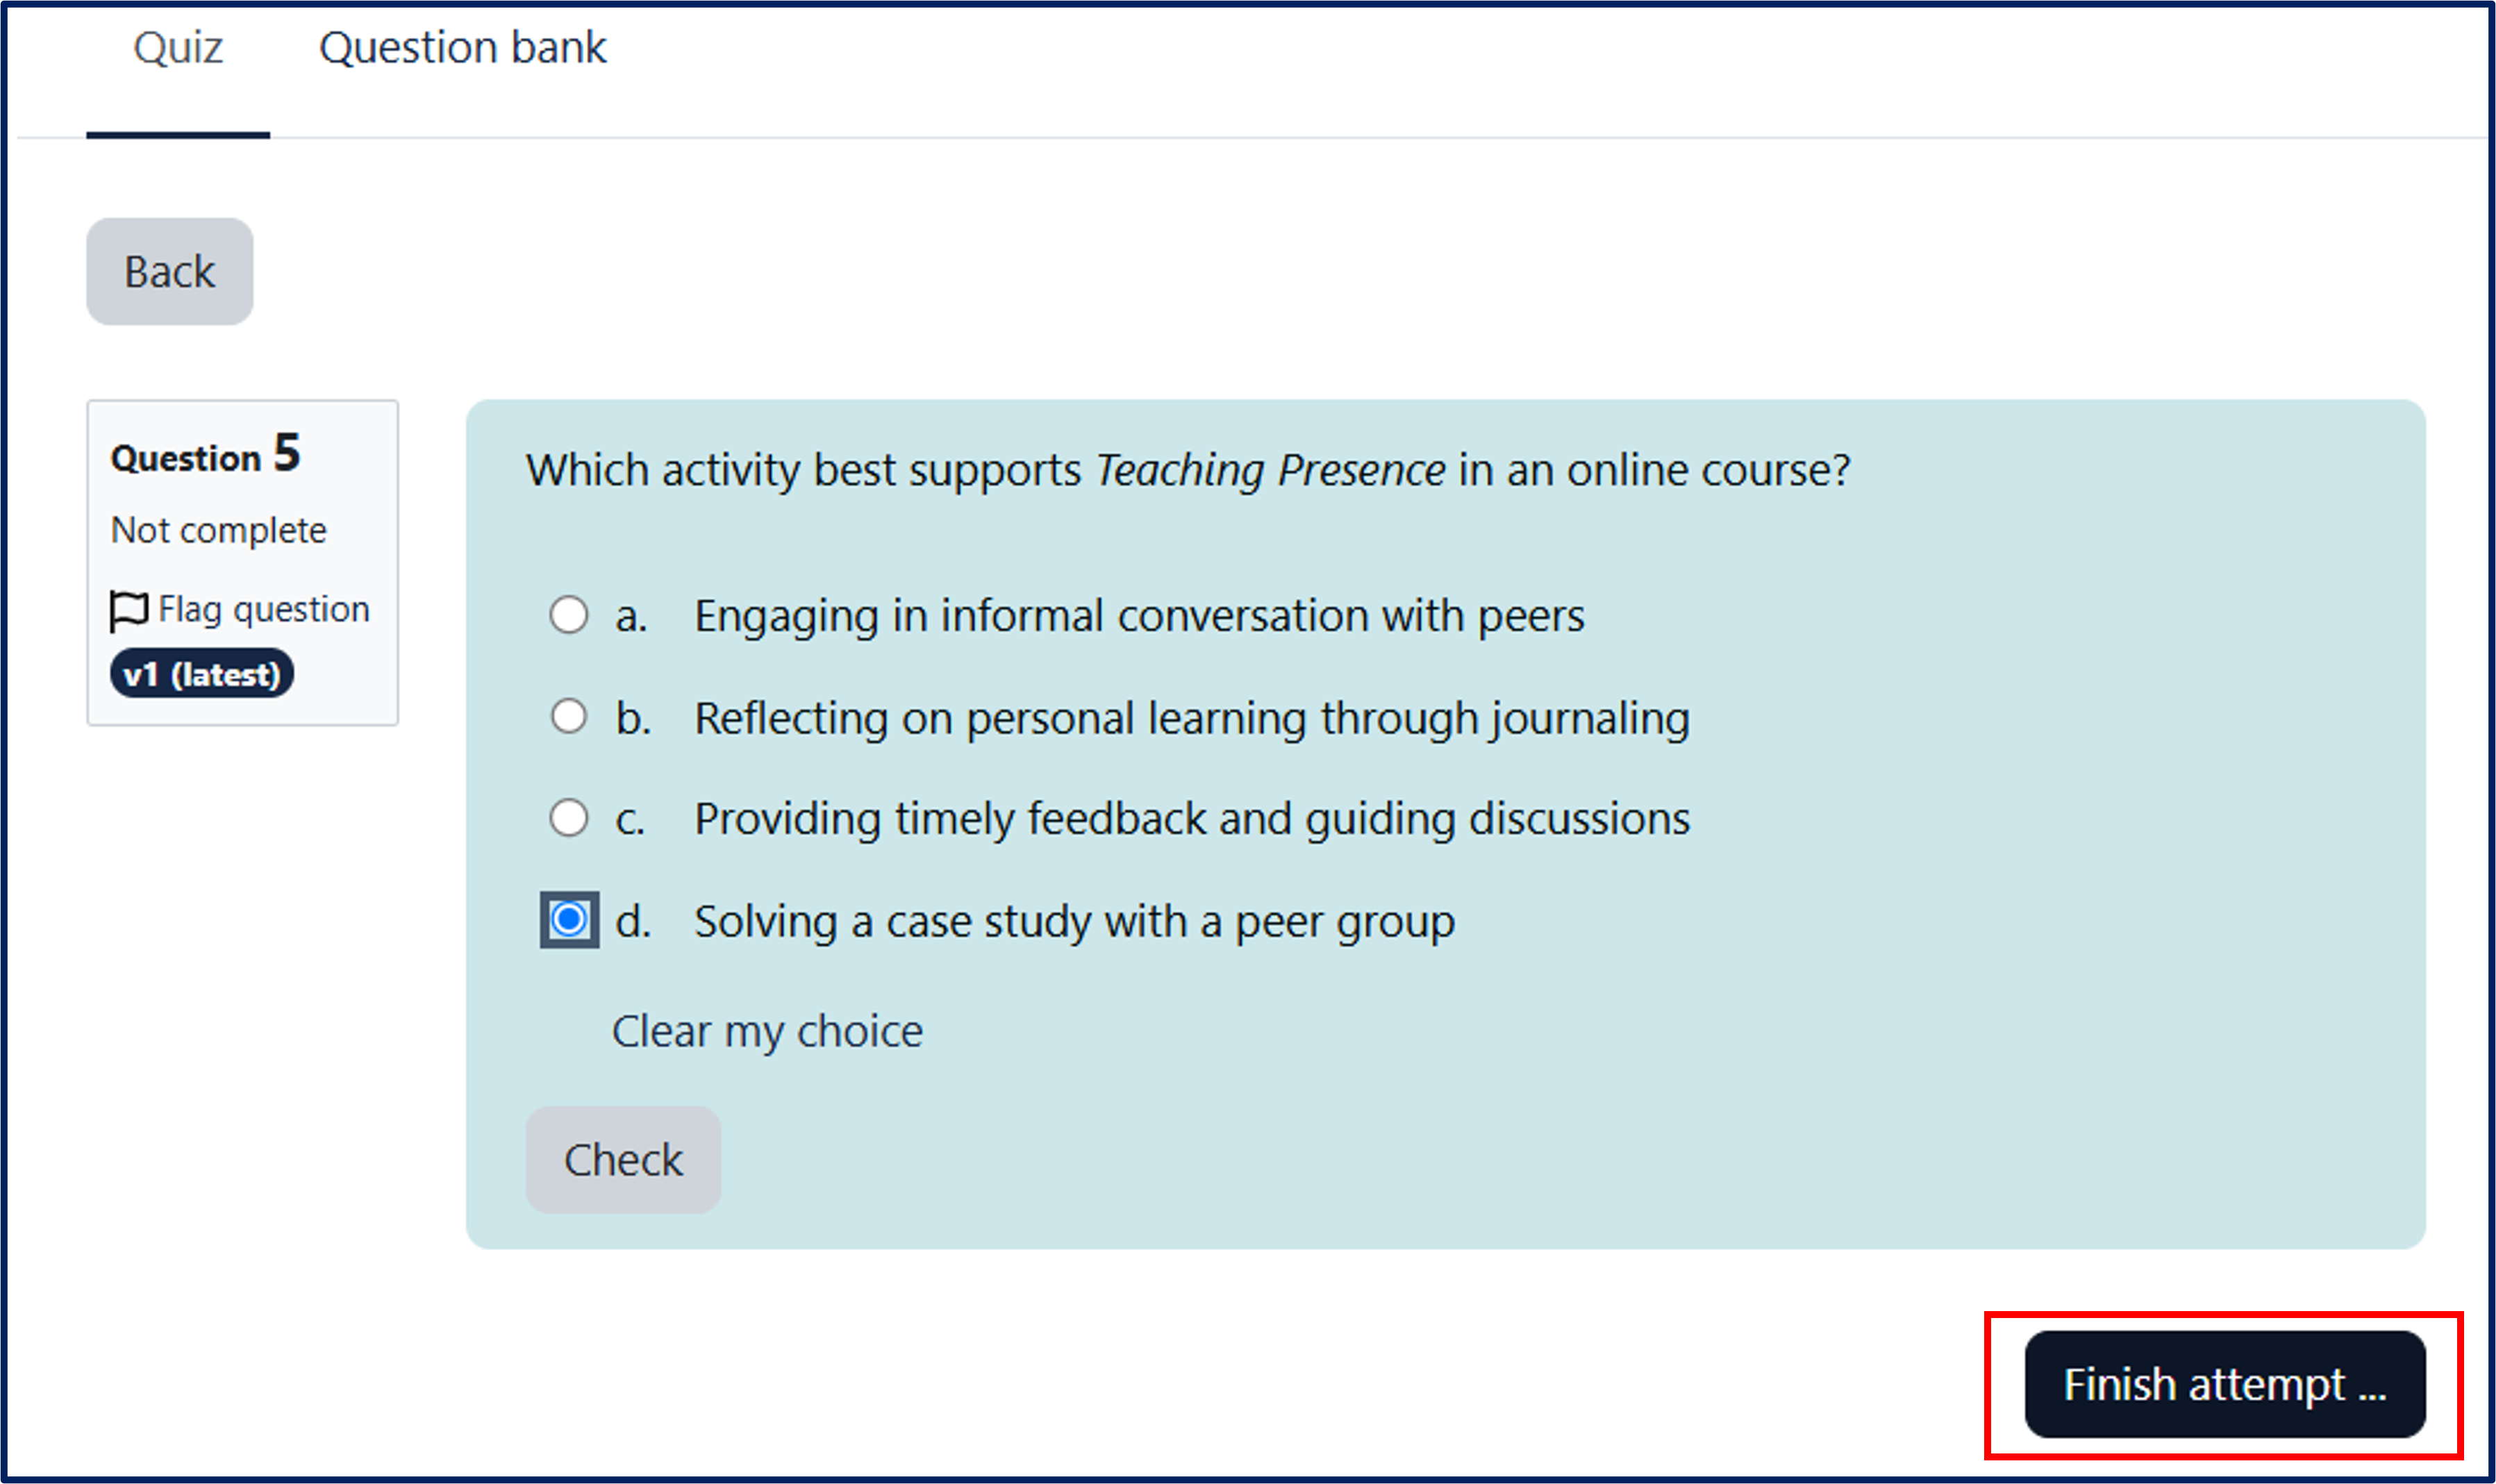
The quiz consists of multiple-choice questions.
Once you have selected an answer option, you can cancel your choice and select another answer by clicking "Clear my choice."
![]()
By clicking the "Check" button, you can immediately verify whether your answer is correct or incorrect.
Immediate feedback will appear next to the selected answer.
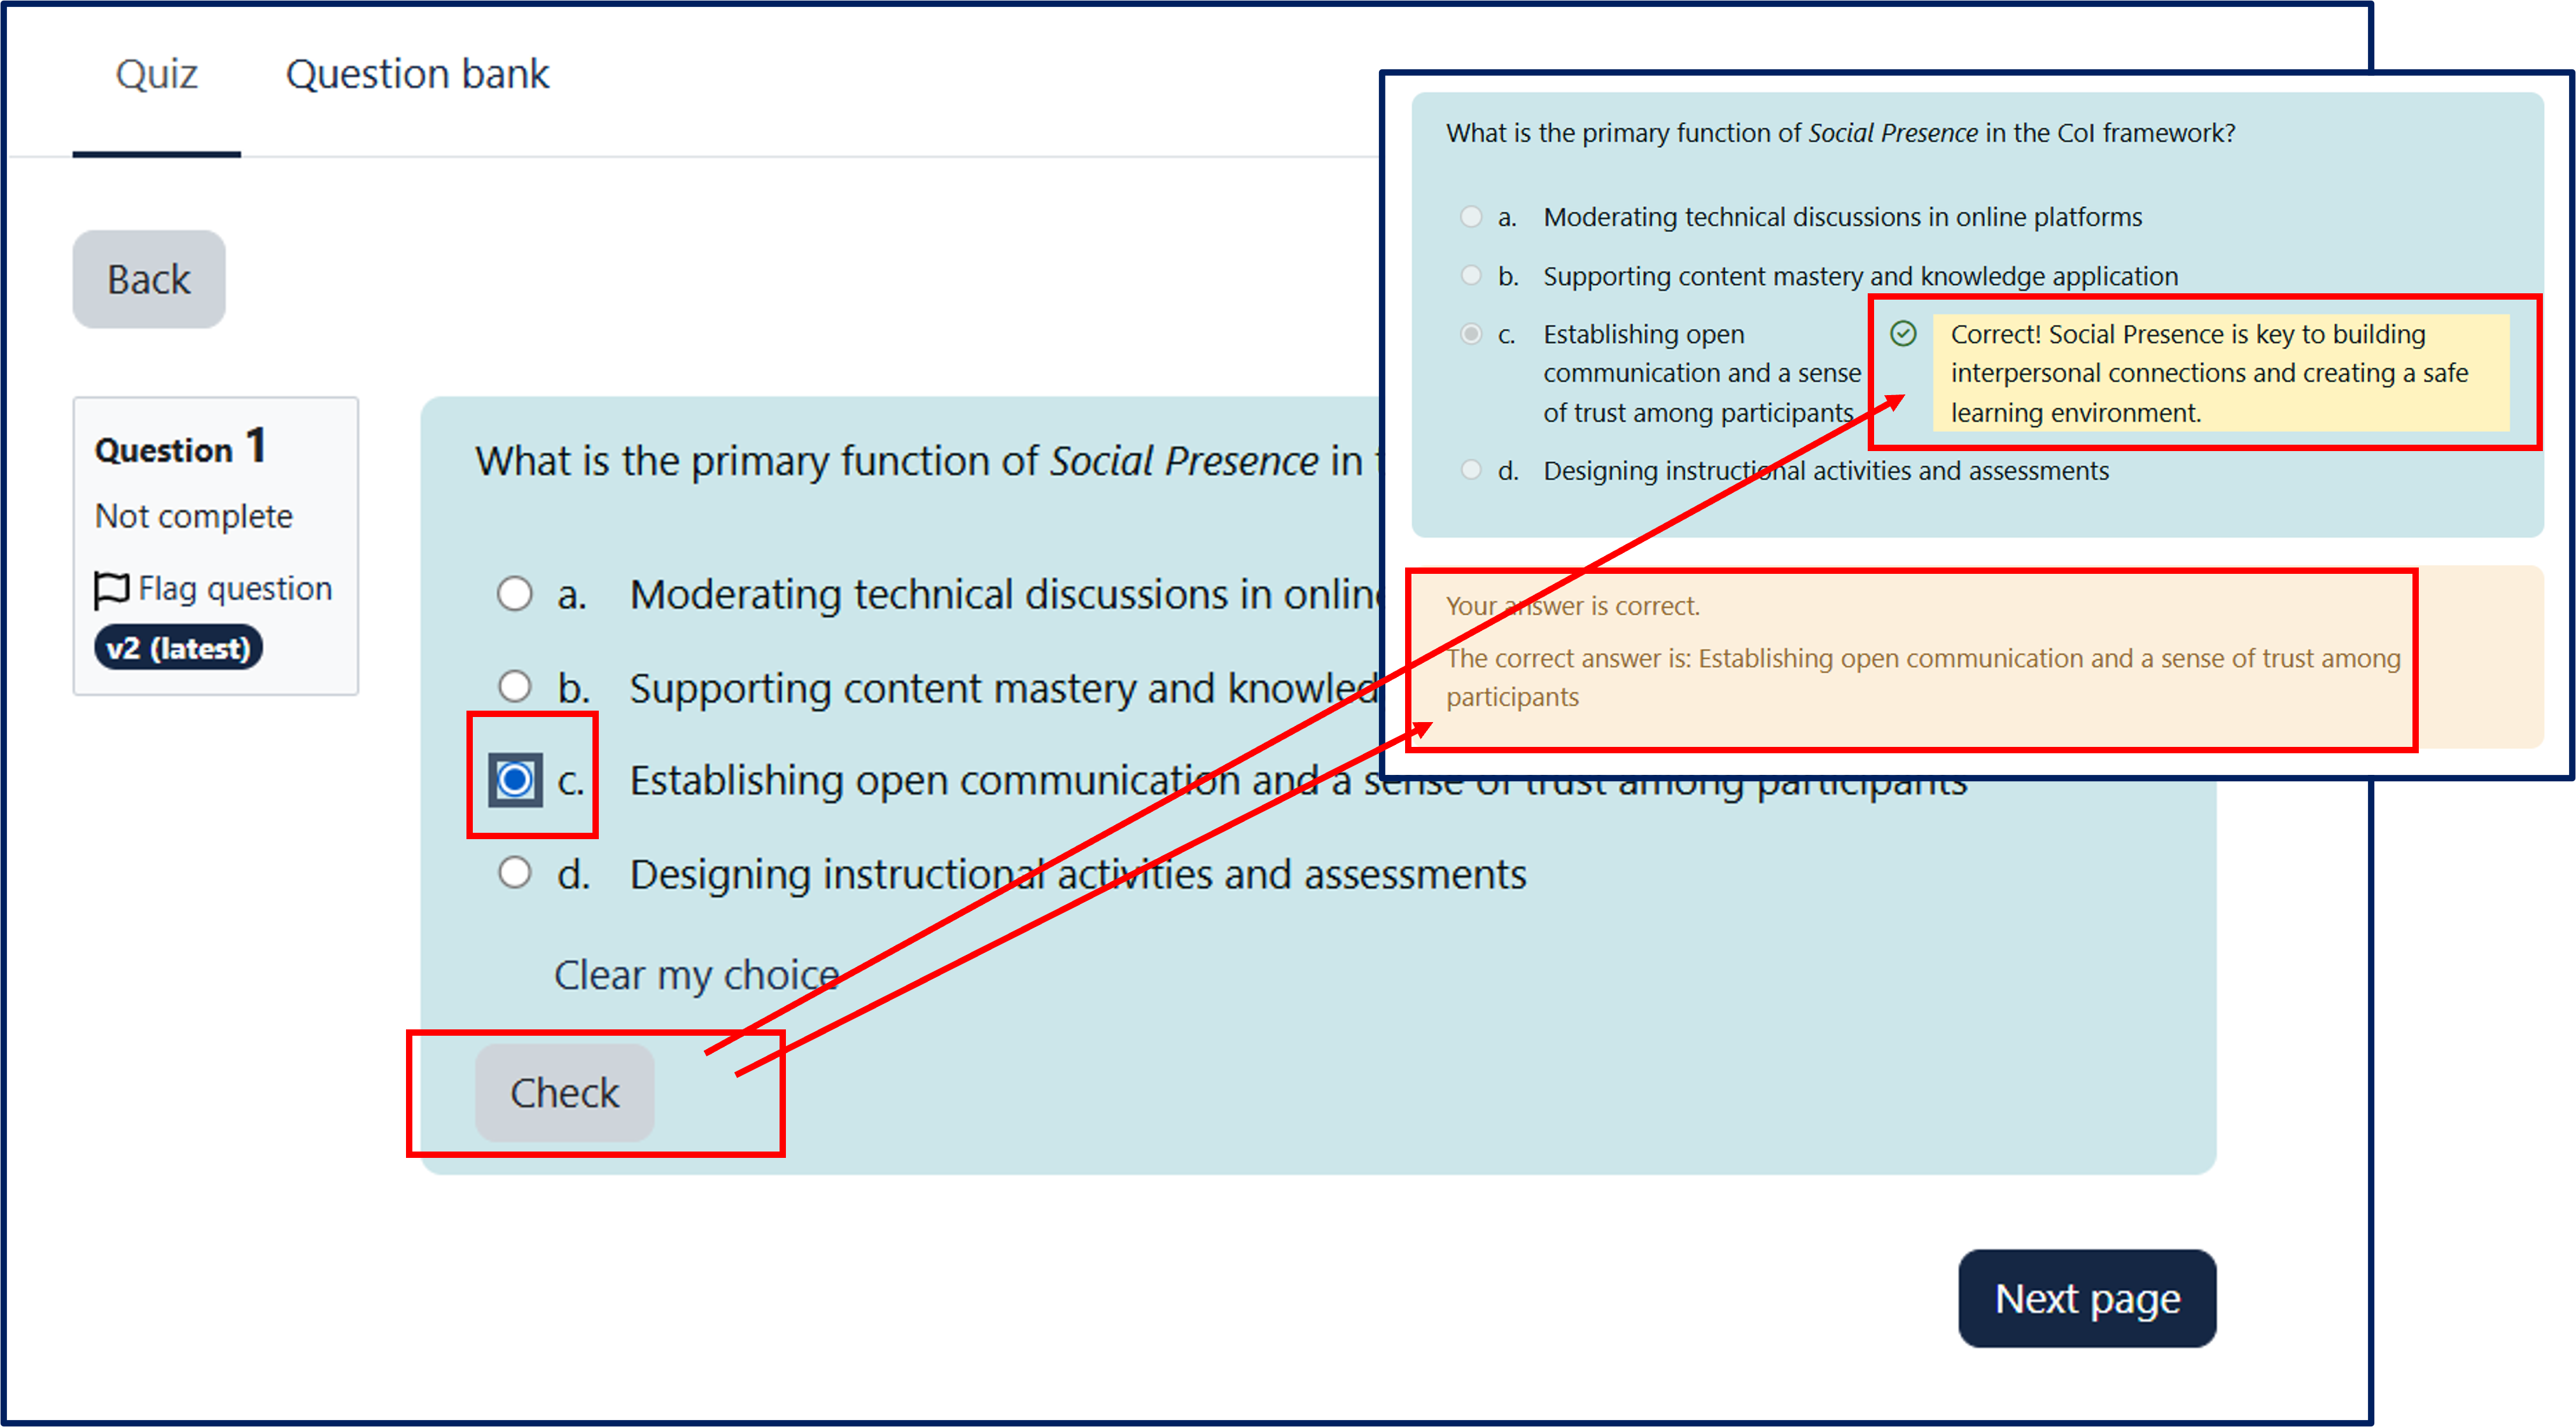
You can also proceed directly to the next question by clicking the "Next page" button.
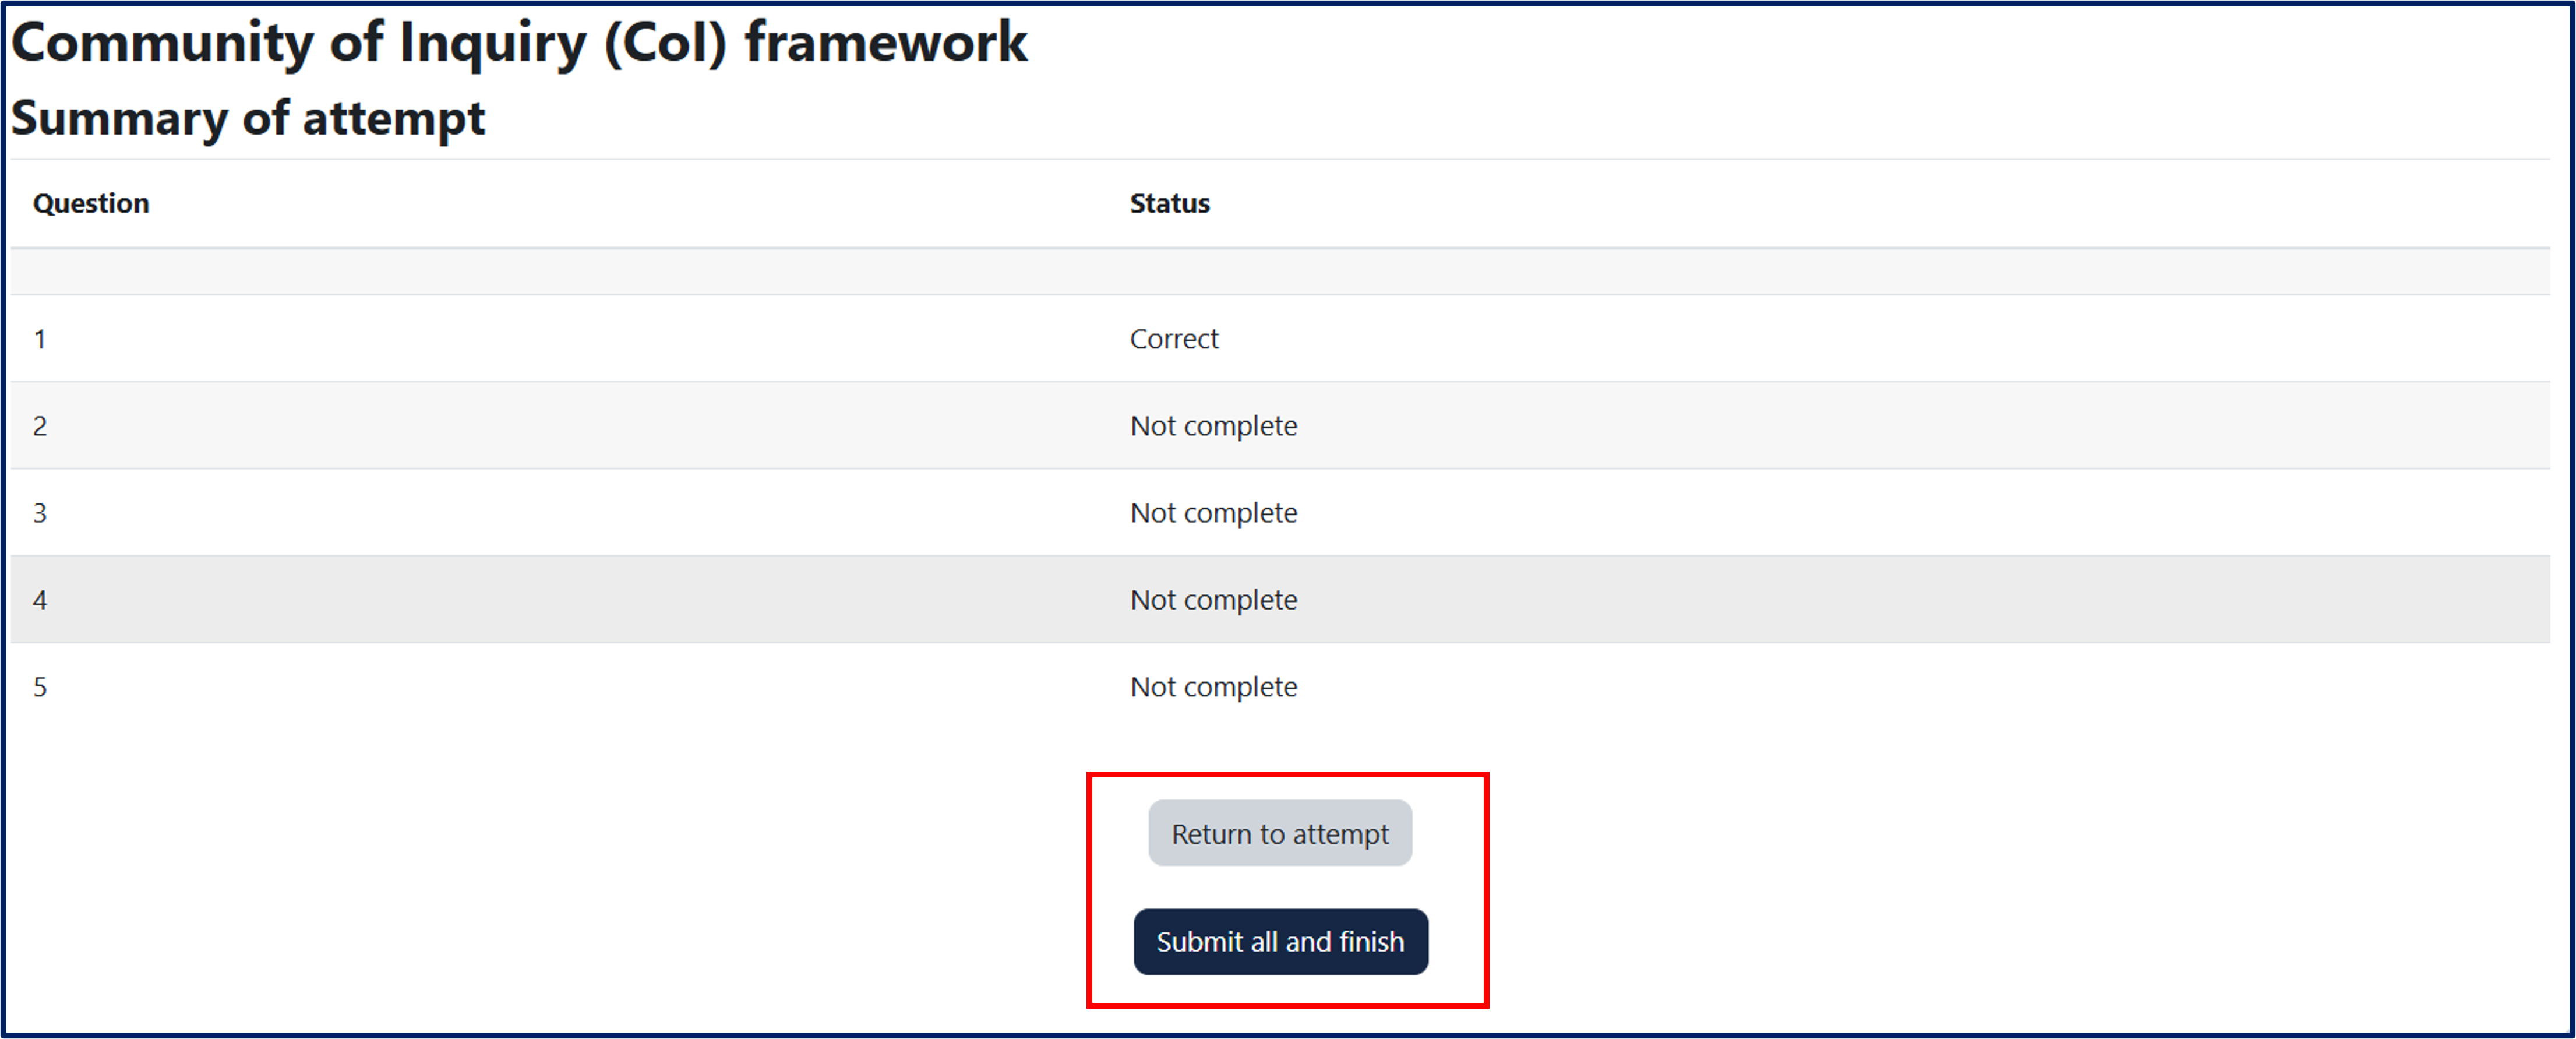
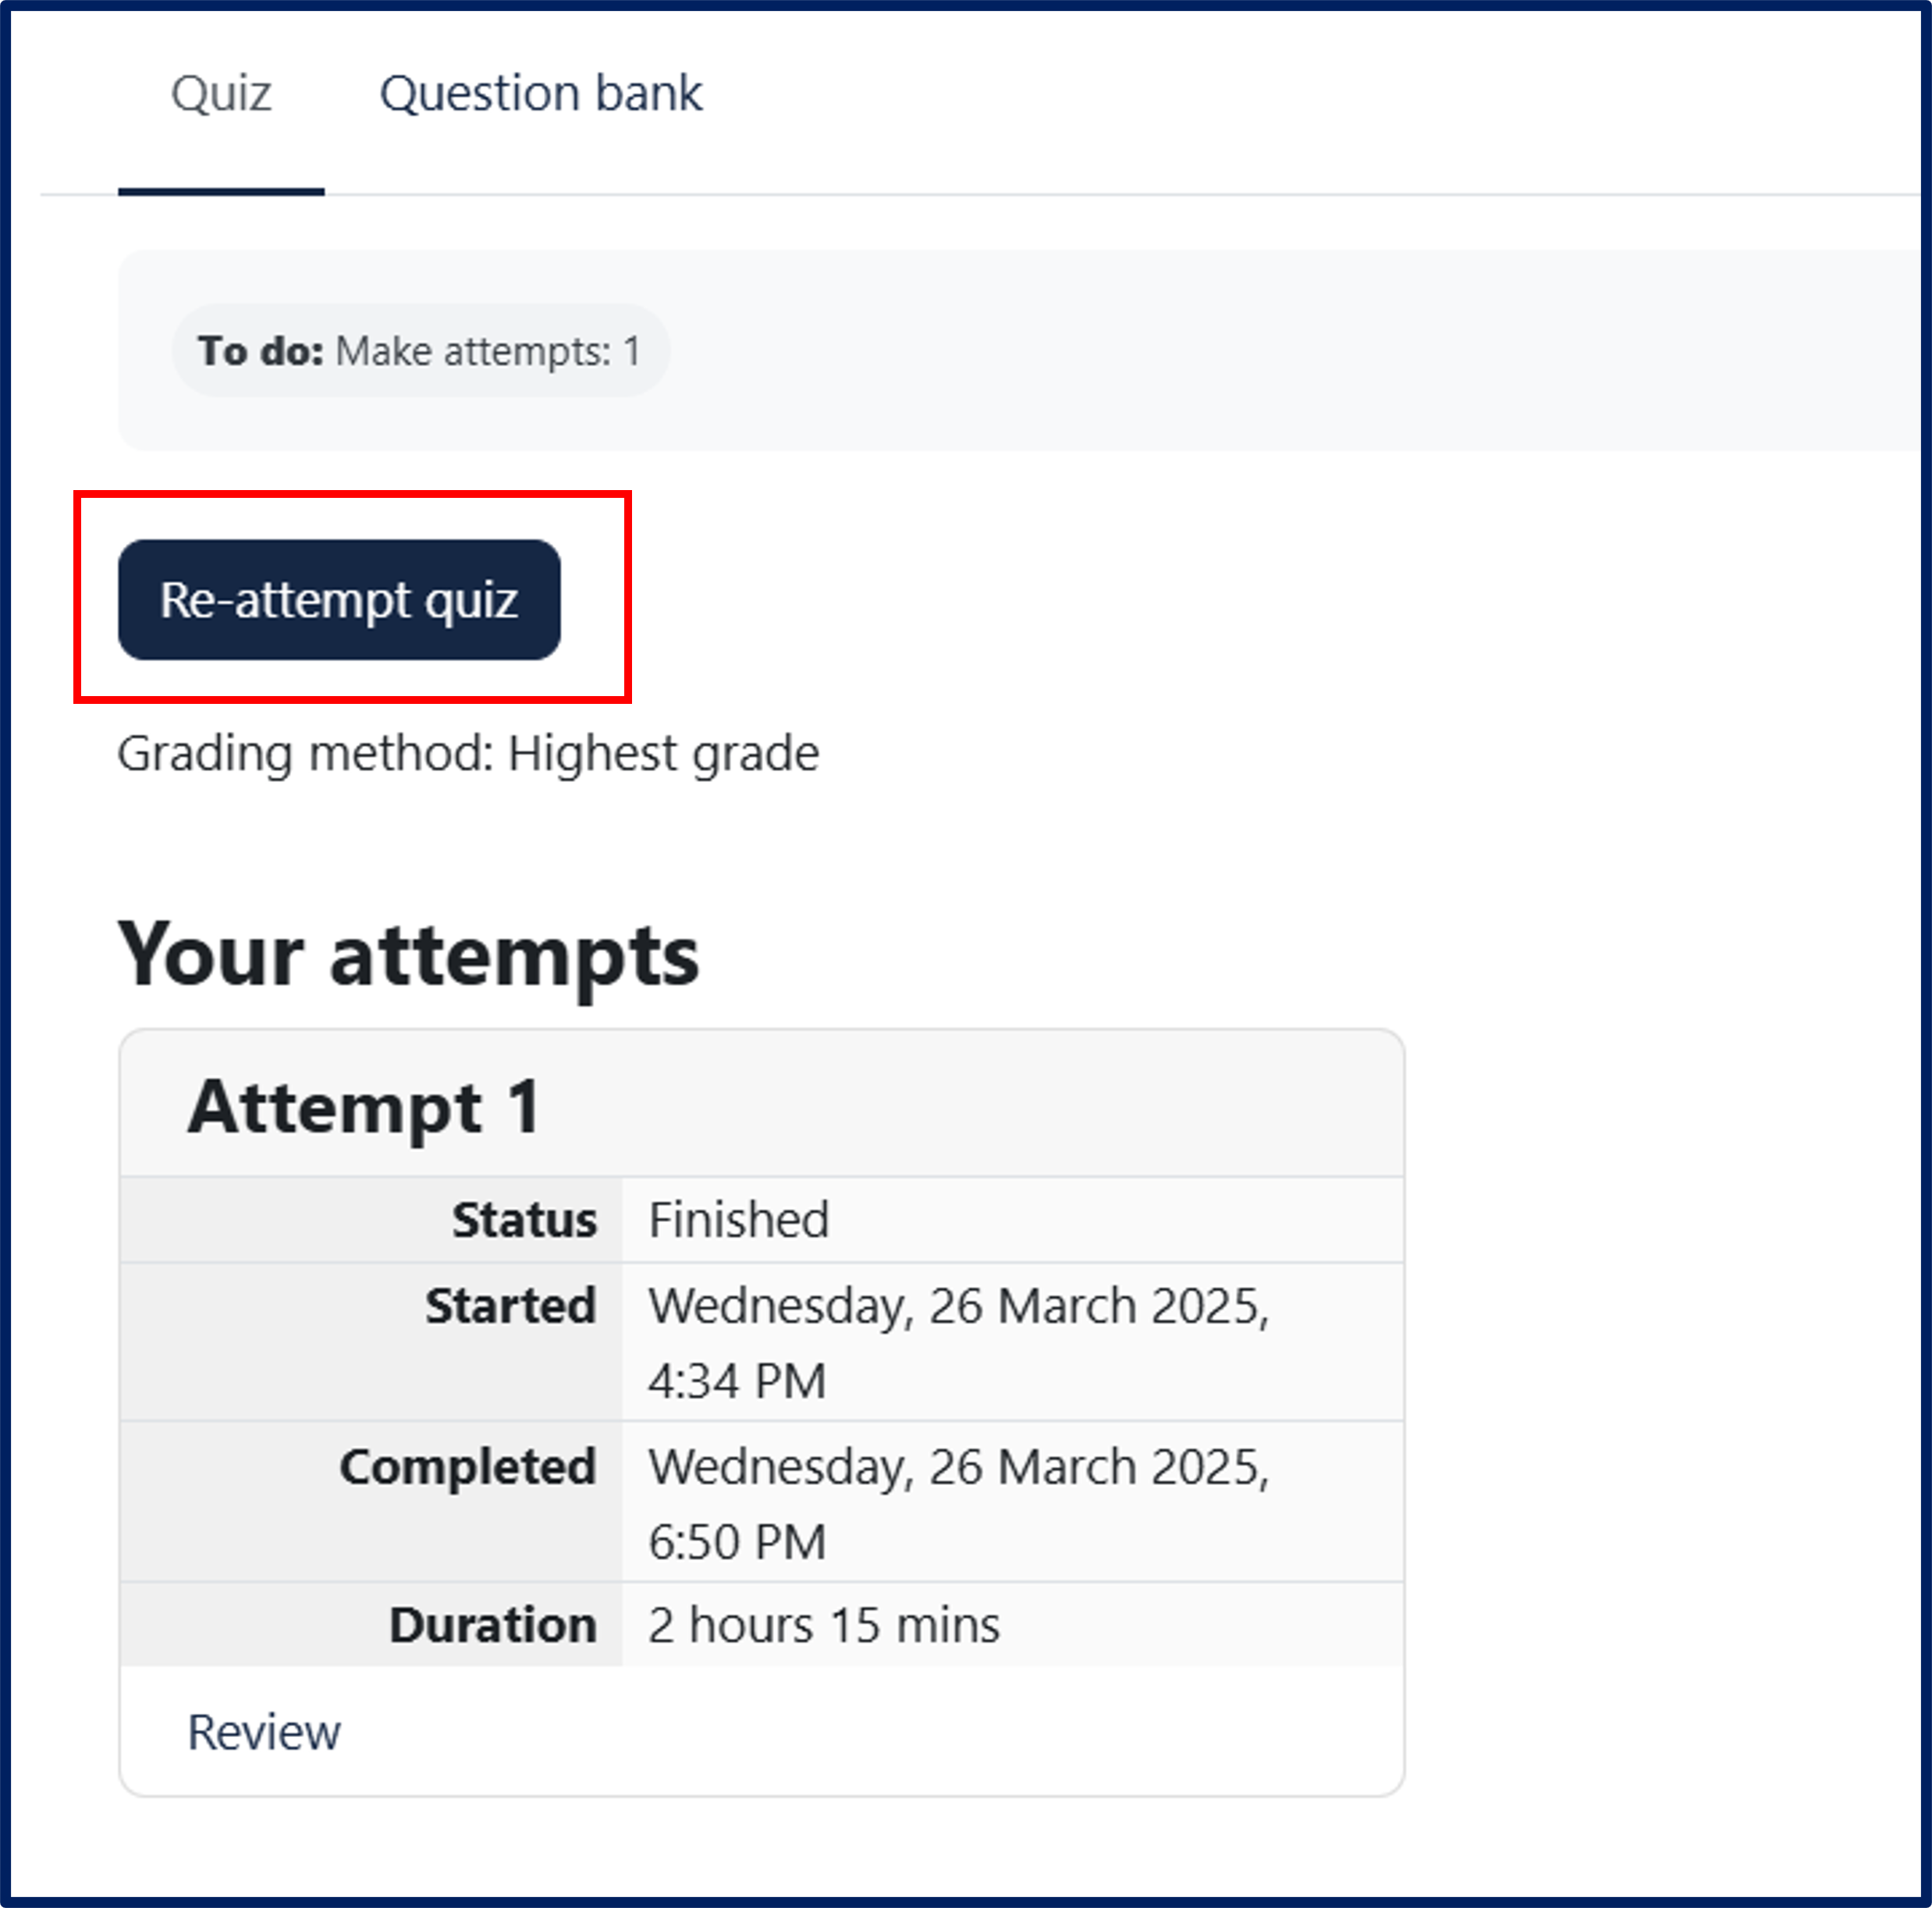
At the end of the quiz, click "Finish attempt."
A table will appear with a summary of the answers given and/or not given. At the bottom, there are two buttons:
- "Return to attempt" to go back to the last question of the quiz.
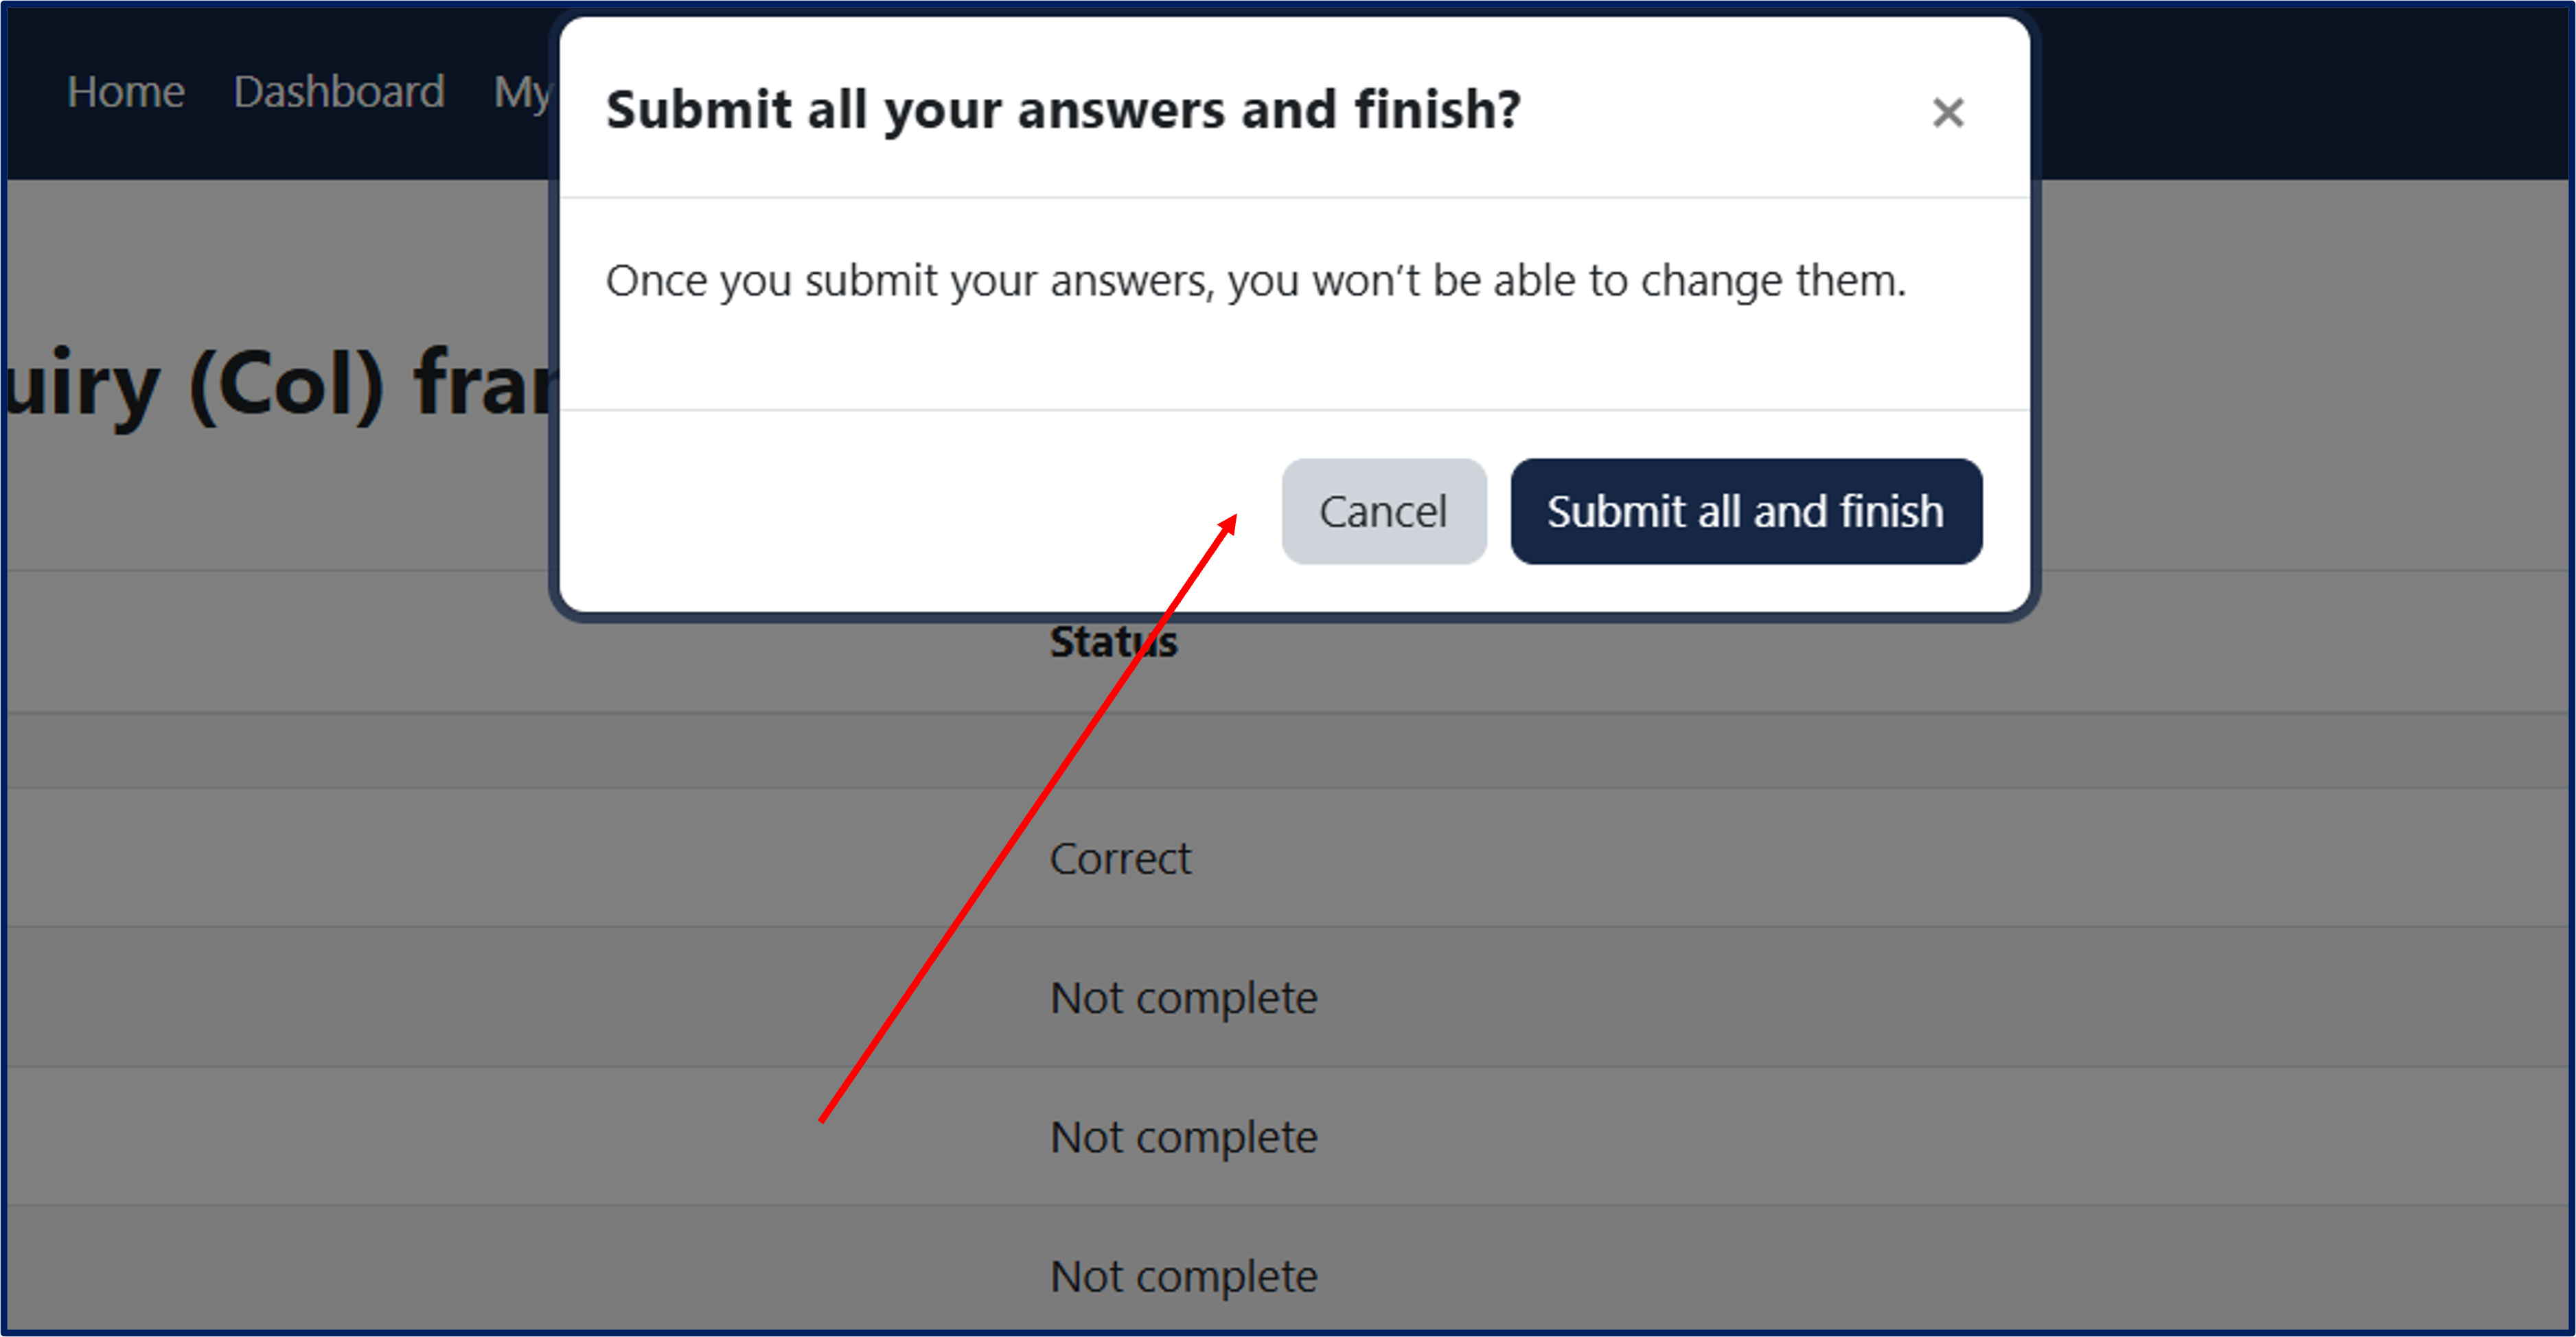
- "Submit all and finish" to complete and submit your attempt permanently.
A pop-up will appear to confirm the choice ("Submit all and finish") or cancel the action ("Cancel").
Clicking "Submit all and finish" will allow you to review your attempt.
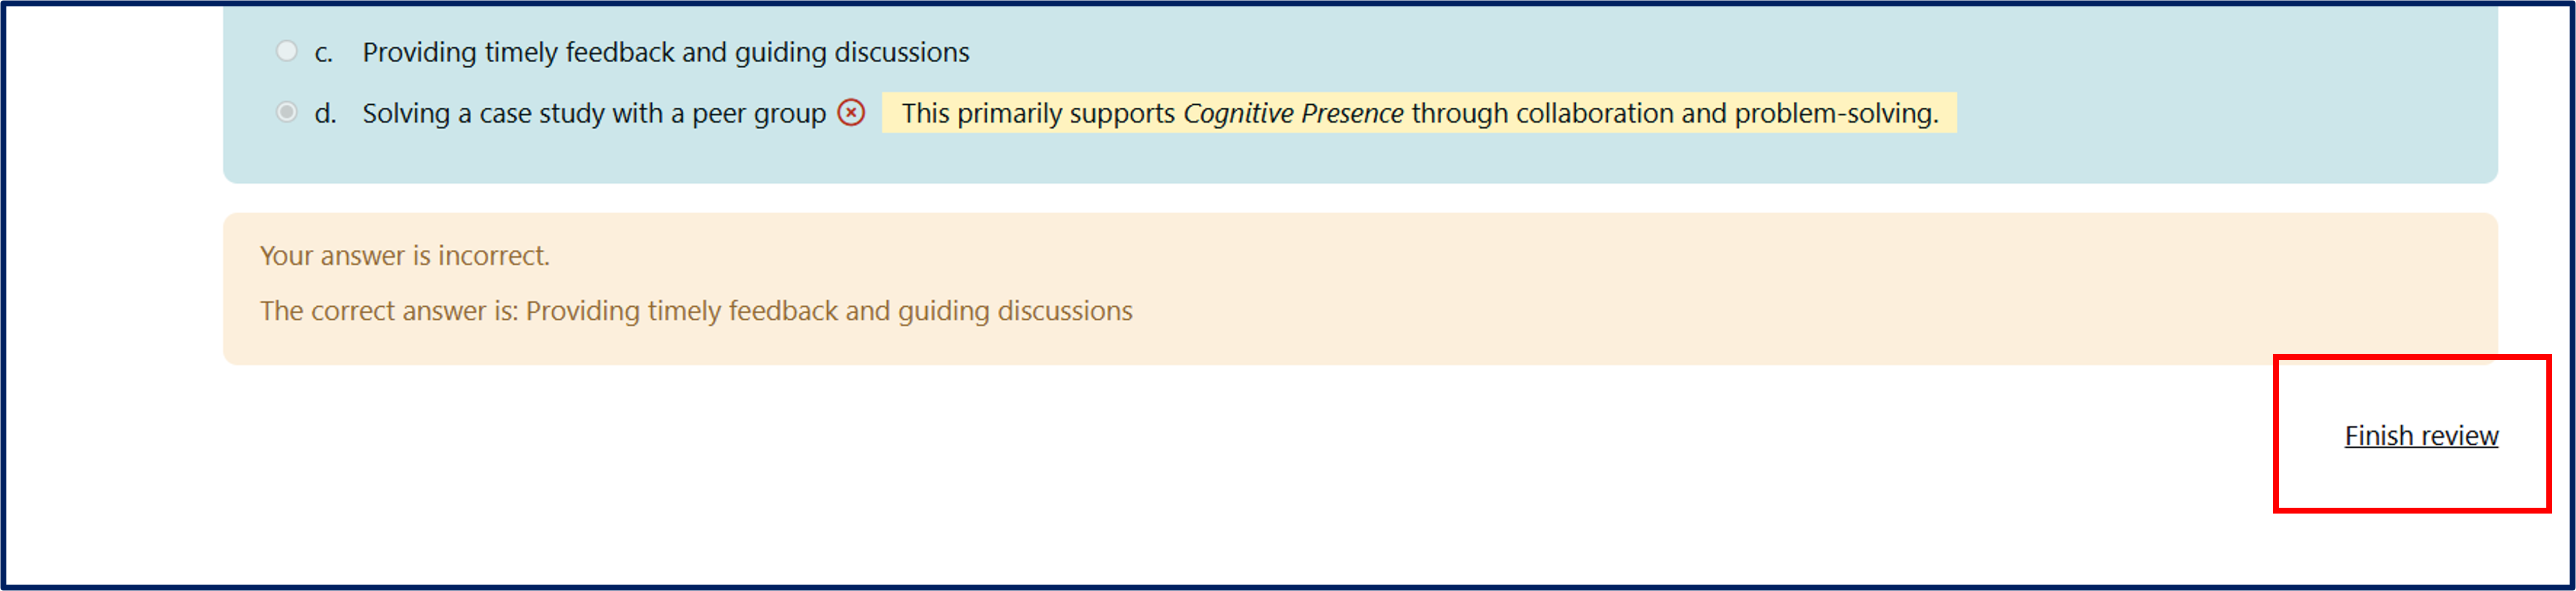
For each question, your given answer will be displayed with:
- Specific feedback explaining why the answer is correct or incorrect.
- General feedback indicating the correct answer option.
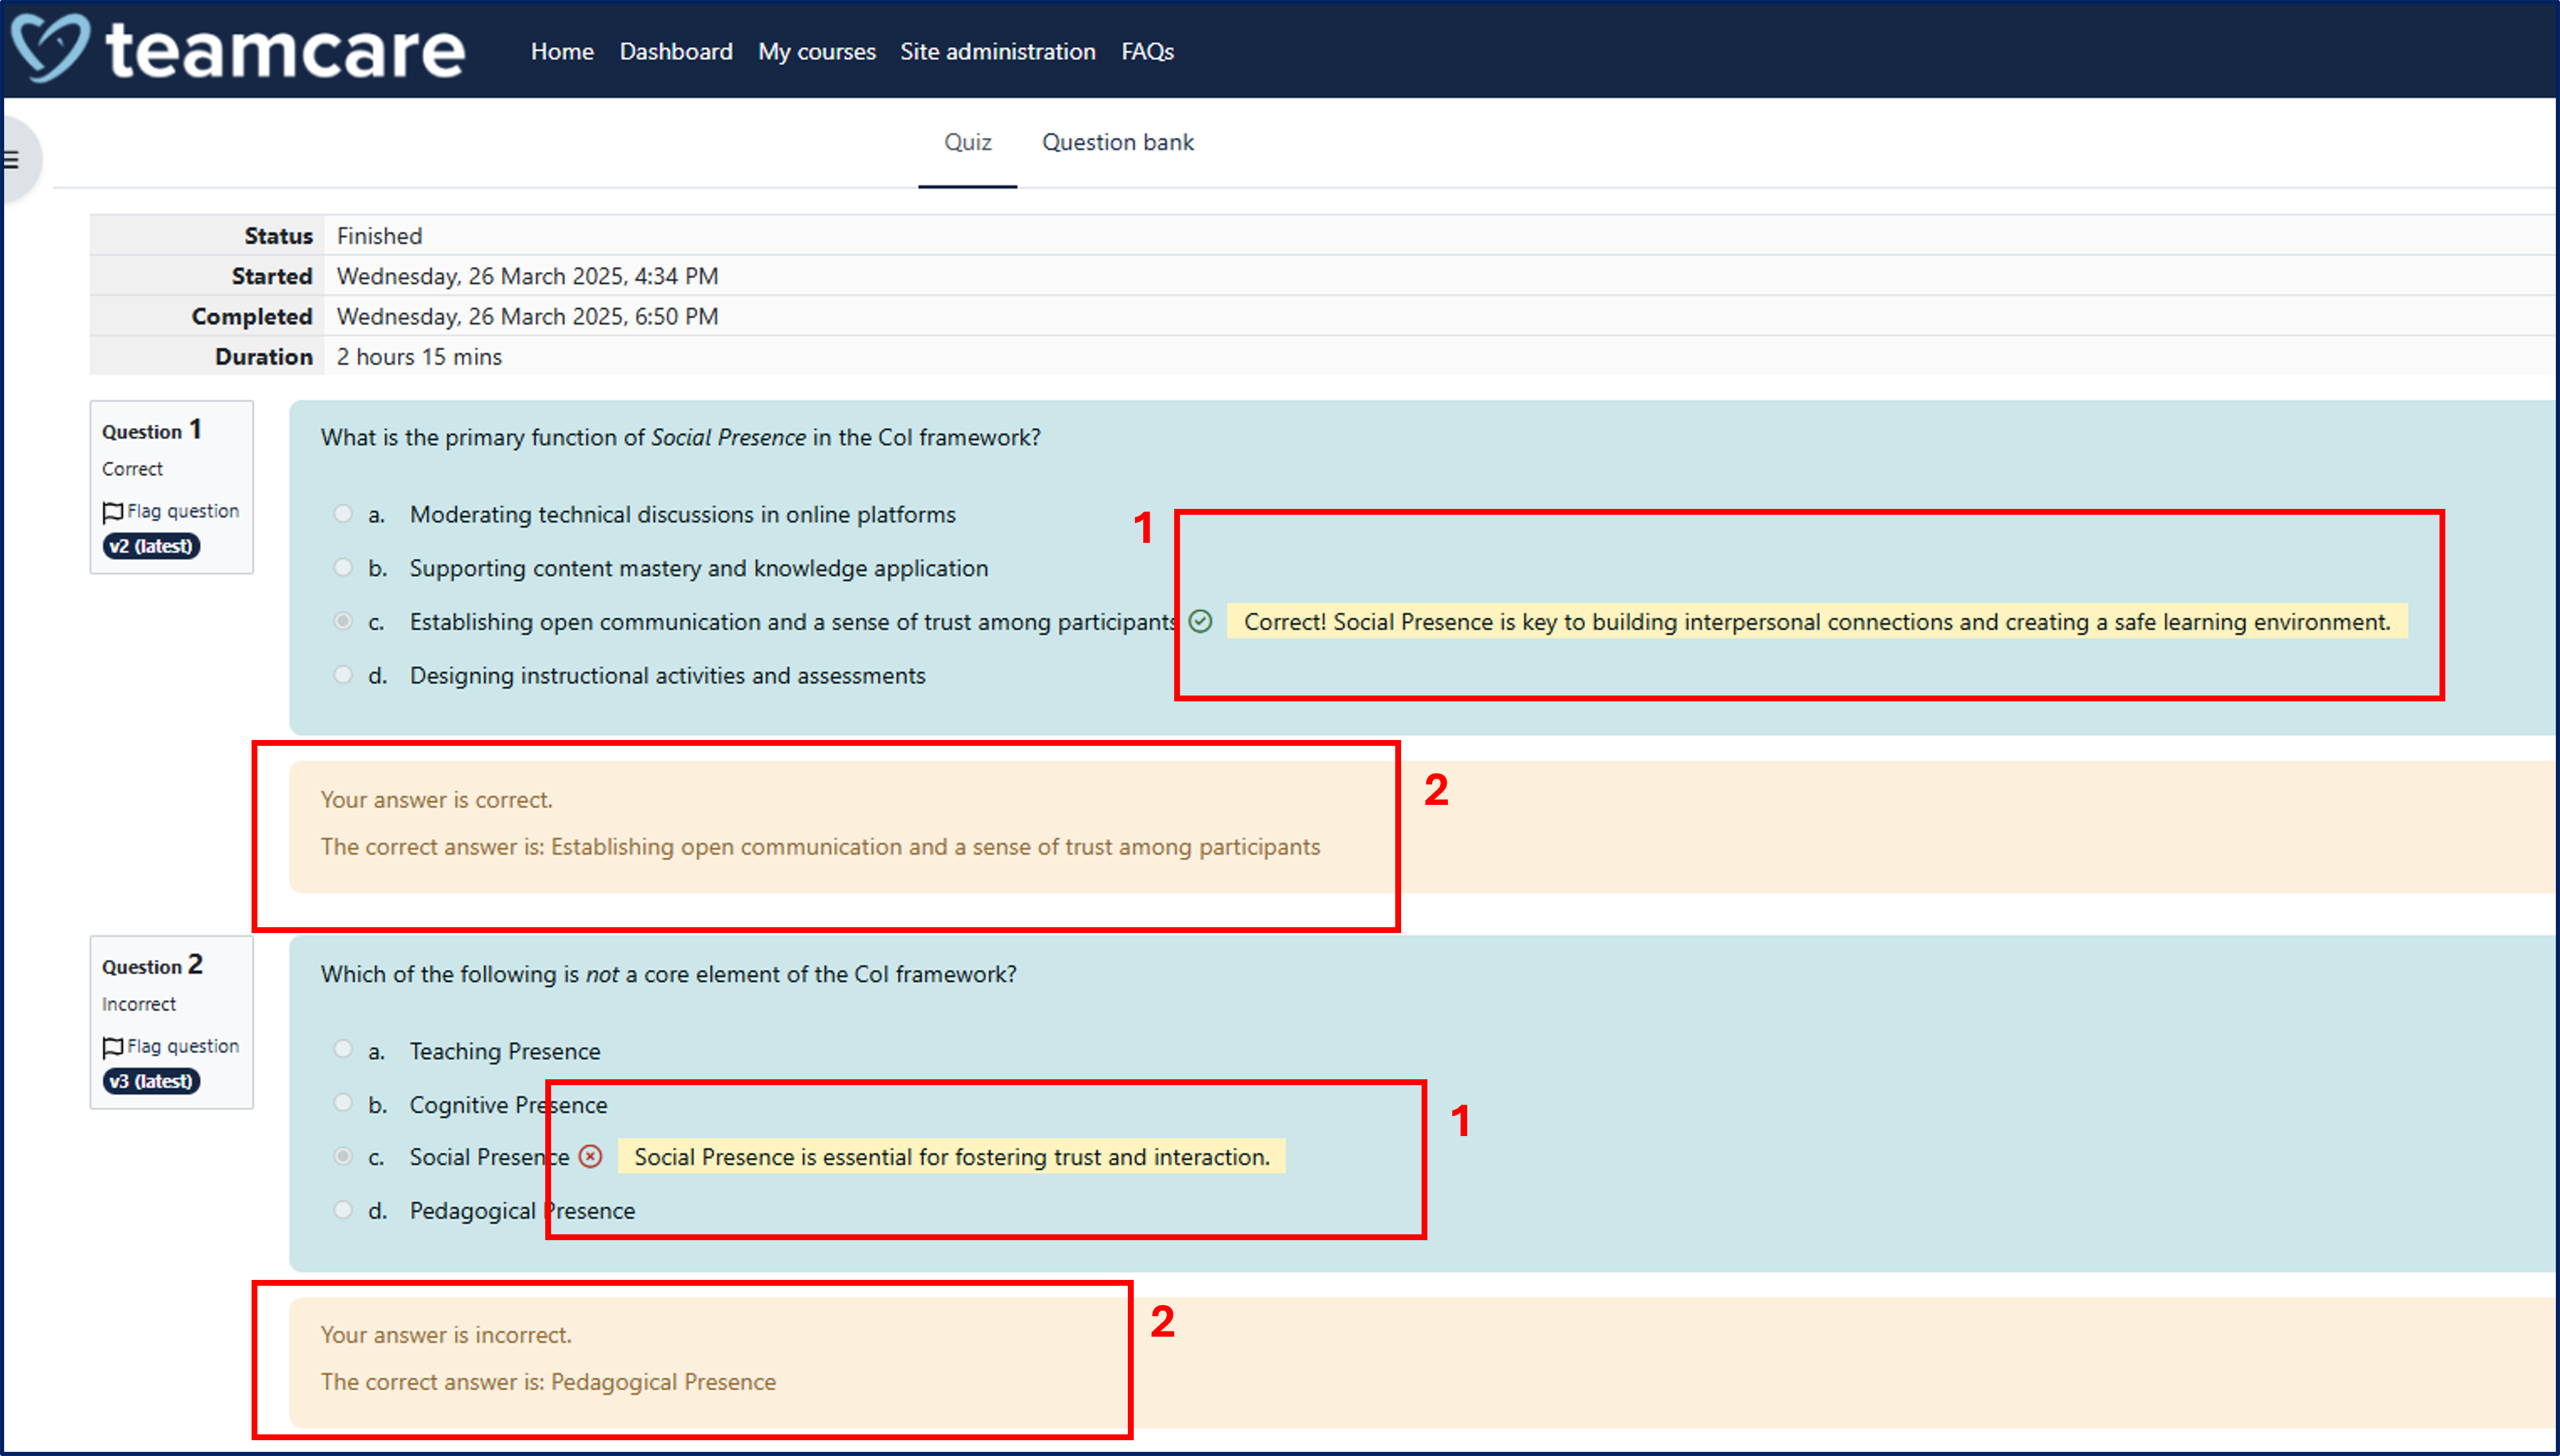
Clicking "Finish review" at the bottom right of the page will close the attempt review.
Multiple attempts are allowed for each quiz.
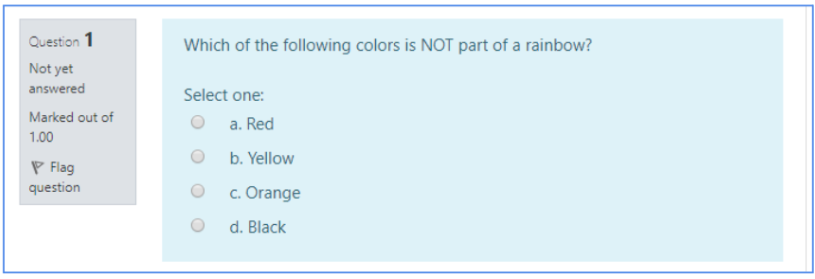
The platform includes different types of questions:
- Multiple Choice
- True or False
- Short Answer
Multiple Choice (only one correct answer)
These questions allow one and only one answer to be chosen by selecting the radio button next to the answers.
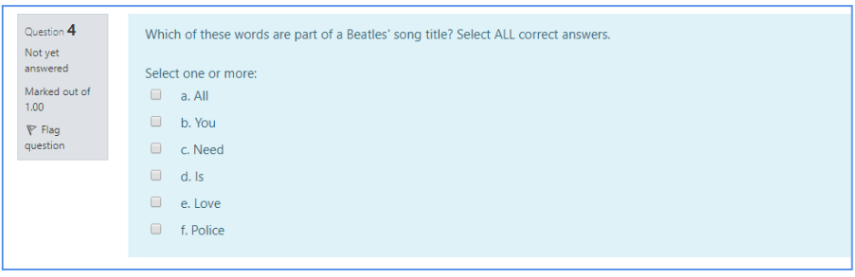
Multiple Choice (more than one correct answer)
The only way to get this right is to pick ALL the correct answers, by clicking on the checkboxes next to them.
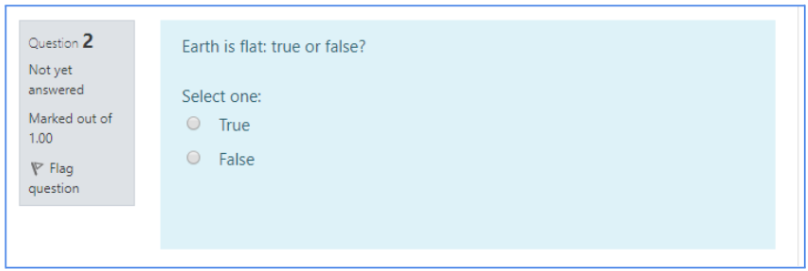
True or False
A participant is given only two choices for an answer in this kind of question: True or False.
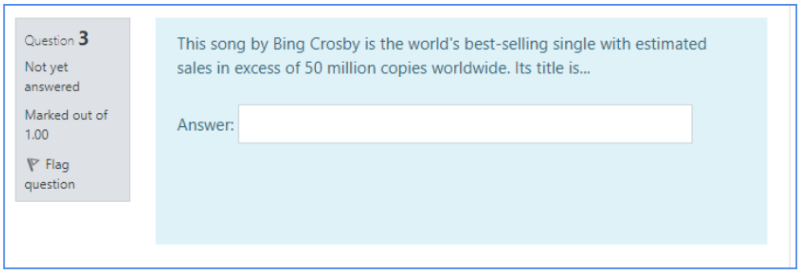
Short Answer
To reply to a Short Answer question, type a word or a brief phrase in response to a question in the provided text field. Answers must match exactly the expected solution and are NOT case-sensitive (i.e. WHITE CHRISTMAS and white christmas are both correct answers to the example below because the expected solution set by the tutor is “White Christmas,” while White Xmas is not a valid answer).
9. Assignment

The assignment activity provides a space into which participants can submit work for grading and feedback. In an assignment, you may be asked to submit one or several files and/or to type text essays.
Assignments can be individual (and each participant will have to submit them for the activity to be marked as completed) or group assignments (only one member of the group will have to perform the submission, and this will mark the activity as completed for all group members).
Assignments can have deadlines and cut-off dates.
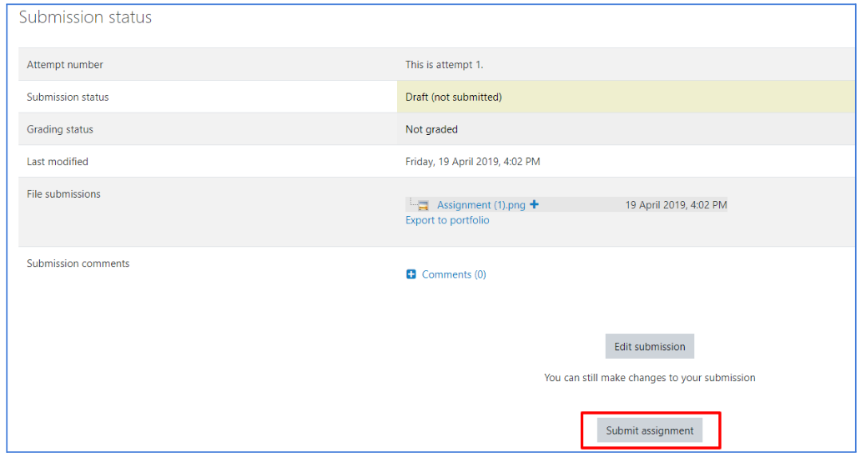
9.1. Submitting an assignment
To begin submission of an assignment, go to the assignment page and click “add submission”.

Depending on the type of assignment, you will be asked to either upload one or more file(s), or to type some text in an open field. The picture below shows a text assignment example. When you finish working on your assignment, click “Save changes”.
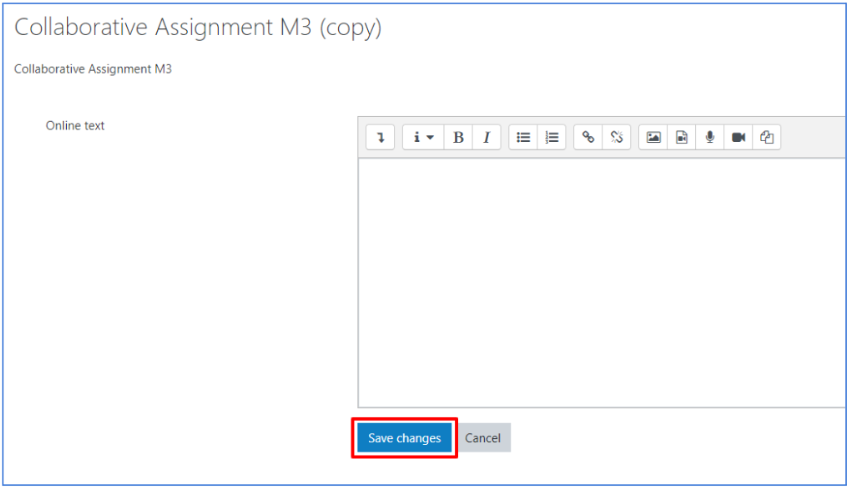
After saving your draft, you will be shown a summary of your draft. You can still edit your draft by clicking “edit submission”. Your work has not yet been submitted!
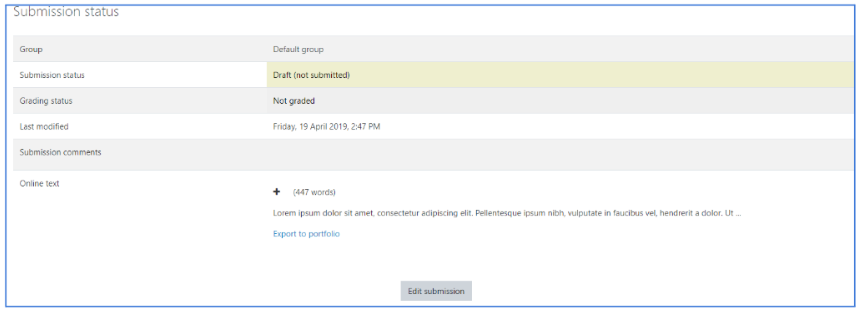
To submit your work, click instead “Submit assignment”.
10. Database
 The database module allows the participants to build, display and search a bank of record entries about a given topic. The format and structure of these entries can include images, files, URLs, numbers and text amongst other things.
To access a database in the platform, click on the Database title in the homepage of the course.
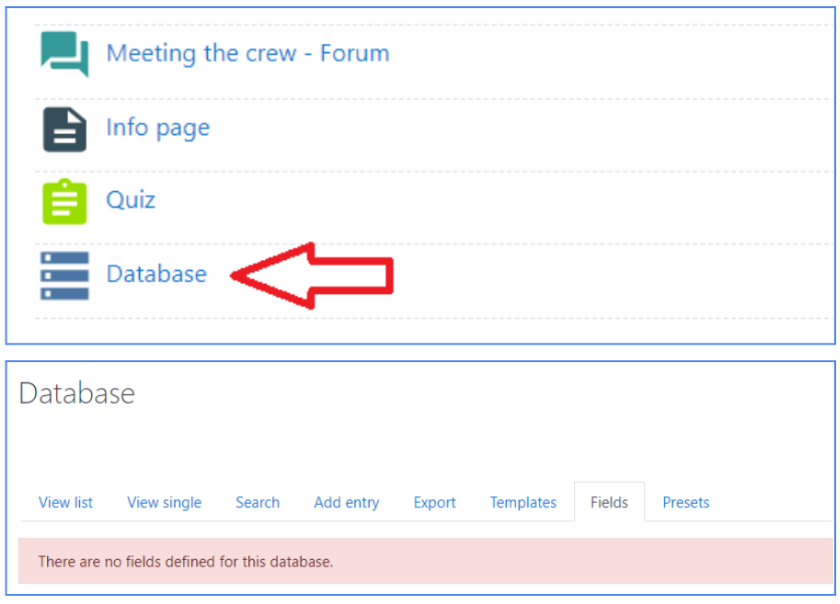
It is possible to use the provided links and tools to perform a number of actions:
- View list: view several items at a time;
- View single: view only one item at a time;
- Search: search the entries by keyword or contributor;
- Add entry: add an item to the database (see image below).
11. Completion

In the course, each activity has completion criteria that indicate the necessary actions to consider it completed.
In some cases, it is enough to view the activity, while in others, it may be required to achieve a specific score or manually mark it as completed.

You can check the activities that still need to be completed through the "To-do" menu, which displays a list of the required actions for each item. This tool helps monitor progress within the course.

12. Badges
 The platform implements badges. These represent achievements you reached by performing specific actions. Badges are awarded after specific events in the TEAMCARE Platform, and you will be notified when the opportunity to earn a badge arises. To see your badges, click on the “Badges” section in the main menu.
![]()
This will allow you to access a page where you can see the badges you can earn (1).
For each badge, the completion criteria required to obtain it are indicated (2).

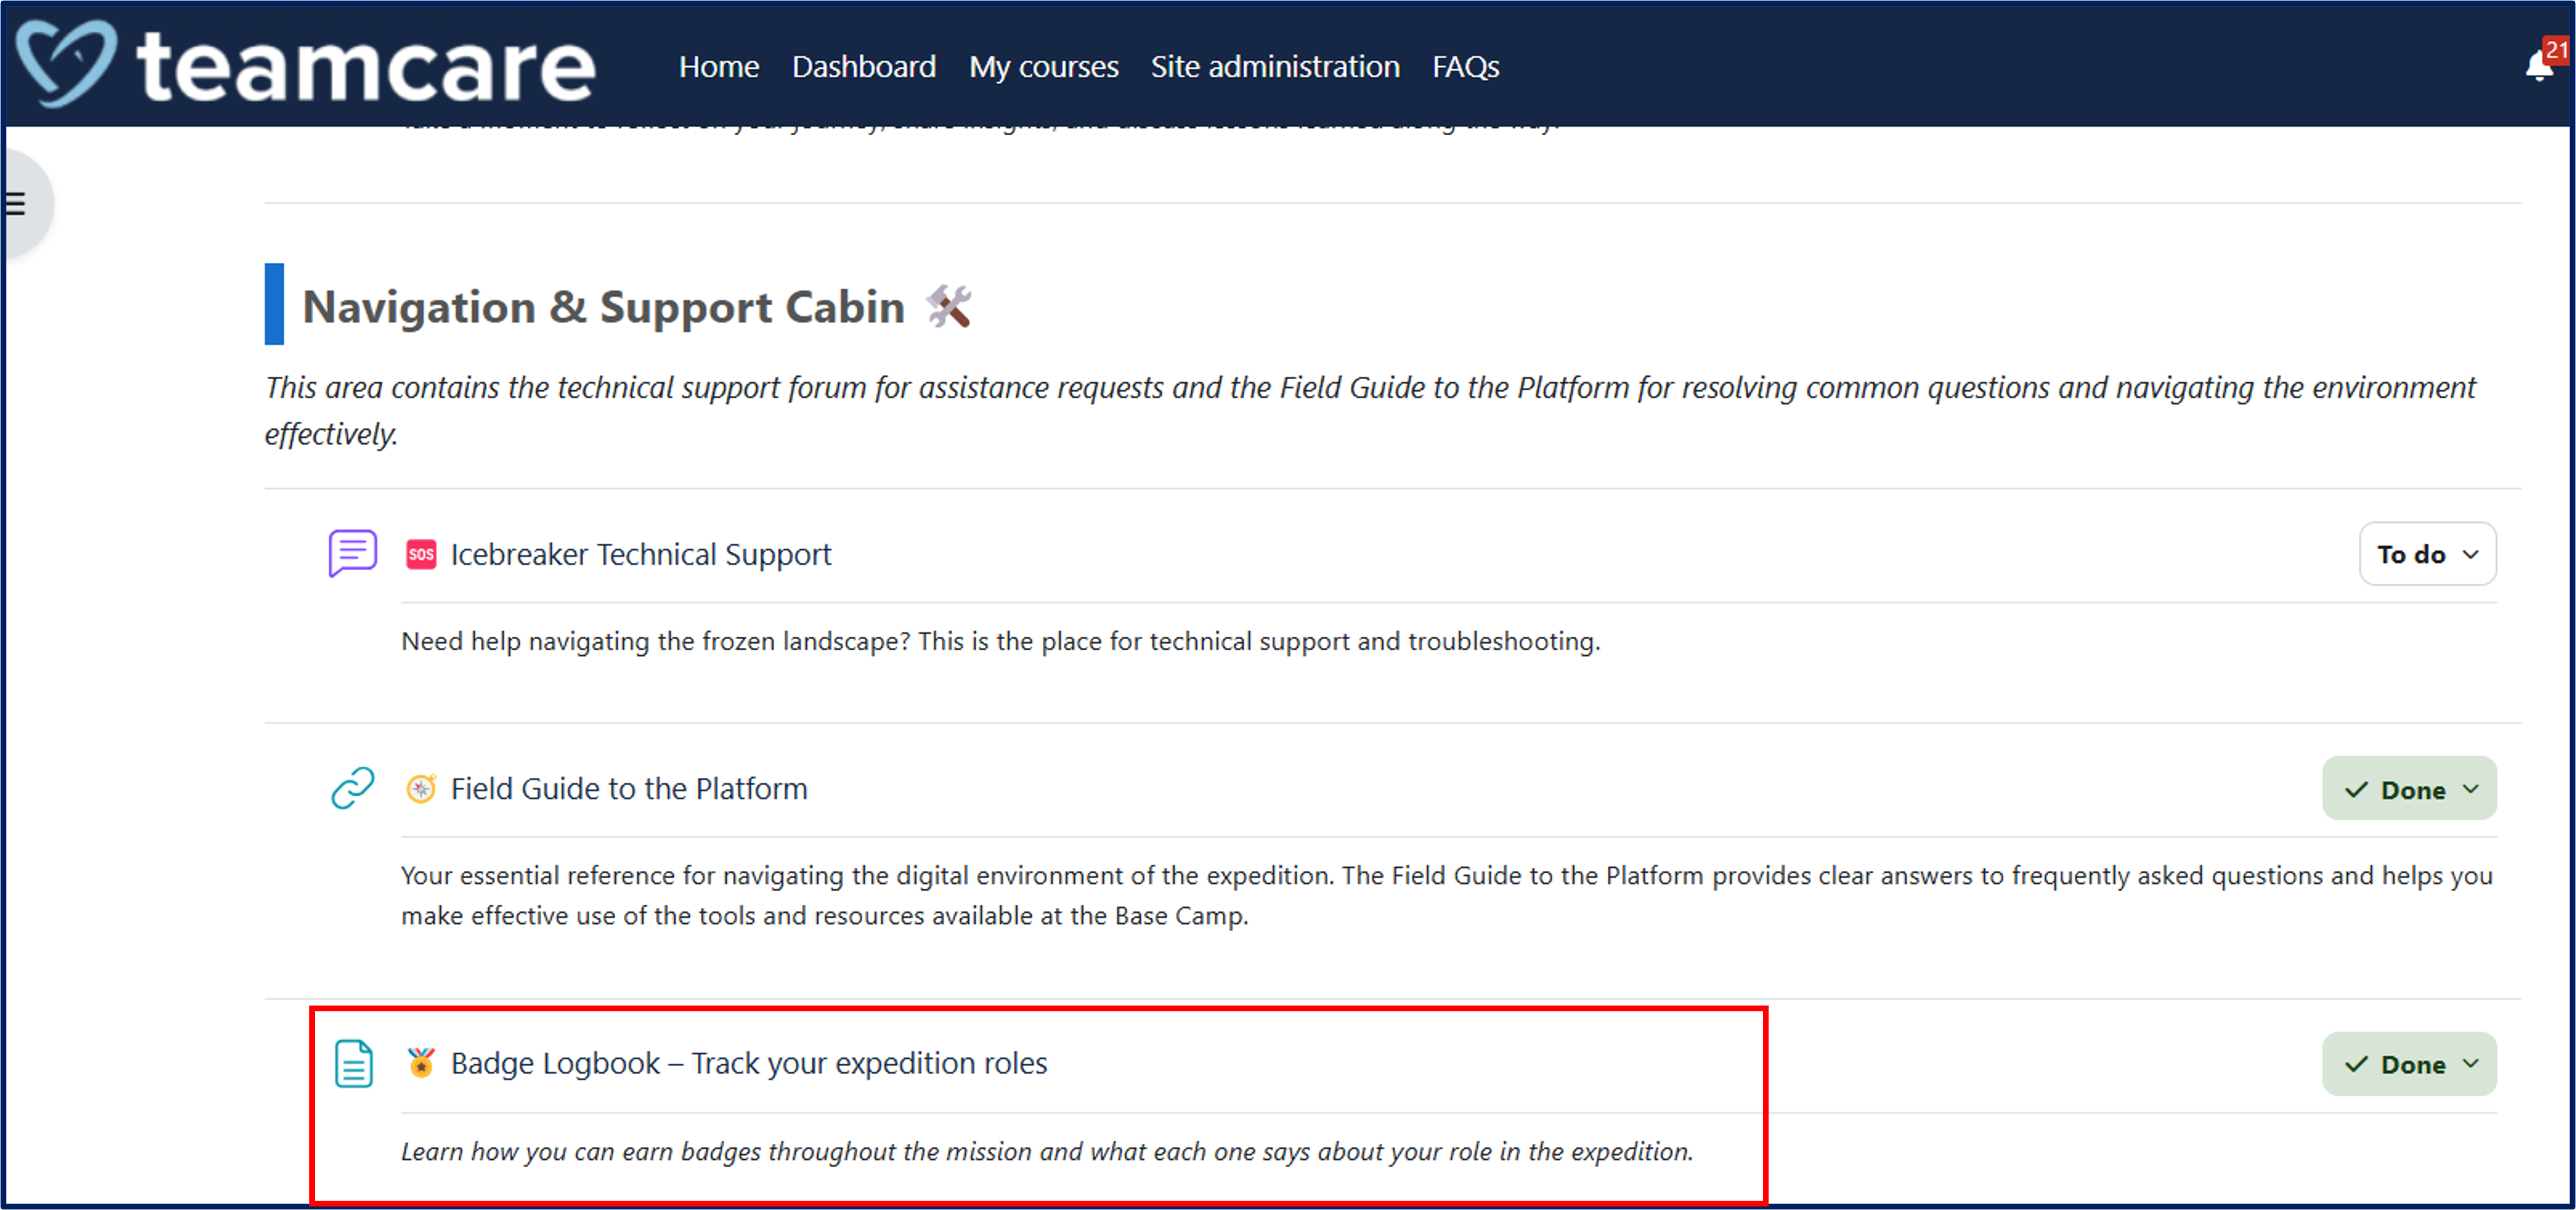
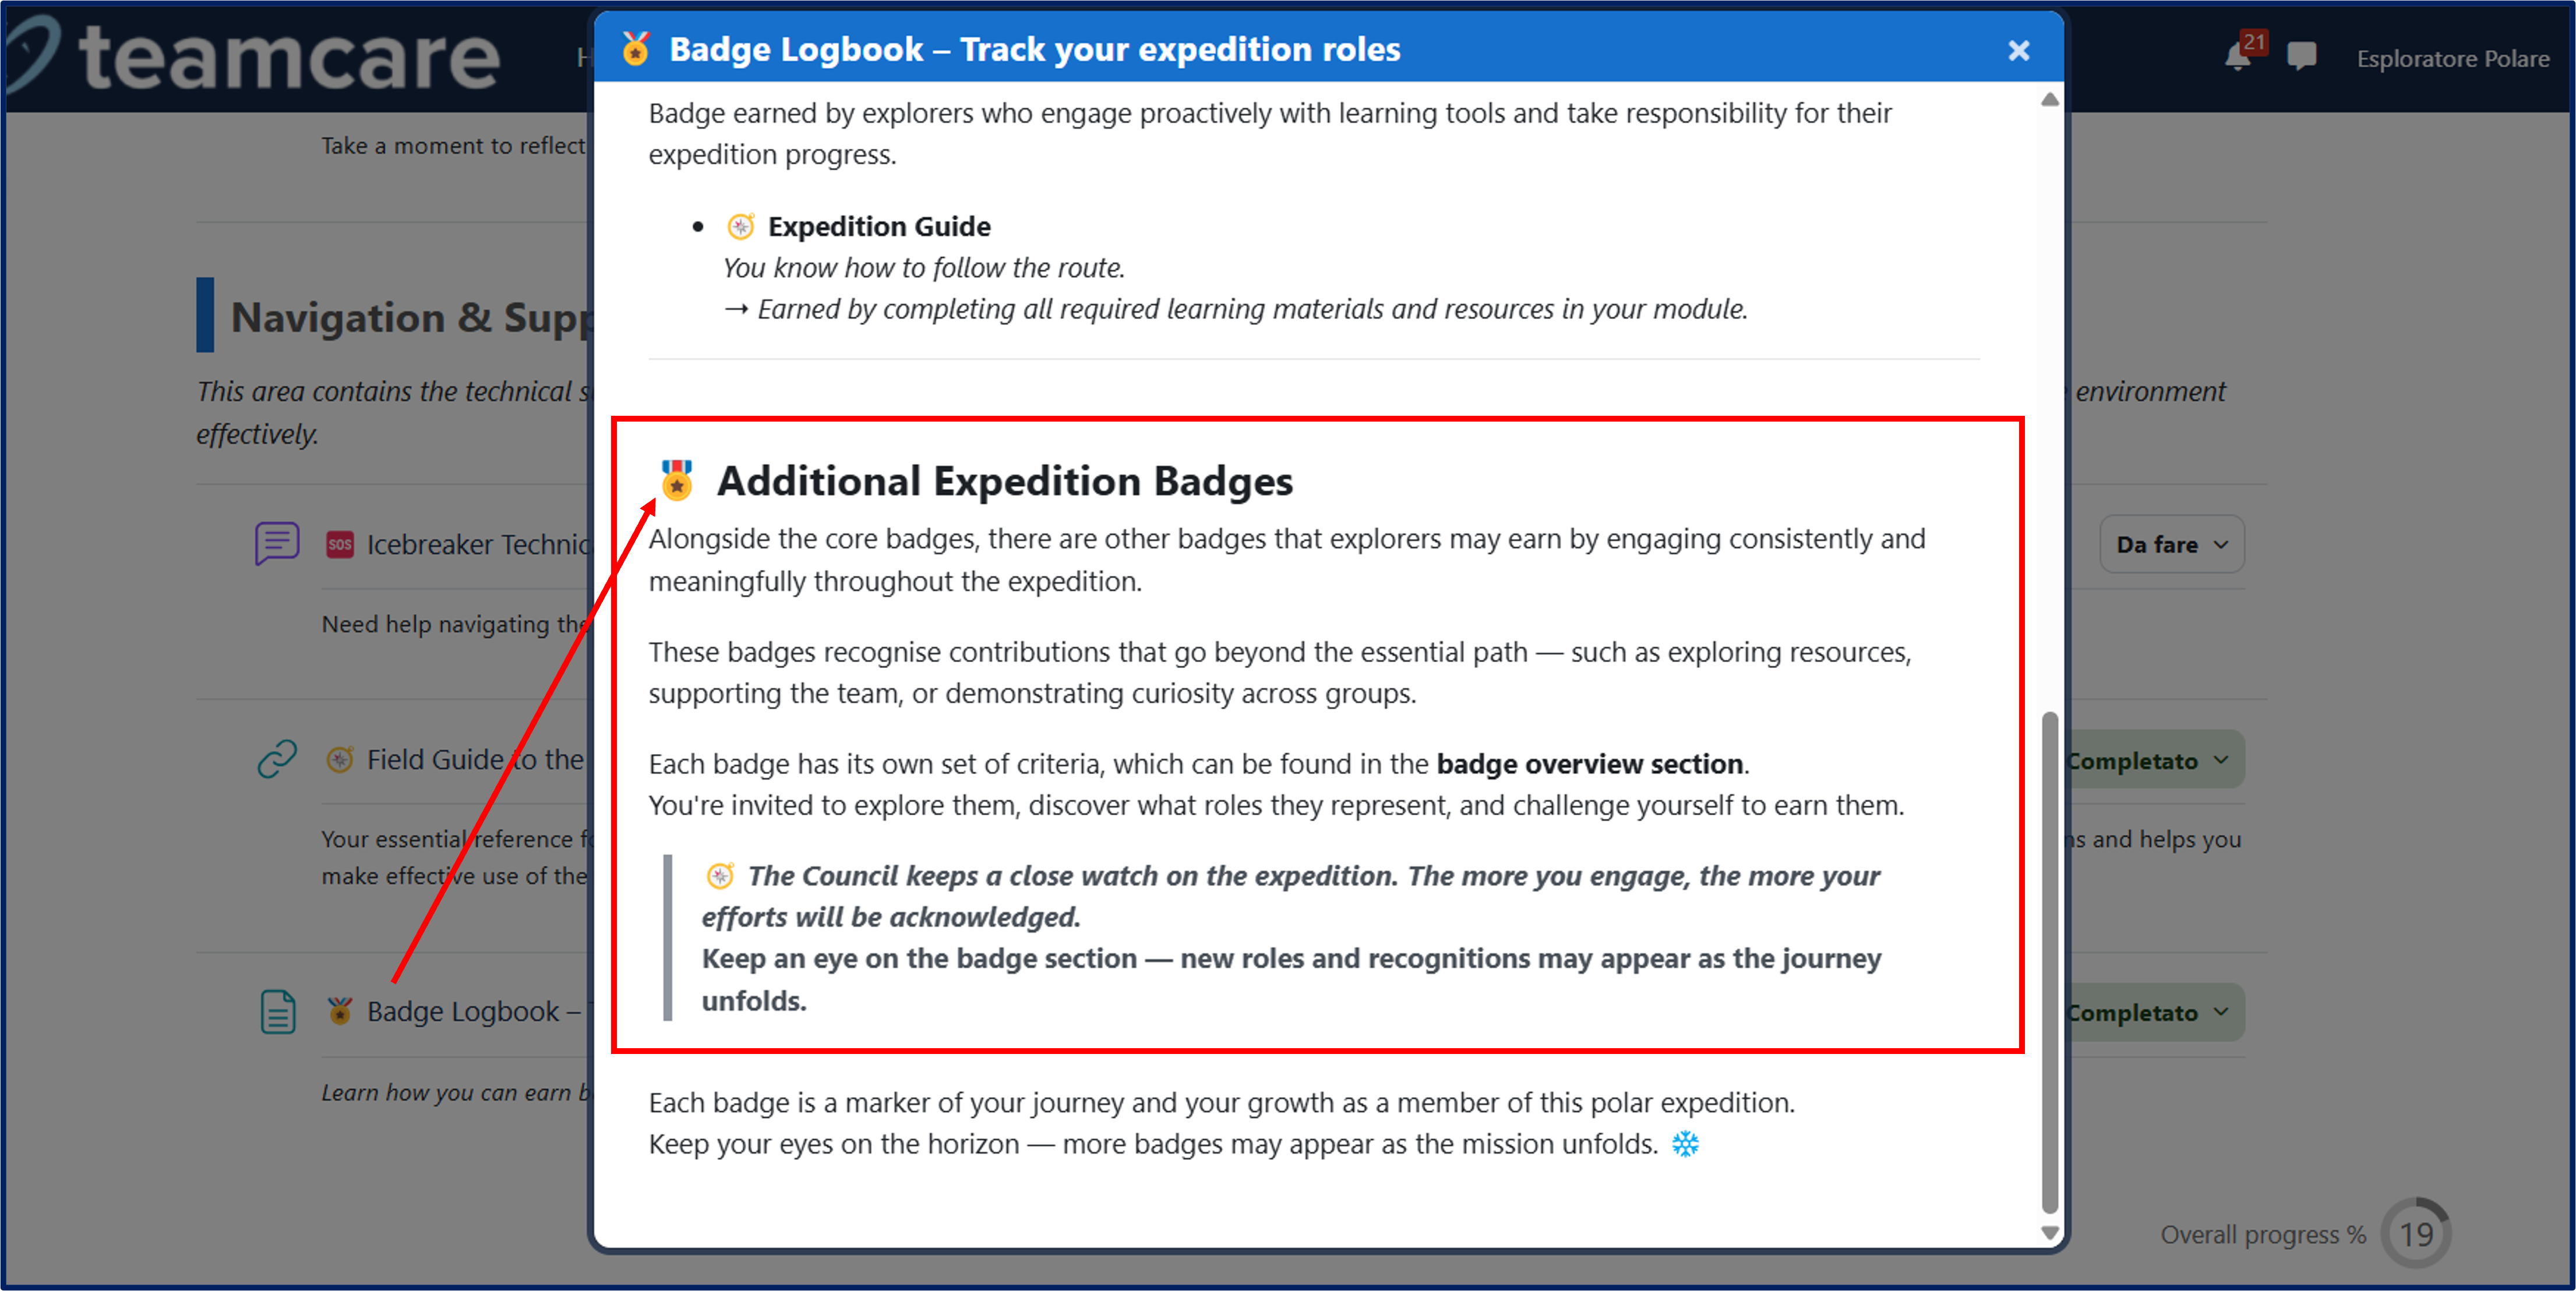
In the "Navigation & Support Cabin 🛠" section, you will find the "Badge Logbook" to track the available badges and their significance in relation to the progress made during the course.
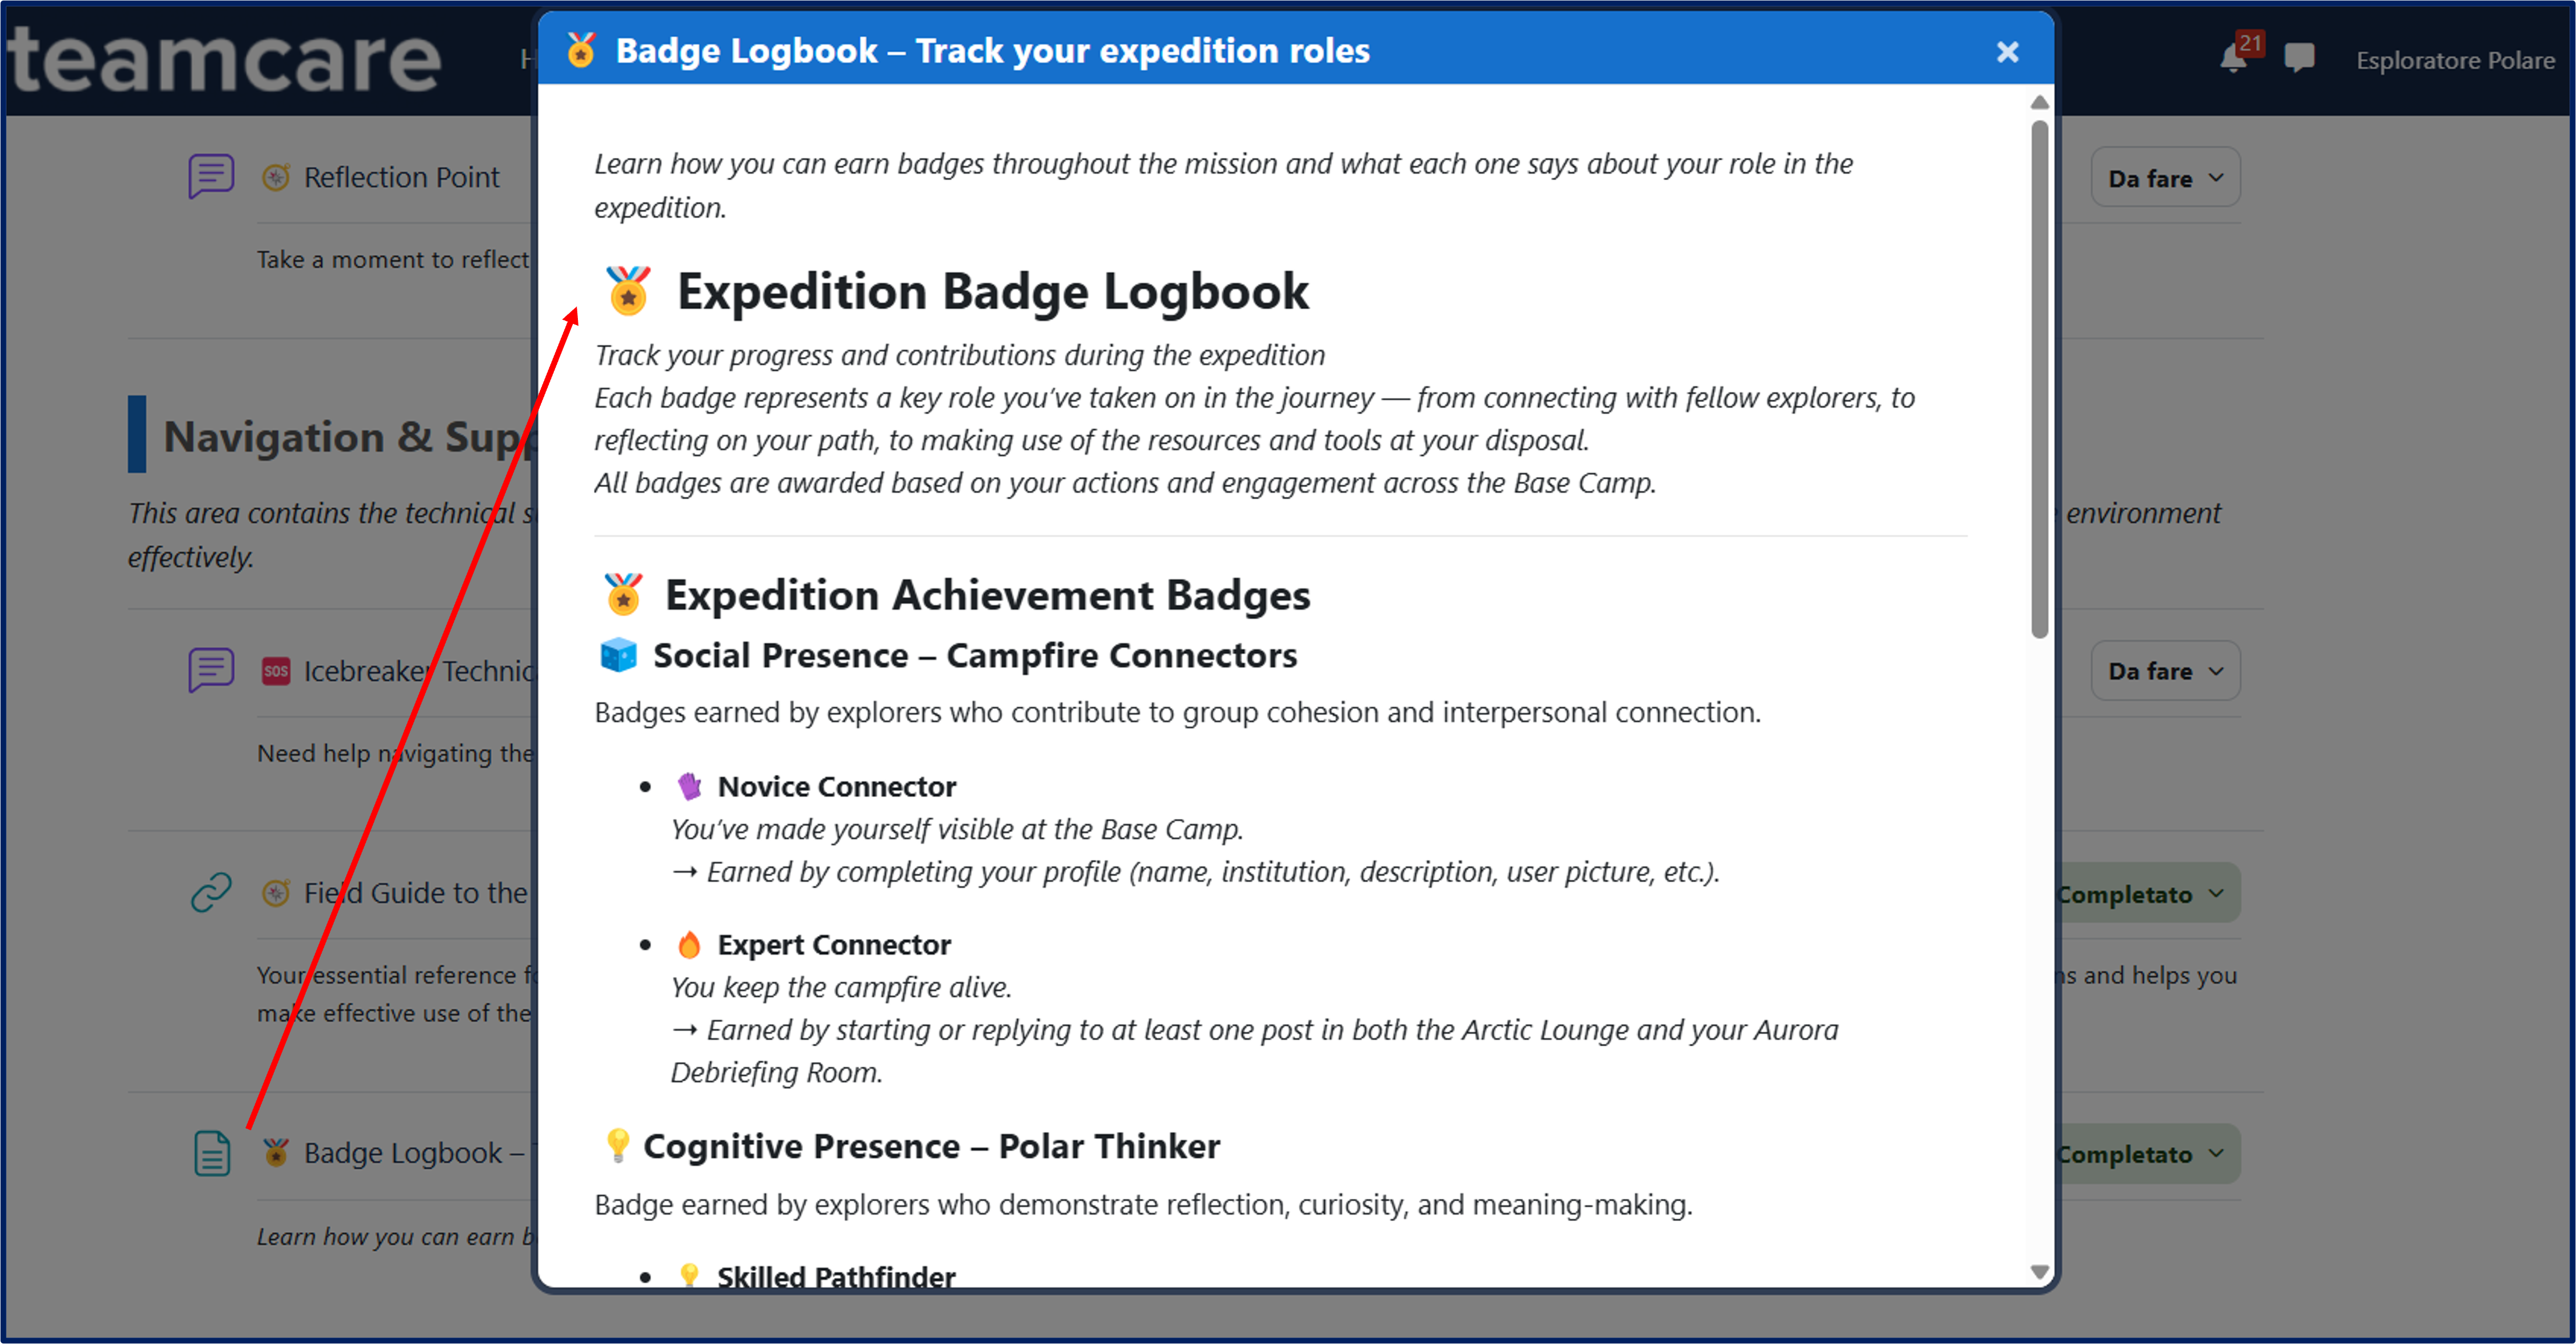
The Logbook also includes a list of additional badges that recognize contributions beyond the essential course path, such as resource exploration, team support, or demonstrating curiosity within groups.
Each badge also has its own set of criteria, which can be found in the badge overview section (2).
13. Quick Reference

13.1. How do I change my time zone?
In order to avoid confusion around activities that start at a given hour (i.e. Webinar) it is very important to set the correct time zone.
To do this:
- Access your profile page and click on Edit profile;
- Set the timezone by selecting the correct value in the Timezone drop-down menu (e.g. Europe/Sofia)
- Click on the blue Update profile button to save the change.
13.2. How do I change interface language?
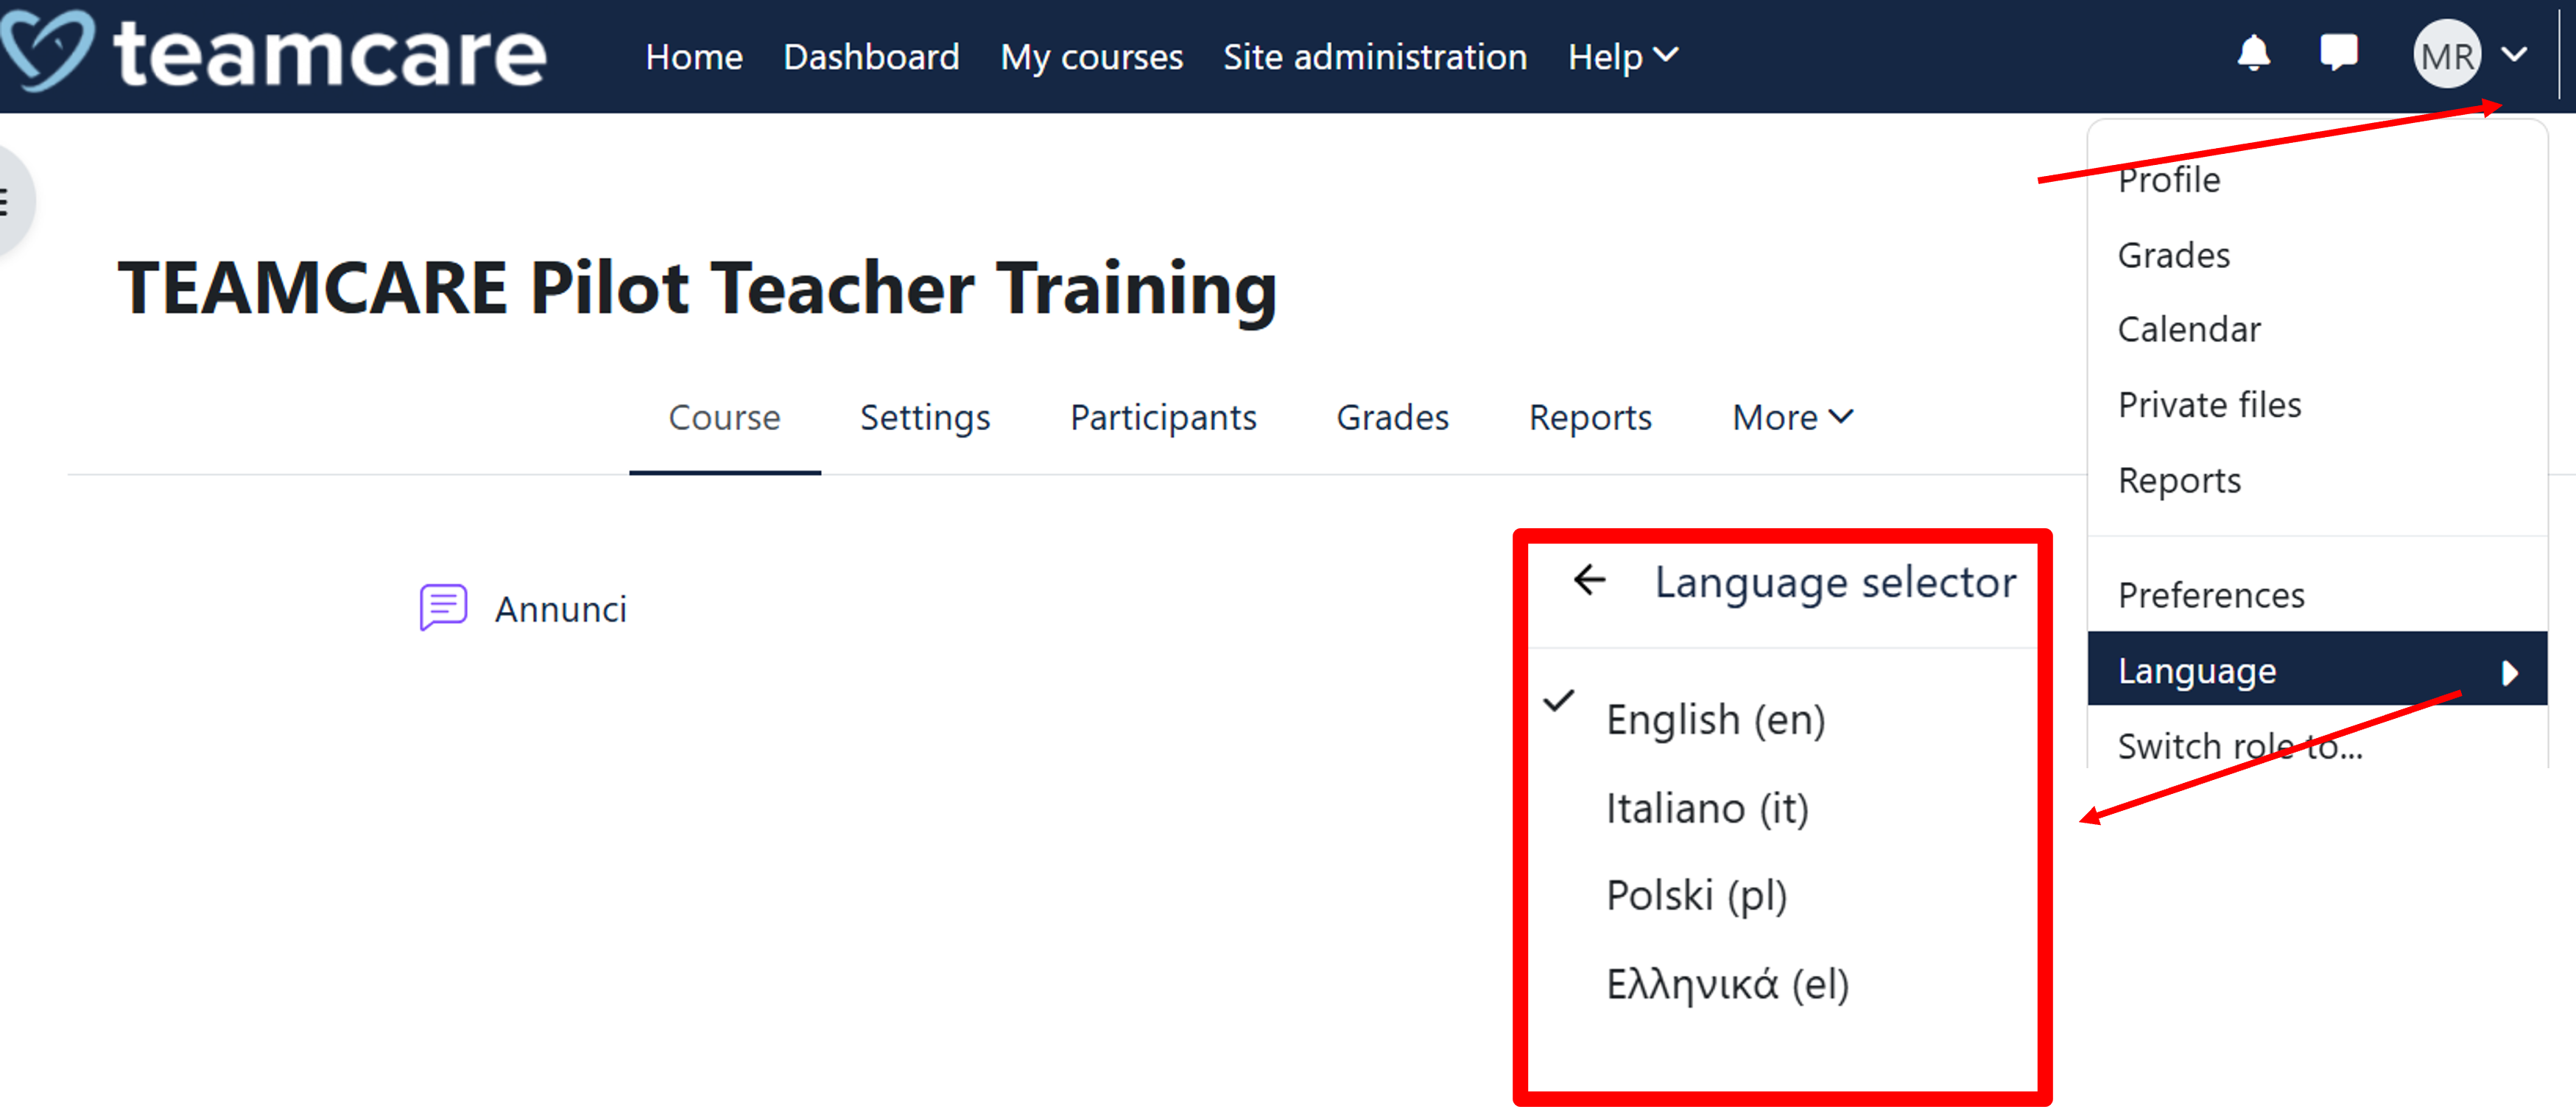
Most of the content of the TEAMCARE Platform is available in four different languages: English, Italian, Polish, and Greek.
To change the currently set language:
- Click on the language selection menu in the upper-right corner of any page
- Select the preferred language from the dropdown menu.